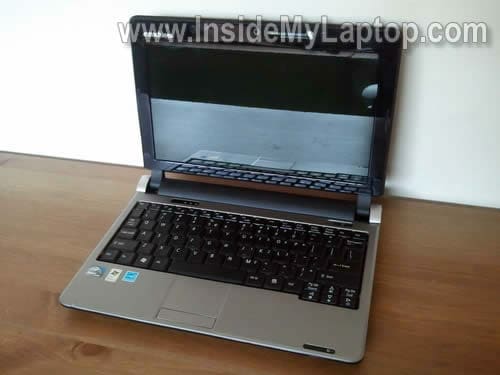
In this guide I’m taking apart an eMachines 250 netbook.
I’ll show how to remove the hard drive, memory and keyboard.
Before you start taking it apart, make sure the it’s turned off.
STEP 1.
Remove the battery.
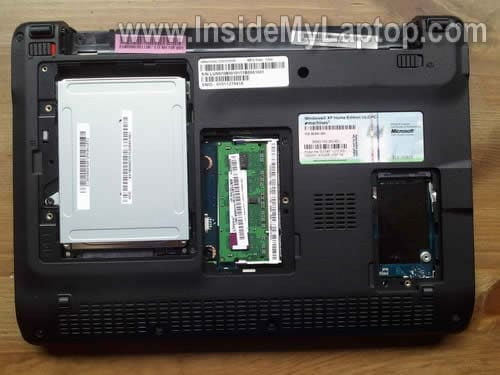
Remove two screws securing the hard drive cover and remove the cover.
Remove one screw securing the memory cover and remove the cover.
Remove one screw securing the WWAN (wireless wide area network) card cover and remove the cover.

eMachinges 250 comes with a standard 2.5″ SATA hard drive installed.
There is only one memory (RAM) slot.
In my case I didn’t have WWAN card installed.
STEP 2.
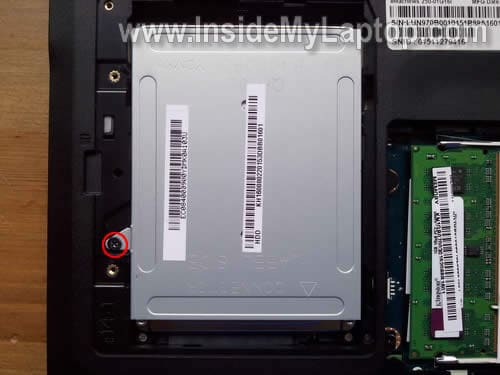
Remove one screws securing the HDD assembly to the laptop case.
STEP 3.
Slide the HDD bracket towards the battery bay to disconnect it from the motherboard.
Remove the HDD assembly.

STEP 4.
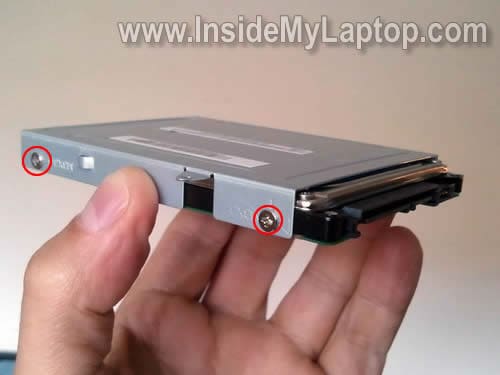
If you are replacing or upgrading the hard drive, you’ll have to transfer the mounting bracket (caddy) to the new drive.
Simply remove four screws securing the caddy (two from each side).
STEP 5.
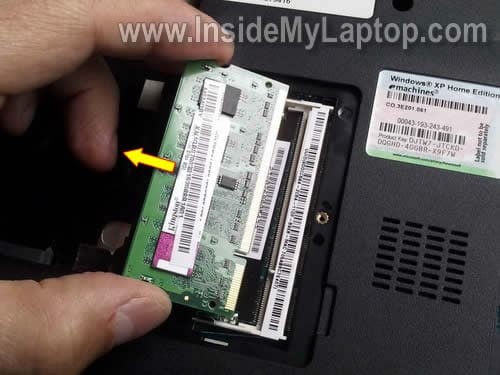
Spread latches on both sides of the memory slot and the memory module will pop up at a 30 degree angle.
Pull the memory module from the slot by the edges.
In the following steps I’m explaining how to remove the keyboard. It’s not necessary to go though all previous steps in order to remove it.
There are four knobs and one spring loaded latch securing the keyboard.
The spring loaded latch located above the F8 key.

STEP 6.
Insert a knife blade between the keyboard and top cover and lift up the left side of the keyboard.
Push it through small knobs on the left side.

STEP 7.
While lifting up the keyboard, push on the spring loaded latch with a sharp object.

STEP 8.
Lift up the keyboard.

STEP 9.
Now you can access the cable connector.

STEP 10.
Before you can remove the cable, you’ll have to unlock the connector.
On the following picture the connector shown in the locked position.
To unlock the connector, move the brown clip about 2 millimeters towards the LCD screen.
Works slowly. Do not apply too much force to the clip.
The brown clip must stay attached to the white base.

On the following picture the connector shown in the unlocked position.
As you see, the brown clip still attached to the base.
Now you can remove the ribbon cable from the connector.

STEP 11.
Finally, remove the keyboard and replace it with a new one if needed.

You’ll find the part number printed on the label.

Here you get some limited access to the cooling fan. If the fan is dusty, you can blow it off using canned air.

Thomas
the power jack is loose inside my case. how do i lift the silver casing loose? or even the bottom. i removed all the screws i could see under the keyboard. im afraid of applying too much force and breaking the case. can you help me at all?
IML Tech
Thomas,
I usually use a guitar pick to separate top cover from the base.
1. Make sure all screws on the bottom are removed.
2. Make sure all screws under the keyboard are removed.
3. Make sure all cables located under the keyboard disconnected from the motherboard.
Now insert the guitar pick between the top cover and laptop base and move it alone the side of the cover. The cover should separate from the base. Continue removing the cover with your fingers.
Daniel
The audio out port on my netbook has become quite fiddly. Sound quality often sounds tinny and not full, but if I touch the plug, eventually I can get it to come in full force. Is there any way to replace this?
Ben
Great instructions. Thanks! For opening up to fix the power jack, I would just add that there was a screw in the memory compartment and a bit of tape in the hard drive compartment that need to come out before the silver cover would budge. These had me beat for a while. I could not believe how poorly secured the power jack was. It looked like it was had a bit of double sided tape holding it in place.
Thanks for your help.
Brenda
Hi. thanks for the site. it is very helpful. I have an eM250 that I need to replace the screen on. Can you give me any info how to go about it? thanks again.
gina
how come my emachines m250 series laptop wont fully boot up.i mean I dont have or see my desktop anymore.Please help me fix i
IML Tech
gina,
It’s hard to tell what’s wrong because you provided a very short description.
I guess the laptop turns on, starts loading Windows and doesn’t boot to the desktop?
This could be hardware or software related problem.
Try using Last Known Good Configuration. Turn on the laptop and press F8 when eMachines logo appears on the screen. Select Last Known Good Configuration from the menu.
Aaron
I too have a bad screen that I need to replace. I found the replacement, just would like some insight, ….great site!!
Jeffery Jones
Thank you.
Sawyer
Hi. I have the same power jack problem, but i cannot get the middle screw near the speakers out, any insight on how to weaken the loctite?
Laurel
Hey, thanks for the tips and directions on how to open the computer. I was using mine at school one day and a student tripped over the cord pulling it out and causing it to not charge any more. I had tried unsuccessfully to open it up before and it never worked. Between you and Ben I was able to get it all apart and find the loose connection. The guitar pick was a genius idea. I was so glad to see it wasn’t one of those that was attached to the motherboard. I feared it was cracked…Thanks again!
Jan
What it the best way to secure the power jack so it will not come loose again? Thank so much
for the instructions. This old g-ma took her g-daughter netbook apart and having fun doing it. lol
justin
thanks with this easy to follow guide i got my all apart and back together with out a problem
John Orlick
I am having trouble removing the screen from my em250 laptop. Most sites refer to the screw removal at the lower corners of the screen but this model only has screws at the top corners. Any help with please.
paul
Hi, very useful guide, but…. i need the bottom casing off, is there screws under the keyboard to get to the bottom case off? yours paul.
Jake
Is there any way you can get the screen off?
Tanya
I am planning to buy a replacement LCD screen since mine is cracked, but I can’t find any instructions on how to replace it… help!
Yann
Hey there, great demonstration on how to disassemble this machine, although the only thing that is missing to complete the repair is resetting the BIOS as it prompts for a password and I would like to boot from USB to install a different OS, can’t get in the BIOS to change the boot order, any suggestions on how to reset BIOS?
anthony
Thanks for the instructions! There is a sd cardslot on the right hand side, I pushed in a mini sd card adapter for microsd. I’ve spent a few hours trying to fish it out. Read the instructions in the emachine manual as to which type of memory card…it accepts….. from my experience stick to sd cards saves you from dismantling the laptop!
Marty
Looking for access to secure D/C plug adapter. Tends to work it’s way loose and become so recessed that the power cord plug won’t make the connection.
Marty
I was having a problem with the power jack coming loose so when I got my netbook apart I put a couple of dabs of super glue on the bottom of the jack it. I also cut a couple of very small pieces of velcro, (very small), and put behind the jack to try to keep it from moving back inside. Seems to be working so far. I am being more careful also about moving my netbook around when it is plugged in as I am pretty sure that’s the cause of the jack coming loose.
Alex
Im having a bit of trouble with the spped of my internet video’s, e.g. youtube. Sometimes there fine, but sometimes the sounds sound like there going in slow motion, i think its the memory, i know you can upgrade it from a standard 1gb memory to a 2gb memory, so i assume its that. If anyone has any other ideas, would be greatful if you could share.
IML Tech
Alex,
Installing more memory will not hurt for sure.
It’s possible youtube videos running slow because you have many other programs running on your laptop and they are taking all CPU and memory resources.
Daet Idea
thanks, worked perfectly for The e350, THE TABS ARE IN A DIFFERENT LOCATION, THOUGH THE process is the same.
Manila
Thank you for this fine tutorial. My laptop’s fan was beginning to make strange noises and I didn’t know how to open it up to reach the fan section so I could inspect it and clean it. I saw that by removing the keyboard, I will have access the fan without opening the main casing of the laptop.
steven
Hi, whilst I was removing the keyboard on my emachines em355 netbook I think I pushed the latches in too far because they won’t come back out when I push the keyboard down. Is there any way to get the latches back out? I have tried pushing the flathead screwdriver back into the holes but they just won’t pop out at all.
Sebastian
Is there a way to replace or improve the graphics card/accelerator?
IML Tech
@ Sebastian,
There is no way, it’s built into the motherboard.
alan
I am inquiring if anyone has replaced the hard drive with a ssd device. If so how faster did it make the netbook? I have an old dell d620 that i am inquiring whether it would run faster than it. Any responses very much welcome. Happy New Year all!!
Ted A.
Thanks for the great description on getting the keyboard out and the case apart. I am having a problem with the connections to my screen. When I move the screen ( open or close) even a little the picture disappears and is filled with lines or is solid white. I suspect this is from bad connections to the motherboard. Is there a replacement for the cable that attaches them and can it be replaced or is a whole new screen necessary? Thanks!
Harry Madden
Very nice and very helpful as far as it goes. However, I need to know how to open the case to fix a broken power socket (it’s loose, so I can’t plug in the charger). Any ideas there?
Thank you.
Randy
Harry,
Not far to go from where these instructions left off. Simply remove the 5 screws holding the top cover in place then release the final two ribbon cables the same way the key board was completed and you will have access to the power jack. Just following the wiring harness around the top to release and then lift the cable from the cemented locations and replace the jack. Took just a few minutes to complete once the key board was removed.
jdl
Are the 5 screws to get to the power jack in the under the keyboard area, or are they on the underside of the netbook holding the clam shell halves together?
Alejandro Navarrete
I just wanted to thank you, you helped me a lot, and thanks to you i was able to open this netbook, once again thank you and good luck 🙂
Tracy
I see I’m late to the party- 😉
My query is about cleaning the keyboard, once it’s removed. I’m trying to reinstall for a guy & the “ctrl, Fn, & Win” keys at the lower-left are “sticky”– like some coffee or such got in at one point?
Once it’s out of the netbook, can I “rinse” the keyboard? As in, running warm tap water & angling the keyboard so the water only passes over & off of those three keys to try to clear whatever is under them? Or, will that let water inside/between layers or such?
Really hope to hear back- other than that, the thing is fine.
Cheers from AU! 🙂
IML Tech
@ Tracy,
I think you can damage the keyboard this way.
Can you try removing key caps and cleaning underneath with cotton swabs soaked in alcohol?
Tracy
I opted to get a new KB off of ebay.
Now, I’ve just removed the old one and am having difficulty in inserting the new KB’s cable!
It would seem I’d be attempting to slip the new one beneath the sliding lock mechanism- between the lock & the motherboard? But it doesn’t want to slide in.
Or, am I supposed to be between the lock & the upper, non-moving part of the holding clip?
Image of slot is uploaded here:
http://imgur.com/vFch5LO
Help!
IML Tech
Tracy,
Probably above the brown tab.