
My customer complained that one of the keyboard keys stopped working correctly. Something got stuck under the key and it stopped moving freely. He had to push on the key very hard to make it type.
After a short diagnostic I confirmed that something got stuck under the right side of the key.
Here’s how you can take off the key cap and remove the stuck object.
STEP 1.
Make sure the laptop is turned off.
Very carefully lift up the key cap.

STEP 2.
Continue removing the key cap from hinges.

STEP 3.
Make sure the key hinges (lifting mechanism) stay connected to the keyboard.
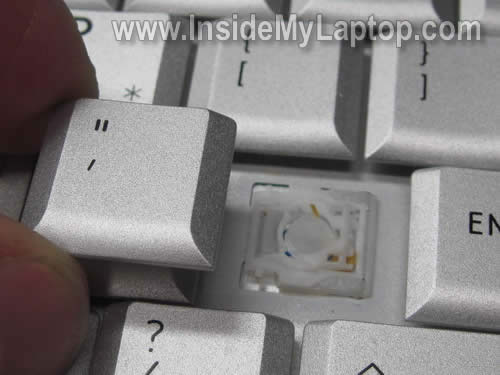
STEP 4.
As you see on the next picture, there is something stuck under the right side of the hinge assembly.

STEP 5.
Carefully lift up the hinge assembly and clean it up.
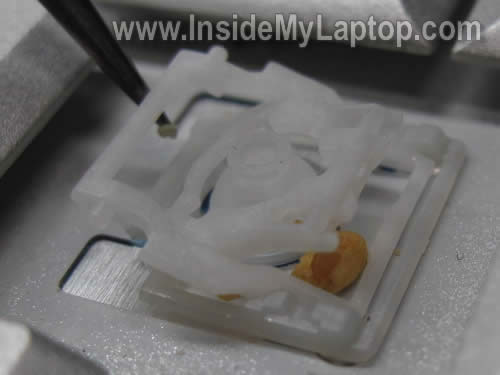
STEP 6.
Position the removed key cap above the hinge.

STEP 7.
Push on the key cap until it clicks back in place.

Ask Questions Online
Thanks for this guide. The #1 keypad was not working correctly and it turns out there was a small object stuck in there too. This guide helped me fix it!
Microsoft
OMG Thanks dude! I never knew you could remove keys like that – this will be very useful. Thanks alot.
I can’t believe I actually searched it up – it happened to many of my keyboards before but i Never knew until now.
Anon
Is it all right to use the same procedure for back-lit keyboards?
IML Tech
Anon,
Yes. The procedure should be identical.
Khdnl
I tried following this guide and the hinges came off and I have no idea how to fix it. Any help?
Rossy
This is awesome! thank you very much!
Zachary Knoblauch
What if the key doesn’t have the cap on it ? it’s still sticking in!
IML Tech
@ Zachary Knoblauch,
Cannot tell without looking at it. I guess key retainers are getting stuck somehow. Take a closer look at the retainers. It shouldn’t be very difficult to figure out what is wrong.
Arsalan
I have an hp pro book. its keypad is different from the one shown.. Can i just pull out the keys for it as well??
got a couple of keys with something stuck in them.
IML Tech
@ Arsalan,
You can search on google for your laptop replacement keys. Normally, companies selling single keys has pictures. Take a look how the key is designed. If it’s similar to the key shown in my post you can remove the key and clean it.
Also, in some cases it’s not necessary to remove the key completely. You can gently lift up the key without separation it from the keyboard. That would be enough to clean the area under the key.
Barb Beaghan
PLEASE HELP!!! I am replacing the plastic keyboard frame only on my Compaq Presario CQ50-215NR computer. It is the plastic frame that covers the power and WIFI buttons and surrounds the keyboard. I have the replacement part but need instructions. I am not doing anything else except replacing this part. Can anyone provide me with instructions? MANY! MANY! THANKS!!!
IML Tech
@ Bar Beaghan,
Take a look at this Presario CQ50 disassembly guide.
The cover removed in the step 9.
Derpity
what was stuck underneath your key that you had to fix?
grossly
I have a Asus X401A1. The one and two keys stopped working, so I took them off. Unfortunately, the two plastic pieces that make the keys pop back up after pressing them came off with the cap. I scoured the internet on a way to put the pieces back on, but I just can’t figure it out. Someone told me to replace the entire keyboard myself, but that seems ridiculous, since it’s only two keys that doesn’t work anymore. Can you post something on how to put keys back on laptops? I would greatly appreciate it! I’ve followed your work for a long time and your tutorials have been thorough and interesting. Keep it up! Thanks!
AC
Thank you! I thought I would have to get a new laptop because my ‘Y’ key was not working but, now it is!It’s still not working perfectly but,it works really well!!