Today I explain how to remove and replace the keyboard on an Alienware Alienware m7700Â D9T.
First of all, turn off the notebook, unplug the AC adapter and remove the battery. Make sure you work in static free environment.
Removing the keyboard from this notebook was easier than I expected.
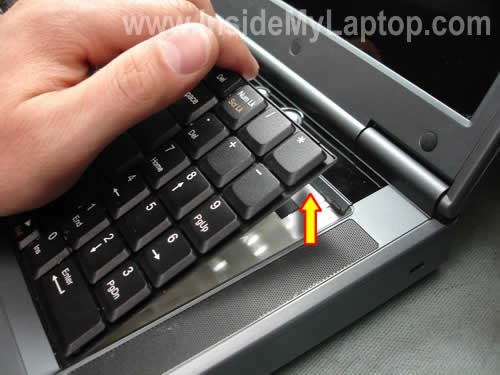
You will find four small latches located above the functions keys, I pointed them with four arrows.

Carefully release latches one by one with a sharp object, you can use a small flat head screwdriver.
When you push on the latch, the keyboard will lift up a little bit and the latch will stay open.

After all four latches are open, lift up the top side of the keyboard.

Move it towards the screen so you can access the cable connector.
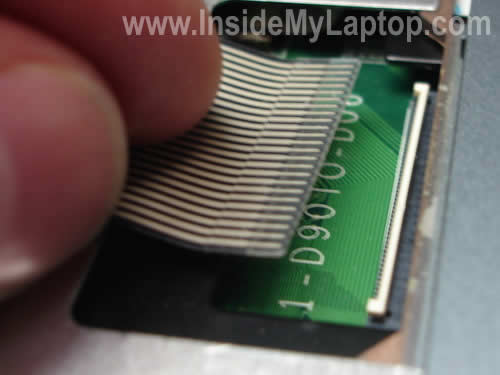
Now we are going to unlock the connector and release the cable.
WARNING! Be very careful with the cable connector. It’s soldered to the motherboard and if you accidentally break it, you will have to replace the motherboard.

On the picture below you can see the connector in the LOCKED state.
Lift up the left side of the cable retainer and open it up at a 90 degree angle.

On the next picture you can see the same connector in the UNLOCKED state.

Now you can pull the cable from the connector and remove the keyboard.

You can find a new replacement keyboard if you search using the model number printed on the back of the original one.
In my Alienware m7700Â I found two different numbers on the label:
Model number: MP-03753US-4302
Part number: 80-D90T0-011-1
Replace it and assemble everything back together.
Tony
I followed your instructions about replacing the inverter on my hp dv9000 but I still get a screen that can only be displayed by using a flashlight. Any other suggestions?
Peter
Hi,
Thank you for an excellent resource.
I have an issue with my Compaq 8510P that has been holding me up for months. Would you be kind enough to point me in the right direction?
The 8510p came with a Hitachi 160Gb SATA I disk. I want to upgrade to a larger, faster disk. However, the original drivers appear weird. They are identified as ATA only, not SATA. Attempts to update the drivers fail, with messages such as “hardware does not support this driver”.
But the disk model identifies it as SATA.
When I ask HP, I just get responses like “these are the only supported disks”. The Intel chipset spec’s say nothing about the disk interface.
Do you know if the 8510p will support a SATA II (3Gb transfer rate) disk? A clear answer to that will tell me if I am attempting the impossible.
Thanks again,
Peter
Zig
That is most likely a rebranded Clevo D900T.
Matricks
This guide will definitely work for the following laptop models:
Base Model: Clevo D900T (D9T)
Rebranded Models:
Alienware Area-51 M7700
Sager 9860
It is a gaming laptop designed as a desktop replacement.
Al Dove
Works great, Alienware Aurora M7700 D9T or D9K is AMD CPU model. Do you have any more on this unit?