
In the following post I explain how to pull apart an HP Pavilion dv6-3000 series laptop.
Also, this pull apart guide should work for HP Pavilion dv-4000 series.
This is my THIRD disassembly guide for HP Pavilion dv6 line. You’ll find line to other dv6 models at the end of this post.
Before you start taking it apart, make sure the computer is turned off.
I would strongly advice to note locations of all removed screws. They all have different length. This will help you a lot during the reassembly process.
STEP 1.
Unlock and remove the battery.
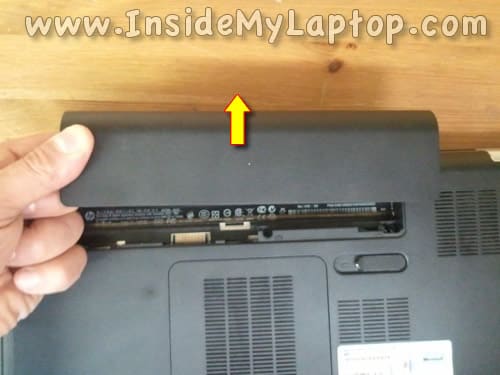
STEP 2.
Unscrew the service cover and remove it.
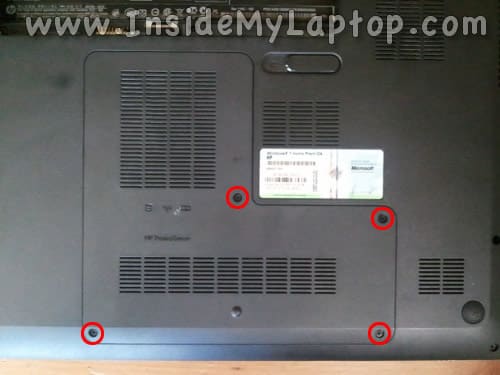
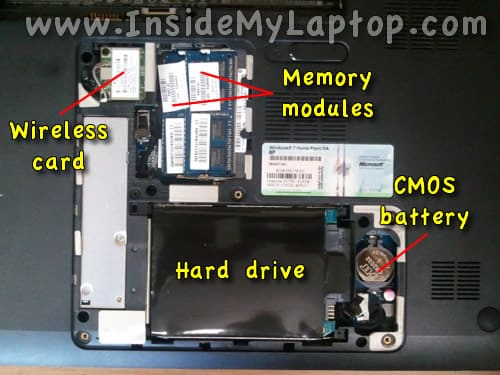
Under the service cover you can access the following laptop components:
– Wireless card.
– Both memory modules.
– Hard drive.
– CMOS battery.
This laptop can handle 8GB (2x4GB) DDR3-12800 SODIMM memory modules.
STEP 3.
Unplug the hard drive cable from the motherboard.

STEP 4.
Lift up and remove the hard drive assembly.
Upgrading this regular 2.5″ SATA hard drive to a 2.5″ SATA solid state drive will improve laptop performance significantly.

STEP 5.
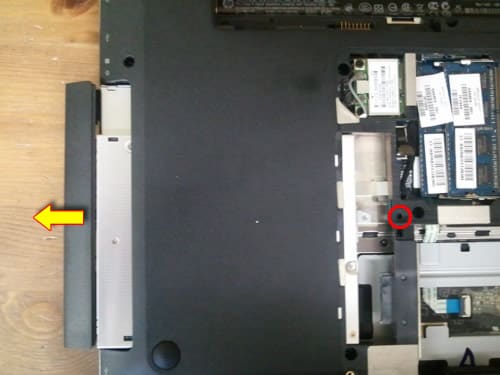
Remove one screw securing the optical drive.
Pull the optical drive to the left and remove it.
STEP 6.
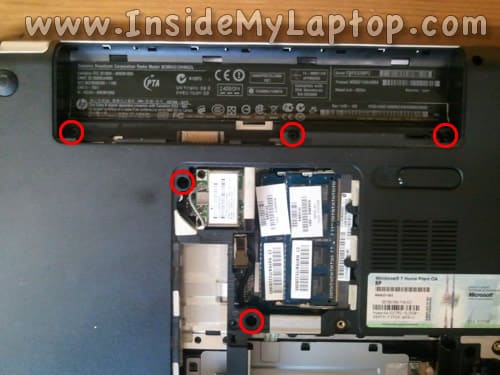
Remove screws securing the keyboard on the bottom.
STEP 7.
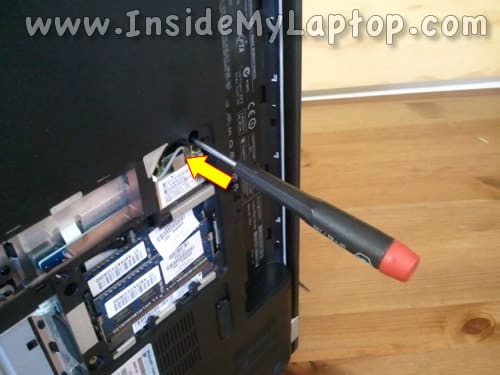
Insert a small screwdriver into the shown hole.
STEP 8.
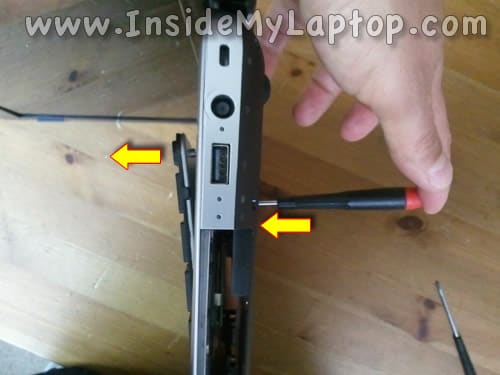
Gently push the screwdriver into the hole.
When you push on the screwdriver the keyboard will lift up on the other side.
STEP 9.
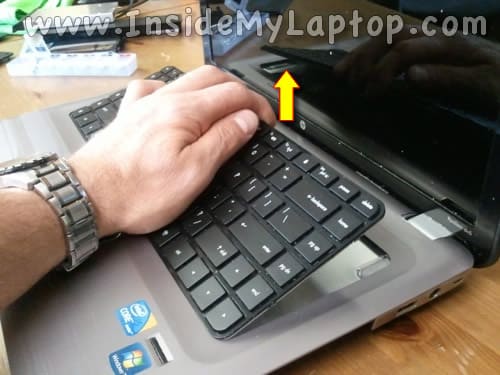
Continue removing the keyboard with your fingers.
STEP 10.
Separate the keyboard from the case and turn it upside down.
Now you can access the keyboard connector and release the cable.
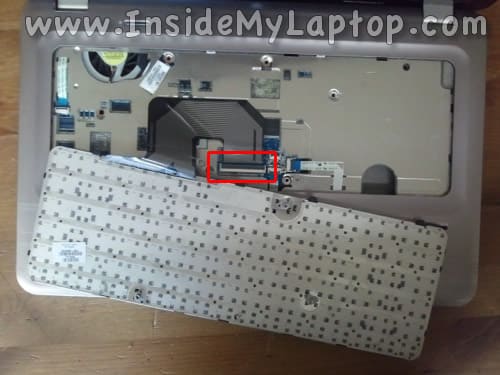
STEP 11.
In order to unlock the connector you’ll have to lift up the left side of the cable retainer with your fingernail.
The retainer will open up at a 90 degree angle.
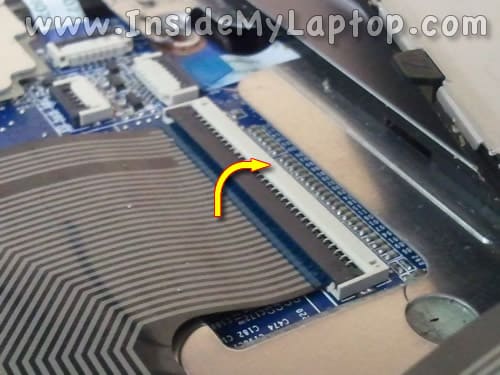
STEP 12.
Pull the keyboard cable from the connector.
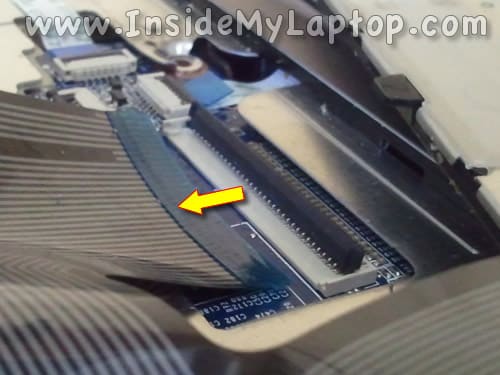
STEP 13.
Now you can remove the keyboard.
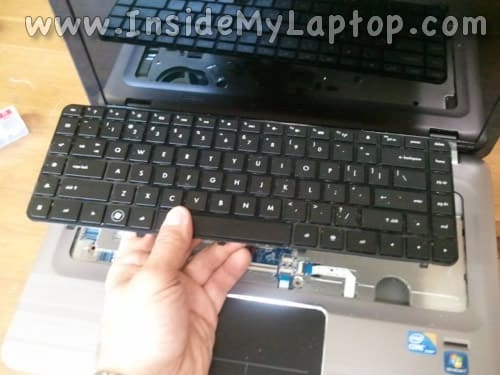
STEP 14.
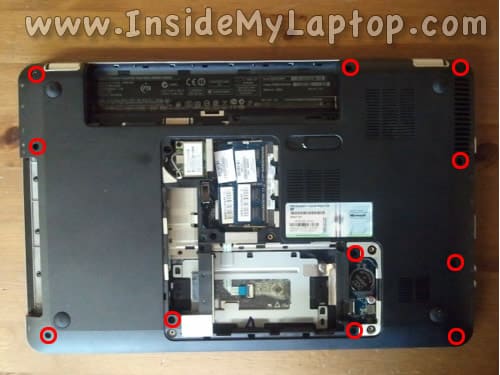
Remove screws from the bottom.
STEP 15.
Disconnect the following cables:
1. Power button board cable.
2. Finger scanner cable.
3. Touchpad cable.
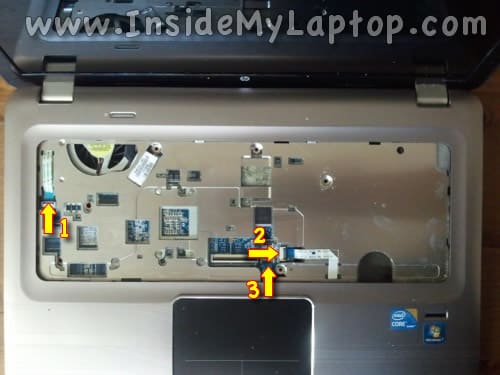
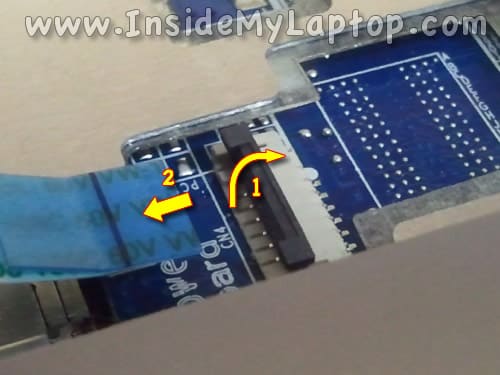
Use same technique as for disconnecting the keyboard cable.
1. Lift up the cable retainer.
2. Pull the cable.
STEP 16.
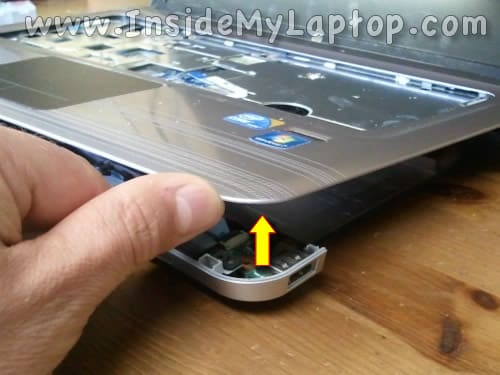
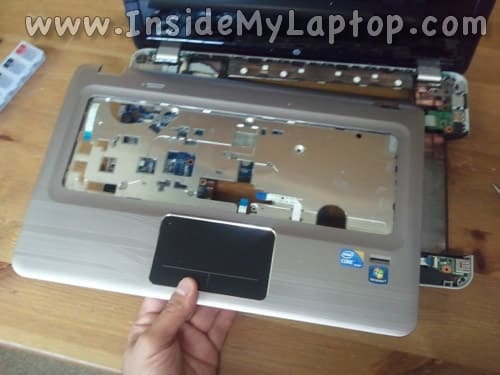
Start separating the top cover assembly from the bottom cover.
STEP 17.
Remove the top cover.
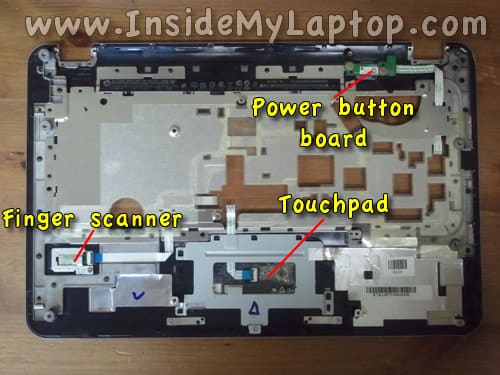
On the bottom side of the top cover you can access the following components:
– Power button board.
– Finger scanner.
– Touchpad.
STEP 18.
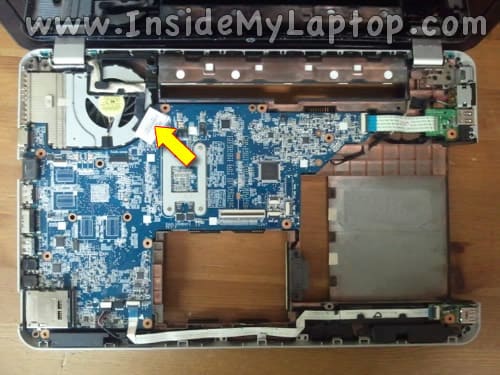
In the next step we’ll disconnect the video cable connector from the motherboard.
STEP 19.
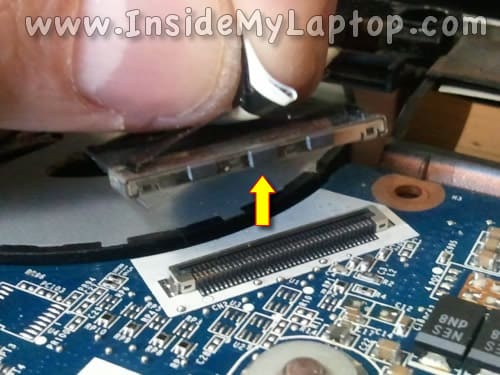
Lift up the connector by the black belt attached to it.
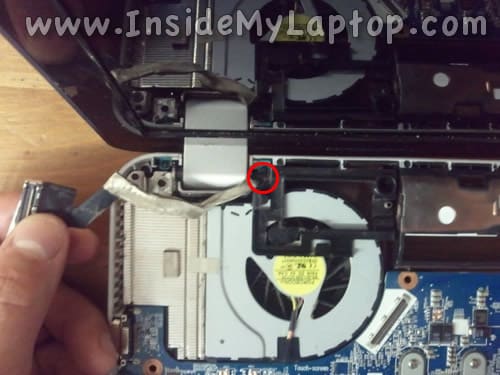
STEP 20.
Remove one screw securing the video cable bracket.
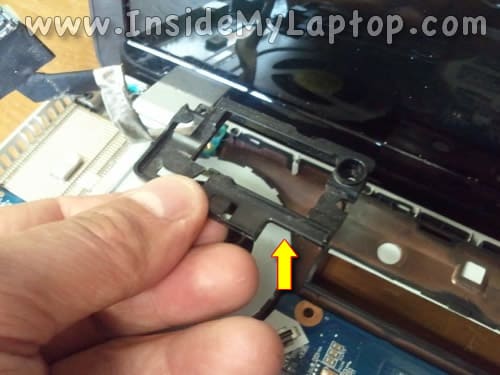
STEP 21.
Remove the bracket.
Before you can remove the motherboard it’s necessary to disconnect a few more cables on the bottom side.
These cables located under the service cover we removed in the step 2.
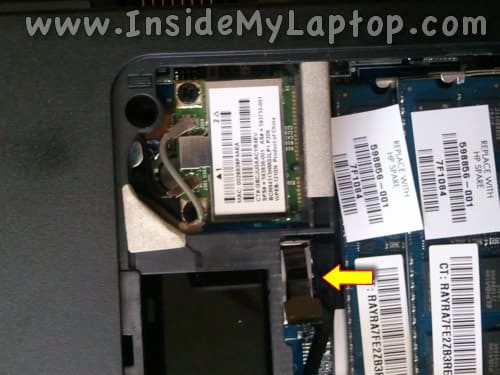
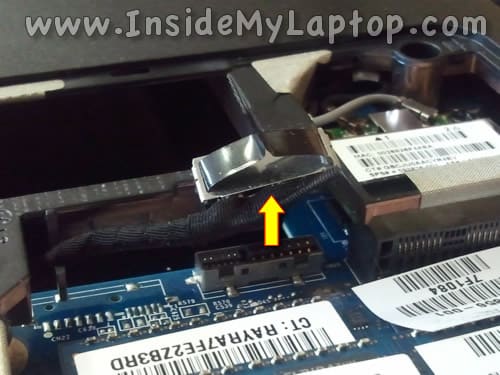
STEP 22.
Lift up and disconnect the optical drive cable.
STEP 23.
Disconnect two antenna cables from the wireless card.
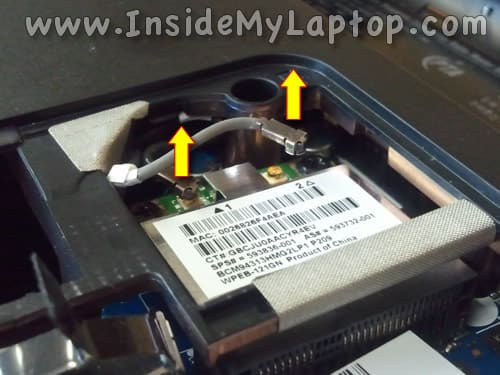
STEP 24.
Disconnect three cables on the top side of the motherboard.
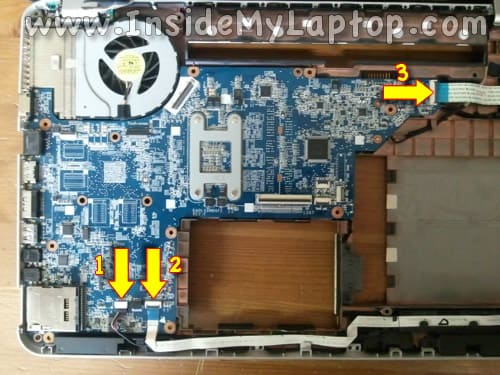
STEP 25.
Lift up the right side of the motherboard and unplug the DC power jack cable.
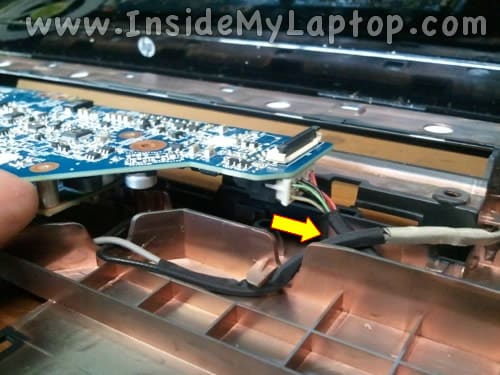
STEP 26.
Start removing the motherboard as it shown on the following picture.
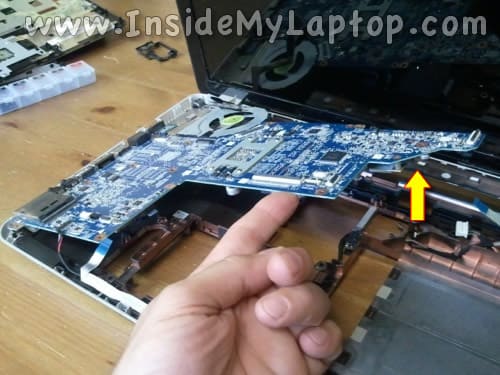
STEP 27.
The motherboard removed from the bottom case.
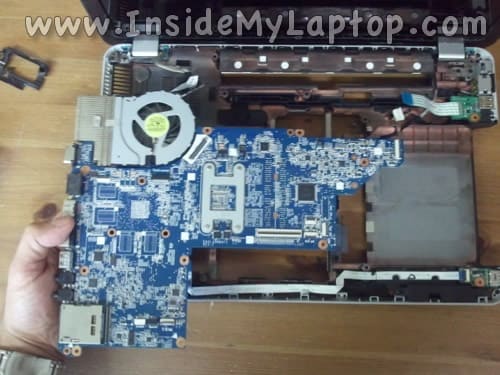
STEP 28.
On the bottom side of the motherboard you can access the cooling module (fan and heatsink).
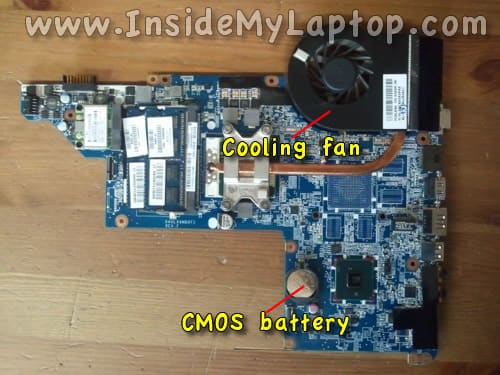
STEP 29.
The DC power jack also can be easily accessed and removed in a case of failure.
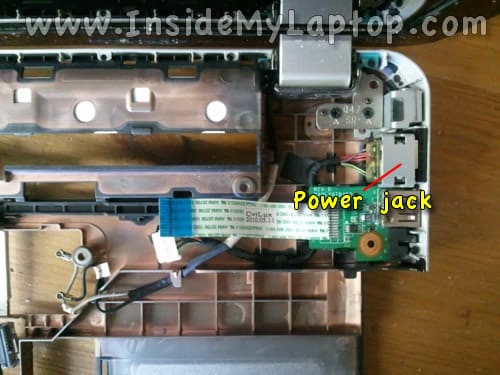
NOTE:Â If your laptop doesn’t look like one shown on the picture above, check out the following pages:
1. How to disassemble HP Pavilion dv6-1000 and dv6-2000.
2. How to disassembly HP Pavilion dv6-6000.
liam
I have taken apart my hp g70 I noticed 2 small leads both with 2 wires the top is enclosed in plastic and looks like 2 small contacts inside one set is conected with the usb port connector the other with a cable going up to the screen the plastic end is sitting on the motherboard cover stuck on. Can you please tell me what these are.
Ps they are both open circuit I thought they look like some sort of thermal cut out.
IML Tech
Liam,
Not sure what you are talking about. Can you make a picture? You can upload it somewhere and post here a link.
By the way, maybe you’ll see it in my HP G70 disassembly guide.
https://www.insidemylaptop.com/remove-replace-damaged-lcd-screen-hp-g50-g60-g70-notebook/
joe
Hello, can you make a guide to open the HP pavilion M6? I need to get to the van but I can’t open up the case. Thank you.
Conor
Hey
I’ve found the screws on my service cover cannot be removed, at least not easily. The screw appears to be jamming or something after I’ve unscrewed it a certain amount. Any suggestions as to how to overcome this?
Also, I’m considering fitting my laptop with a new case for the bottom. I assume I need to dissassemble the whole thing to replace it?
Thanks.
IML Tech
@ Conor,
Probably they don’t have to be removed completely. Just loosen them as much as you can and try removing the service cover.
Mike
Hey – great article.
I’ve a HP Pavilion dv6 3031sa with a cracked screen that I’m trying to replace
but can’t access the bezel screw – have you any advice on how much I need to dismantle the computer in order to get access? thank – Mike.
IML Tech
@ Mike,
I guess you are talking about screws located on the bottom of the bezel.
In order to access them you will have to separate the display panel from the laptop base. You will have to follow steps 1-18 in this guide to remove the top cover assembly. After that you remove the display panel (not shown in the guide). Only after that you can access the screws and remove the bezel.
Here’s HP service manual for dv6-3000 series.
You will find display and screen removal instructions on the page 78.
Hope it helps.
Alan
Hi mate,
I’ve got the Pavilion DV6, it’s very similar to the pictures you’ve shown apart from the fingerprint scanner. I’ve had a problem with the backlight, when switching on the laptop, the hp splash screen always comes on with the the backlight on, then it boots the os, and the backlight goes off, sometimes it comes back on after several seconds, sometimes I’ve got to restart the laptop a few times to get it to work.
Any ideas on the problem?, loose connection on the inverter? worn cable, (these seem prone to wearing)
Any ideas would be welcome.
Alan
IML Tech
@ Alan,
What is your laptop model number? dv6-????
Some of them have a LED backlight screen (no inverter) and some older models have a CCFL screen installed (require inverter).
If you got a CCFL screen, try replacing the inverter first.
If it’s a LED screen, most likely it’s either failing screen or bad video cable.
I cannot tell with one is failing without testing with know good parts.
Hiro
Hi can you tell me where i put the screws because i forgot where did i remove them
J. Manherz
I also have lost the correct locations for re-assembly screws (as Hiro on 8-19-14);
2 very short
2 very long
several intermediate length
several slightly less than intermediate length
Is there a graphic that shows detailed locations, as the PC acts differently with any change in them as I try to find correct locations.
Thanx for great doc and help.
IML Tech
@ J. Manherz,
You can find this information in the official HP service manual. What is your full laptop model? dv6-???
J. Manherz
dv6z-3100
IML Tech
@ J. Manherz
Here’s dv6z-3000 service manual: http://h10032.www1.hp.com/ctg/Manual/c02659236.pdf
It might help to find correct screw locations.
J. Manherz
a dv6z-3100
Ida Sherrod
Loved this. My question is about the hinge attached to the screen. Where the optical cable runs inside. Is there a way to loosen the hinge? When opening my laptop it is very hard to do. So much that the plastic piece has broke where the screw goes. Now when I open it the hinge turns with the screen and it’s pushing up on the keypad.
Jon
My screen had real bad color and clarity problem. looked like when a television wasn’t tuned in and fuzzy. I plugged an external screen and it was fine. I went through the pictures and located where the screen connector was and pressed down hard over the “W” key and the screen cleared up immediately. Good luck to all with my gratitude fro not having to go through the procedure described.
Arindam
Thanks a lot for providing such a thorough and complete pictorial guide to laptop self servicing. I have a similar problem as shared by Ida Sherrod on 6th March’15, with left hinge attached to the screen of my HP Pavilion DV6-3054 TX laptop. Please tell us how to replace/repair the hinge and whether should both the hinges be replaced together. I would also like to know how to fix/replace the rubber bumpers attached to the screen bezel of my laptop model.
Thank you again for the excellent tutorials.
Regards,
Arindam.
Dave
Dv6-3124nr model,
screen has horizontal lines when looking at screen
no output when using vga connection to external monitor,
Do i need new graphics card or is it the video cable connection step 20 that i need to replace?
Thanks so much
John P. Toscano
Terrific disassembly guide. Thanks for putting in the effort. I am in the process of replacing the optical drive with a new one. My old CD/DVD-burner/Blu-Ray Reader drive no longer detects when a disc is inserted. So I bought an upgrade to a Blu-Ray Burner, after carefully reviewing the manual for my DV6T-3000 so that I got a drive that matched an option that was one of the standard configurations. My problem is that the new drive has a very slim bezel, and the old drive has a much thicker bezel that matches the curvature of the case. I know that I should be able to somehow snap the old one off and move it to the new drive, but I just don’t see the appropriate place to “release” the bezel from the sliding tray. I don’t see any screws holding it, so it is probably just one or more plastic clips, but I don’t want to break the bezel by forcing it the wrong way. Can you help me there?
John
Harry Apps
Perfect strip/assembly guide. Never touched a laptop before but have just used this to replace a heatsink fan this morning – took 2hrs in total and worked first time.
Many thanks
H
Ric Cave
Thank you once again.
I used your excellent, clear instructions 6 months ago on my own DV6, and again today on my wife’s machine.
Michael D
Great instructions. I need to replace the video cable in my dv6-3120us(white background turned aqua with several verticle lines). In steps 18-19 you show disconnecting one end. How do I get to and disconnect the other end attached to the screen, I assume?