The following set of instructions explains how to remove and replace the keyboard on a Dell Inspiron 9400 or E1705 laptop.
Before you start, turn off the power, remove the battery and remove the AC adapter.
STEP 1.
Open up the display as far as it goes.
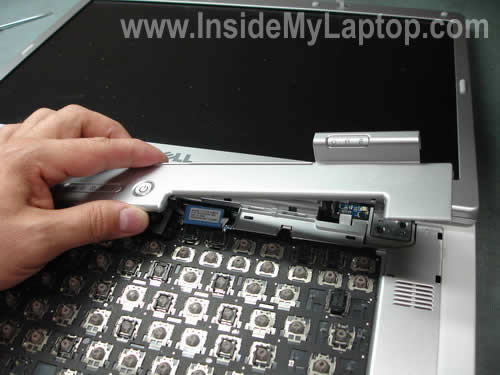
Insert a small flat head screwdriver under the  keyboard cover and carefully lift it up.

Continue removing the cover with your fingers.

STEP 2. Remove two screws securing the keyboard.

STEP 3.
Carefully lift up the keyboard from the base and move it up so you can access the cable.

STEP 4.
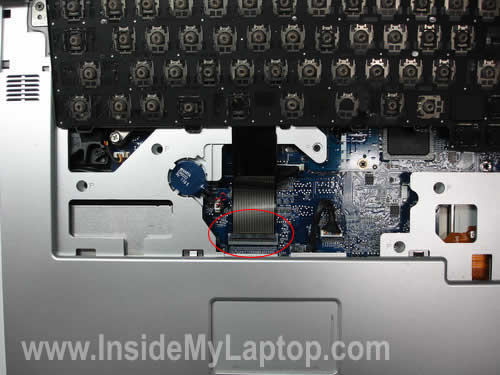
The keyboard is connected to the motherboard via a flat ribbon cable.
Before you can release the cable the connector must be unlocked. Be very careful.
The keyboard connector is permanently attached to the motherboard. If you accidentally damage it, you’ll have to replace the whole motherboard.

On the picture below you see the connector in the locked state.

Lift up the right side of the cable retainer.. On the picture below you see the same connector in the unlocked position.

STEP 5.
Now you can pull the cable from the connector and remove the keyboard.

Replace the damaged keyboard with a new one.

Also read how to replace the screen and fix display hinge.
Paige Delaney
Thank you for your site. I am director of a non-profit library, and money is scarce. I am sure you saved me $125 in replacing a keyboard. Sorry I don’t have extra money to donate, but I wanted you to know I appreciate what you do.
Best of luck
Paige Delaney
Milan Cole
Thanks for the guide. I am going to be trying this repair and I hope it works.
Stephen
Excellent guide. Thank you for the help. FYI, same instructions work for the DELL PRECISION M6300.
I had a 9400 that I was keeping around for parts, removed the keyboard and put it into the Precision using these instructions.
Mark Harrison
Thank you for these clear and easy instructions. I have just followed them to replace the keyboard in my Inspiron 9400 (which Dell, to their credit, replaced under extended warranty, next day.)
I had assumed that step 1 worked the way you said, but it is reassuring to see pictures of someone else doing the same thing 🙂
Step 4, on the other hand, was an absolute winner for me – I’m certain that, had I not seen your guide, I just would have tugged until the motherboard broke.
Thanks again.
Mark in the UK
Renata
Great easy to follow instructions. You made installing my new keyboard a breeze.
Thank you so much.
Renata
The_Gov
Thanks SO much, man!!
This worked perfectly!
I’m typing on it now!! :~)
Russell Sias
Thank you! I just replaced my Inspiron 9400 keyboard – thanks to your guidance! I have never had a laptop open before, and without your guidance, well…. Pics were great, by the way! Thanks ever so much.
Mark
I cannot thank you enough for the savings. I was quoted $200 by a very well known national computer Geek Squad that not only would take $200 to replace the keyboard, but they would have to send my computer off for 10-15 work days. I bought the original keyboard online for $9 bucks and installed it within 2-minutes. I have just typed this email with the new keyboard. You are great, thank you from my $191 dollars of savings.
IML Tech
Mark,
I’m glad to help.
Steve Garrison
Thanks for the tutorial. Fixed my cousin’s sticky U key just by removing the keyboard from its’ cradle then replacing. Another example of fixing something by taking apart and reassembling. No idea why it was sticking.
Patrick K
Thanks much, followed along with no problems.
Tom Bell
Great!! excellant site. I Thank yo for doing this, I wish The computer MFG were this helpful
Diego Nuñez
Thank you very much.
I’ve just replaced my keyboard. Just took me five minutes.
Great!
Michael
Thanks. Keep making the world a better place.
John Webster
Thank you so much … I was looking at my Laptop wondering where to begin. It was a piece of cake and I am glad Dell made this repair non-dangerous. Again thanks!
Bruce
I usually don’t leave raving comments on these sites, but you really saved me a lot of trouble with this great set of instructions. (But, argh, the cursor is still bouncing backward; gotta figure that out …) Your photos and directions were very clear. I thought I’d be using this site as a one-time only thing, but I’m bookmarking it for good. Thank you!
martin
this article did a really great job. it made changing my keyboard damn easy. especially step 4 was something, none of the other sites i came along really explained good enough, if even mentioning it. only problem was, that i didnt expect i would need such a really really tiny screwdriver :o) … so after all, you made finishing this job really easy to me. thanks a lot!
chris
Thank you! your site, 10$ keyboard on Amazon and sent you 10$ donation = 20$ to replace my keyboard several places around town wanted $150 PLUS parts.
Denise
Thank you. The keyboard is reinstalled. No more trying to boot up the computer two or three times. The new keyboard was the problem. After the keyboard was installed, I could do updates and the media center now works perfect as well. I have only one problem… The delete button does not work..??? Anything you can say to help me with that? THANK YOU!!!
Guest
Off topic, but what on earth happened to the computer you were working on? Like all the key caps were ripped off? Did somebody’s cat use the keyboard as a scratching post?