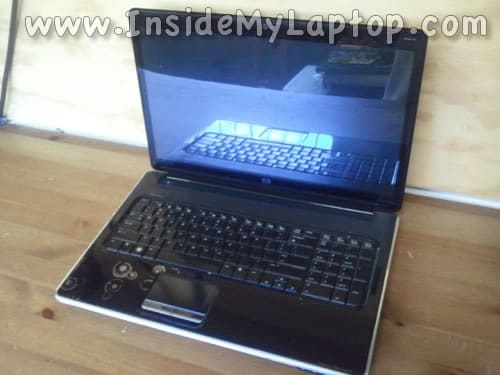
In this post I will show how to disassemble a HP Pavilion dv7t-3000 series notebook.
This guide should work for HP Pavilion dv7-2000 and dv7-3000 series too.
I’m taking it apart because the notebook gets very hot while running games and other multiple programs. It happens because the cooling module is clogged with dust and has to be cleaned up.
I will clean up the CPU heatsink and replace thermal grease on the CPU (processor) and GPU (video chip). This procedure requires complete disassembly.
If your HP Pavilion dv7 doesn’t look like one in this guide, I have some other disassembly guides. Check out links to related models I post at the end of the guide.
Before you start, make sure the computer is turned off and unplugged from the AC adapter.
Also, make sure to organize all removed screws. There will be lots of them. Make notes where these screws go. This will help you during the reassembly process tremendously.
STEP 1.
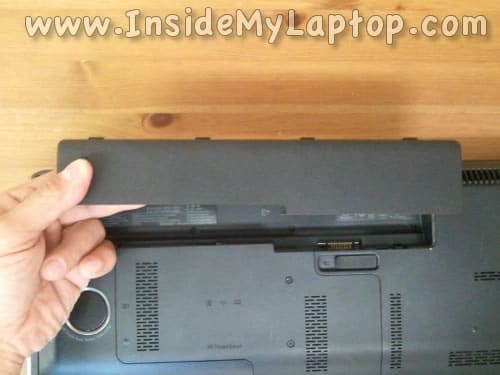
Unlock and remove the battery.
STEP 2.
Loosen screws securing two service doors on the bottom.
Remove both service doors.

STEP 3.
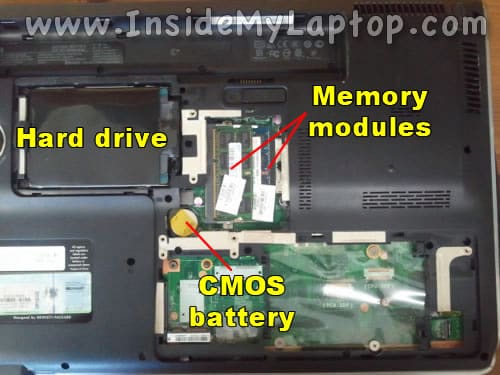
Now you can access the hard drive, both memory modules and CMOS battery.
This laptop can handle 8GB (2x4GB) DDR3-12800 SODIMM memory modules.
Some other HP Pavilion dv7-2000 and dv7-3000 series notebooks might have a second hard drive and TV tuner card installed here.
STEP 4.
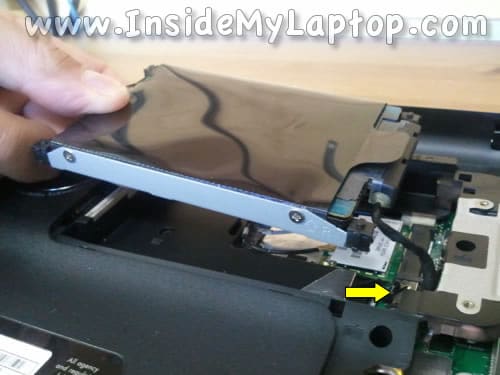
Lift up the hard drive assembly.
The hard drive connected to the motherboard via a cable.
Upgrading this regular 2.5″ SATA hard drive to a 2.5″ SATA solid state drive will improve laptop performance significantly.
STEP 5.
Carefully lift up the hard drive cable connector by the black belt and unplug it from the motherboard.
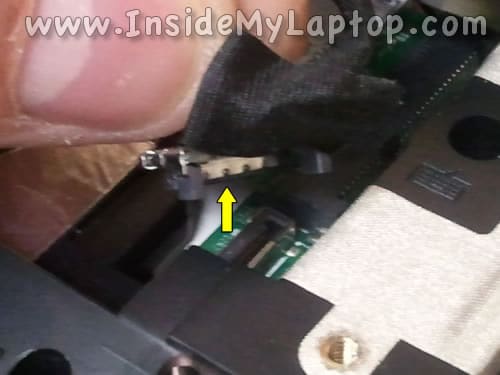
STEP 6.
Remove one screw securing the DVD optical drive.
Pull the optical drive from the notebook and remove it.
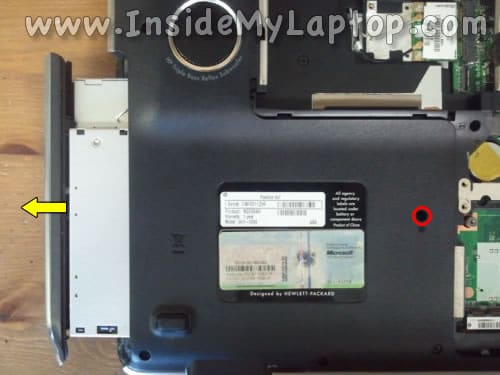
STEP 7.
Remove six screws (red) securing the speaker cover.
Remove three screws (green) securing the keyboard.
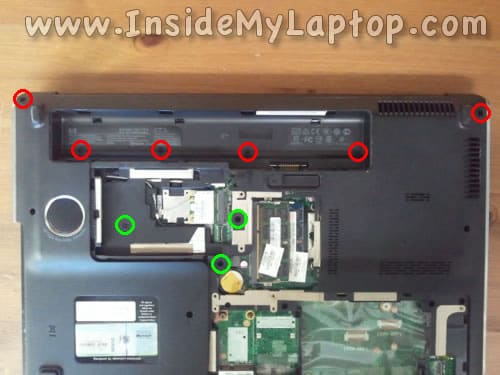
STEP 8.
Lift up the speaker cover and separate it from the top cover.
Be careful, there are cables connecting the speaker cover to the motherboard.
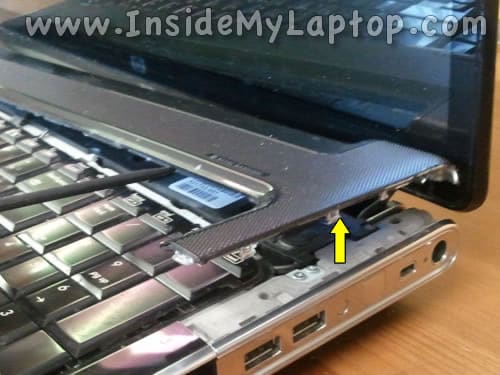
STEP 9.
Move the speaker cable towards the display just enough to access keyboard screws. We’ll be removing the speaker cover completely in the step 16.
Remove four screws securing the keyboard.
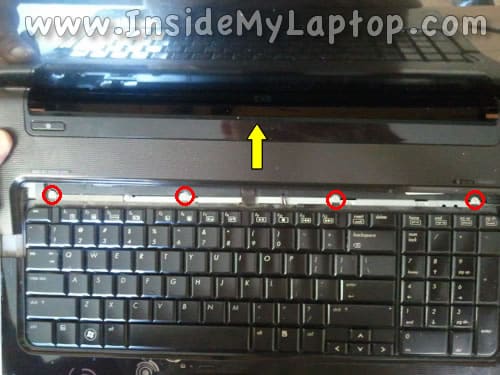
STEP 10.
Lift up the keyboard and move it towards the display.
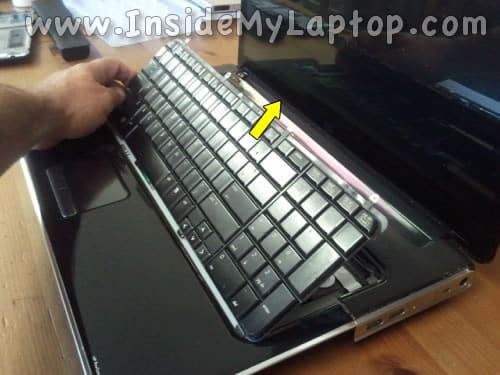
STEP 11.
Now you can access the keyboard cable connector located on the motherboard.
In order to remove the cable, it’s necessary to unlock the connector first.
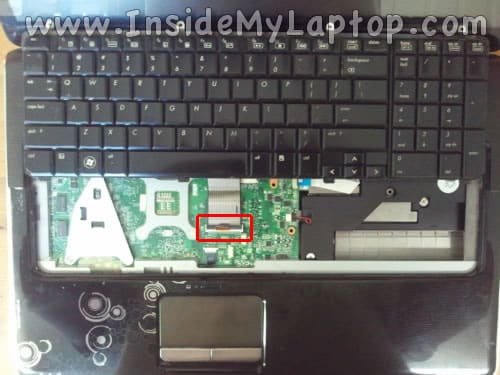
STEP 12.
Lift up the left side of the retainer (brown tab) with your fingernail.
The retainer will open up at a 90 degree angle.
It must remain connected to the white base.
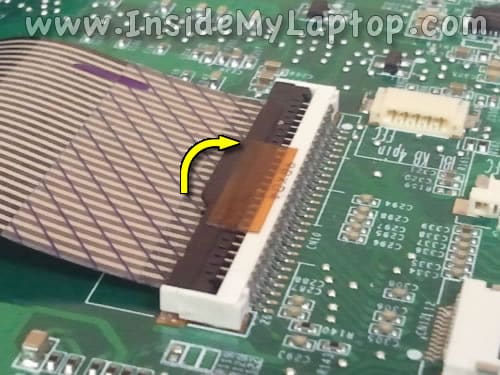
STEP 13.
On the following picture the connector shown in the unlocked position.
Now you can pull keyboard cable from the connector.
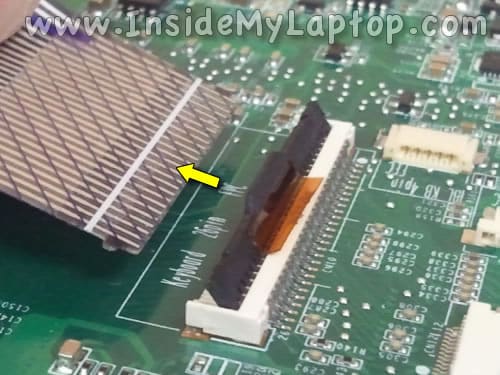
STEP 14.
Remove the keyboard.
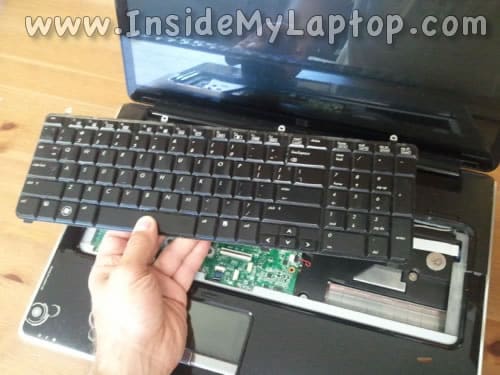
STEP 15.
Disconnect the power button cable and media board cable from the motherboard.
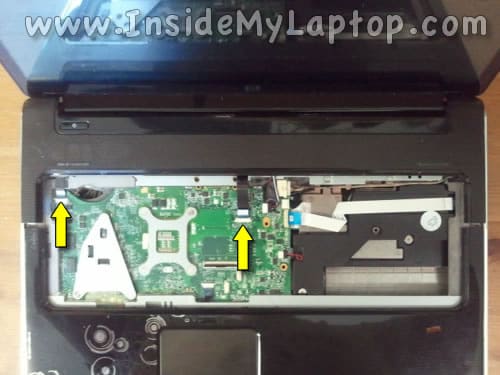
Simply pull the cable from the connector. This connector doesn’t have any locking tab.
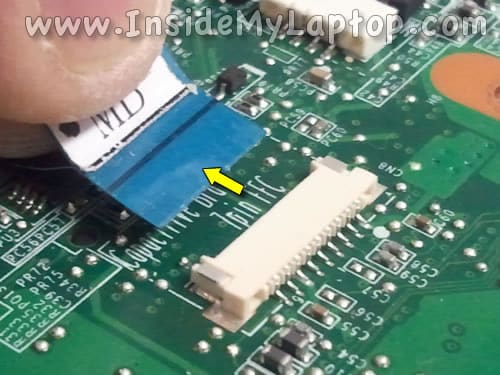
STEP 16.
Remove the speaker cover.
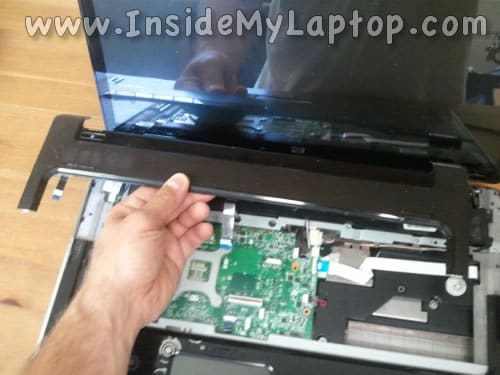
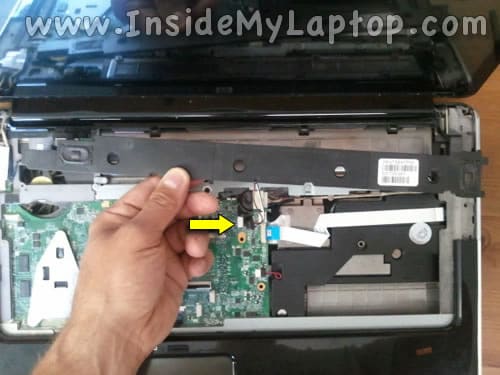
STEP 17.
Disconnect the speaker assembly cable from the motherboard.
Remove the speaker assembly.
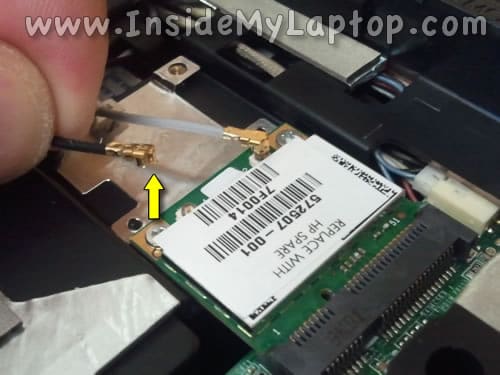
STEP 18.
Disconnect two antenna cables from the wireless card.
STEP 19.
Pull both antenna cables though the opening between the laptop case and motherboard.

STEP 20.
Disconnect the web camera cable from the motherboard.
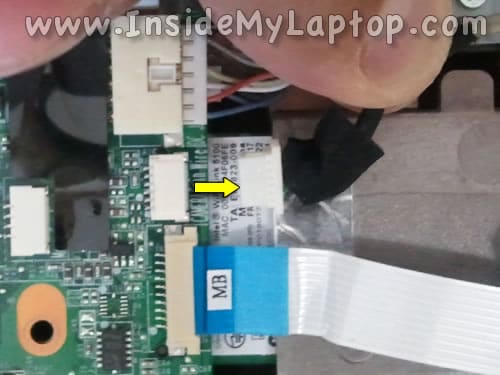
STEP 21.
Un-route both wireless antenna cables and web camera cable from the path on the case.
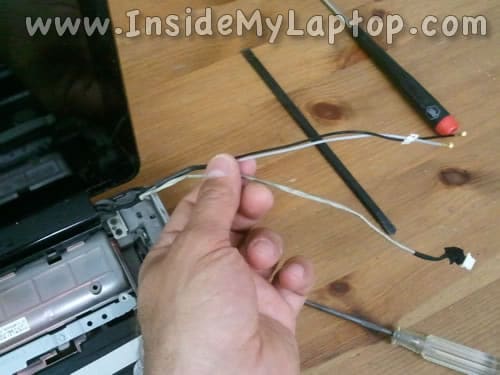
STEP 22.
Disconnect the video cable connector from the motherboard.
Lift it up by the black belt located on the top of the connector and unplug from the motherboard.
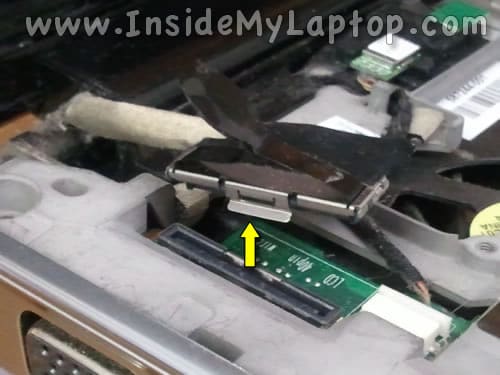
STEP 23.
Remove four screws securing display hinges (two screws per hinge).
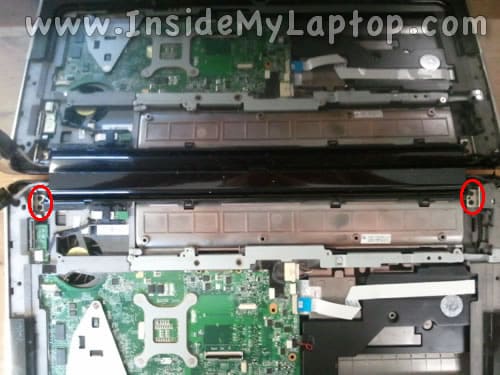
STEP 24.
Lift up and remove the display assembly.
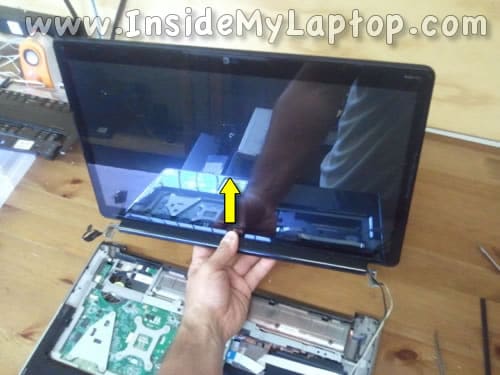
STEP 25.
Remove eight screws securing the mounting bracket.
There are two more screws on the right side. They are not shown on the picture.
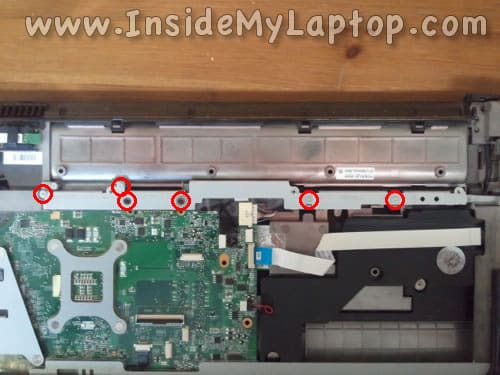
STEP 26.
Remove the mounting bracket.
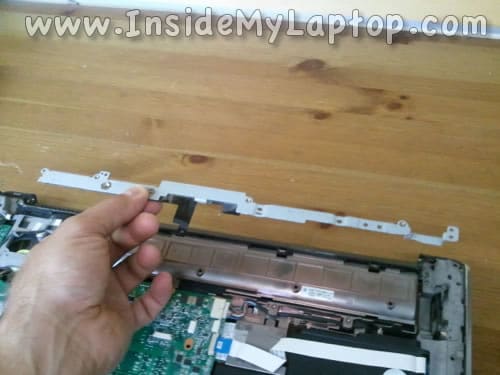
STEP 27.
Remove all remaining screws from the notebook bottom.
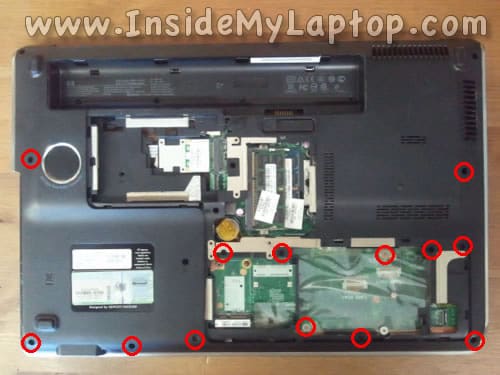
STEP 28.
Don’t forget two screws located in the DVD drive bay.
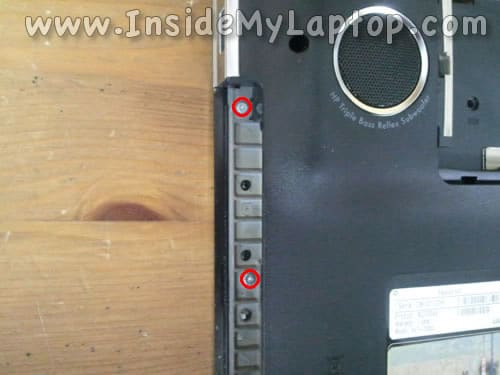
STEP 29.
Remove two screws securing the wireless card. Pull the wireless card from the slot.
It’s necessary to remove the wireless card in order to remove the motherboard.

STEP 30.
Remove five screws securing the palmrest assembly.
Disconnect the Bluetooth cable and trackpad cable from the motherboard.
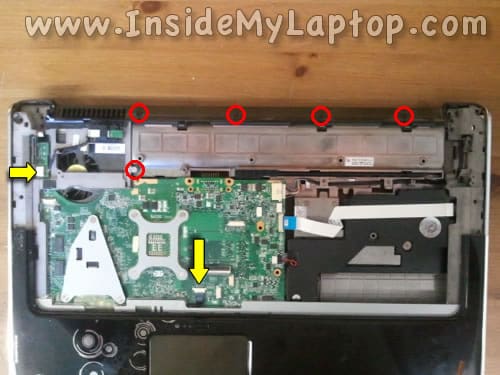
STEP 31.
Start separating the palmrest assembly from the base.

STEP 32.
Remove the palmrest assembly.
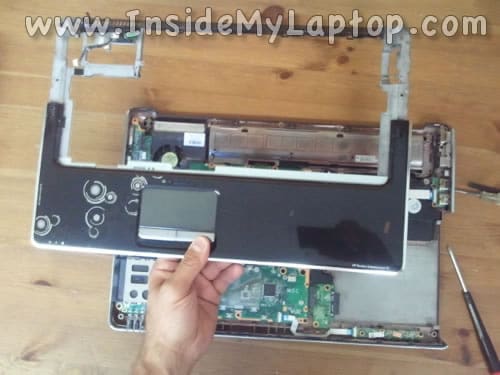
Here’s the bottom side of the palmrest assembly. If you need to replace the trackpad, it can be accessed here.
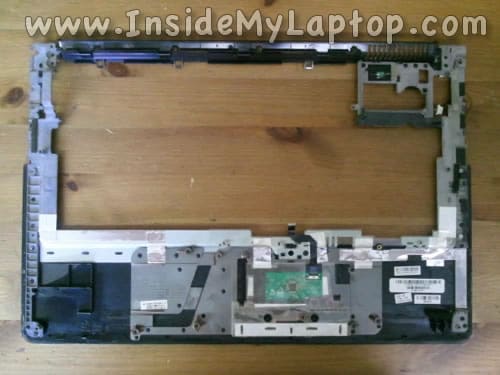
STEP 33.
Remove three screws securing the motherboard.
Disconnect four cables on the right side of the motherboard.
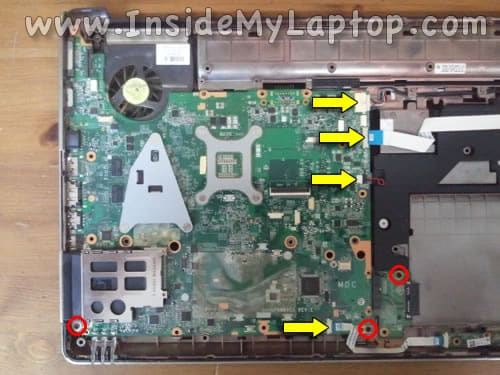
STEP 34.
Remove two screws from the extension port on the side.
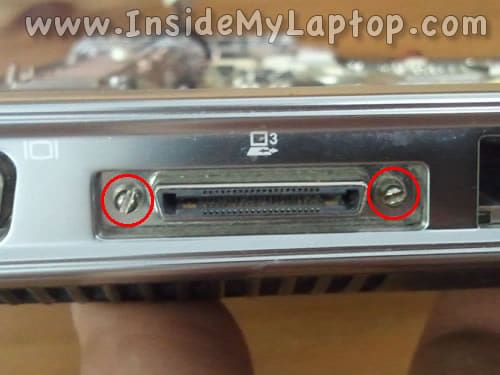
STEP 35.
Start removing the motherboard as it shown on the picture.
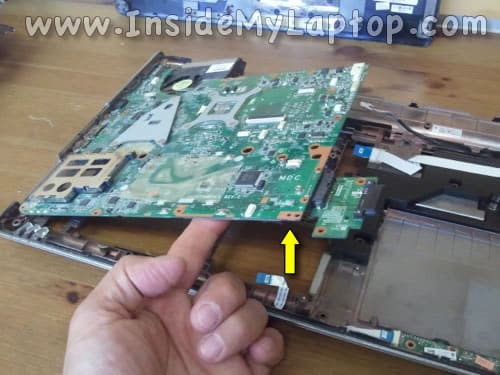
STEP 36.
Remove the motherboard from the bottom case.
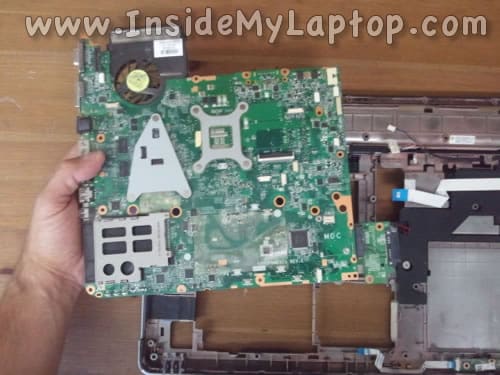
STEP 37.
The cooling module (heatsink and fan) can be accessed on the other side of the motherboard.

STEP 38.
Disconnect the cooling fan cable from the motherboard.
Loosen six screws securing the heatsink assembly.
Loosen them in the order written on the heatsink, you’ll see an number located by each screw.
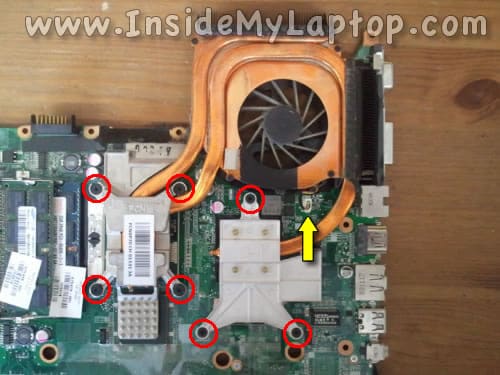
STEP 39.
Lift up and separate the cooling module from the motherboard.
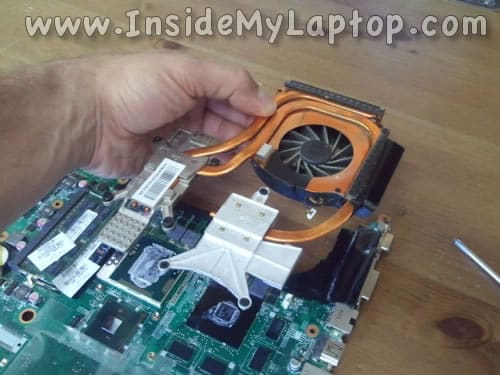
STEP 40.
Thermal grease on the CPU and GPU chips looked dry. I’ll be replacing it with new thermal grease.
Apply new thermal grease on both chips.
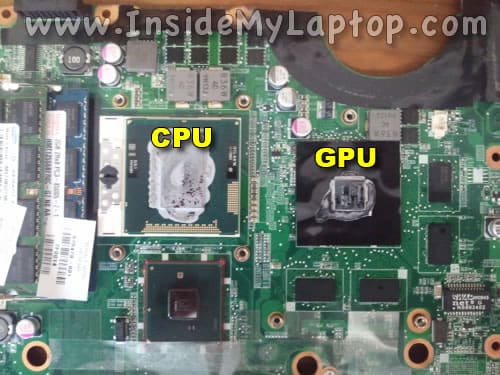
STEP 41.
Clean up old thermal grease from the heatsink. Use paper towel and 90-99% alcohol.
DO NOT REMOVE thermal pads. Do not replace thermal pads with thermal grease. Leave thermal pads as is, you’ll be reusing them.
Do not touch thermal pads, make sure they are clean.
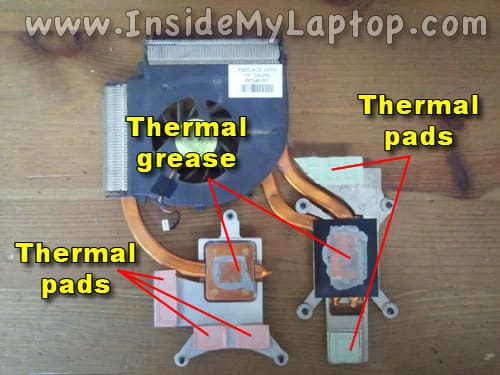
STEP 42.
In order to clean up the heatsink and cooling fan we’ll have to separate the fan from the heatsink.
Remove four screws securing the cooling fan.
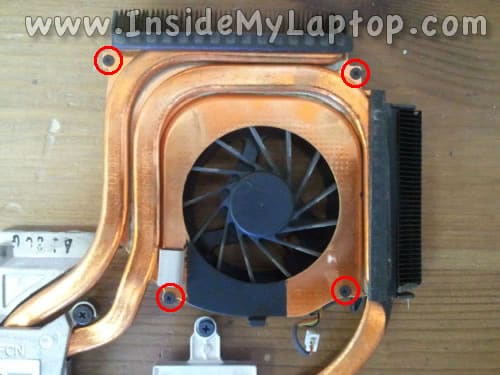
STEP 43.
Separate the heatsink from the fan.
Now you can clean up both parts properly.
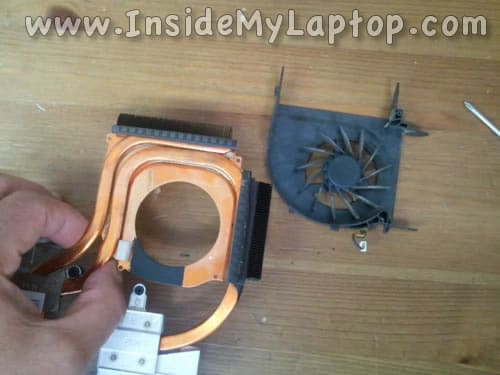
If your fan makes noise, it’s time to replace it.
RELATED GUIDES:
1. How to disassemble HP Pavilion dv7-1000 series.
Bobbie Hartfiel
Quick question. Would I have to take ym entire computer apart to replace the USB ports on the right side? One is broke and one just quit working for no reason what so ever. I have the HP dv7-3160us.
marius
thanks a lot for the tutorial, i just removed 30° C by changing the thermal paste!
Reva
HP dv7-3165dx looks like the Laptop in the top picture in this guide.
Can the Fan be replaced without completely disassembling the entire Laptop? if so which steps do I need to follow? Does the Fancy bezel need to be removed from around the edge?
I was unable to get either of the service doors removed in Step 2 & came to a conclusion my bits for my screwdriver are the wrong size? Do I need bits that are blunt or just a specific size? I have at least 2 sets all pointy/ Deep which didn’t do much.
My Sis has been out of work for 5 years. We can’t afford to pay a Shop when it means no eating for a month & her fan makes a gawdawfull racket like a Weed Whacker on…
IML Tech
@ Reva,
Unfortunately, you cannot do that. In order to replace the fan you’ll have to remove the motherboard first, as it shown in the step 37. You’ll have to go though all disassembly steps.
In this step you don’t have to remove screws completely. You unscrew them but they will stay attached to the cover.
After that you should be able to lift up and remove both covers.
john
I think I might need to replace my fan, can you suggest a particular product? Is it generic enough to pick up at a radio shack or something?
Thank you for keeping up with the questions after all this time.
IML Tech
@ john,
No, this fan is not generic and you cannot buy it at a radio shack.
You can buy this fan on ebay for about 10$. Just search the laptop model + fan.
Marv
I’m pretty sure I did something terribly wrong because my laptop is much worse than before I cleaned the fans. First off, i didn’t apply thermal grease to the cpu because i can’t get it to buy where i am so i just gave the fans a thorough clean. After putting my dv7-3067cl laptop back together, it started overheating so badly it barely got to the log-on screen before going off. it doesn’t hibernate anymore when the battery is low. The white quicklaunch buttons are lit but don’t work and the orange ones aren’t lit at all.
I was finally able to change my battery setting to low power and now my laptop stays on, much slower but will turn off almost immediately on a higher setting. After I dissembled my laptop again to check the cables and ran my finger over the touch buttons, the wireless came on but the light is still not lit. I can now control it from hp wireless assistant though. The quick launch lights flickered, dimmed and went off as i ran my fingers over them. Any ideas how to fix this mess?
IML Tech
@ Marv,
You definitely need to apply thermal grease. Otherwise, the laptop will keep overheating.
Your problem with the quicklaunch buttons could be connection related issue. Make sure the media board cable shown in the step 15 connected properly.
Ron Benninghoff
Can I put a second HD in my HP dv7-3186cl? If so what would I need other than the HD.
IML Tech
@ ron Benninghoff,
Yes, you can put a second HD into this model.
You will need:
1. Hard drive caddy.
2. 4 mounting screws.
3. Second hard drive cable.
Search on eBay for “dv7-3000 hard drive” and you’ll find them.
Chris Williams
I just replaced the palm rest and I followed the super simple STEP 23. Remove four screws securing display hinges (two screws per hinge). This seems like the dumbest question ever BUT i was able to replace the screws on the right side display but NOT on the left side display? I even took the screws out of the right side display and they will not fasten! I don’t even see any threads on the hole for where the palm rest assembly or on the hinge for the screw to thread on to Please advise! I am very desperate as this is my boss’s laptop. Can I just flood the holes with loctite and pray for the best?
Dave
I am in the process of reassemble on my dv7-3165dx after finally getting the right fan how do I find out what screw goes were?
Thanks
IML Tech
@ Dave,
Normally, you make notes or place screws in order while taking it apart.
You can check our the official service manual for the disassembly diagram and screw locations.
Garrett
Thank you VERY much, your guide for my HP dv7-3000 was fantastic. After cleaning the head exchanger and reapplying the thermal grease, it runs SO much cooler! Keep up the great work, wish I could donate more. -Garrett
Hugo
Hi,
For my sister in law who has a DV7-2230SF , I would like to exchange the hard drive with a SSD.
I did open the laptop but I dont see how to remove the hard drive (primary one).
In this video, it seems that there is a specific move to do
http://youtu.be/PMQ6-ZNGOXU
can you explain what to do in STEP 4.
Lift up the hard drive assembly.
how do you do it ?
thanks for your help.
IML Tech
@ Hugo,
There are no screws securing the hard drive. There is black mylar cover on the top of the drive and it has two tabs on each side.
First, pull up the tab located on the back side. When the back side of the drive lifted up, pull the drive left and up to remove it from the case.
Pat
Hi, after following all the steps and re-assembling the laptop and powering on, the monitor shows just a white screen for about 30 seconds, then the computer powers off. Do you know what would cause this? Thanks!
Pat
On further investigation it seems my white screen was due to video cable connector not being secure. Now the screen is working, and it is telling me why it shuts off after 30 sec – the bios is detecting a problem with the fan (cooling fan error 902). It refers me to here:
http://h10025.www1.hp.com/ewfrf/wc/document?docname=c03620929&lc=en&cc=us&dlc=en
Pat
Crap..forgot to reconnect cooling fan wire to motherboard. Dang it!
Dick Martin
I have a HP Pavillion DV7t – 2000 partno. NB406AV
This step by step procedure was a great help and I completed it successfully and cleaned out the dust,dirt collected in the heat sink-fan area. The PC started right up and ran great but about 50% of the former fan noise came back – so the fan needs to be replaced – did anyone buy a new fan? and where did you get it?
Thanks
Fede
Hi! What’s the thermal pads’s tickness? I want to replace them with high performance pads.
Xavier
Thanks you so much for this guide! I just cleaned the fan and replace thermal grease. The CPU lost 15°C.
James
I followed this guide up to taking off the monitor, then put it all back. When attempting boot the monitor doesn’t work at all (even the hp led) and the caps lock light flashes on and off. Also think it corrupted my external drive. Any help?
Kasper
Hey, Great guide!!
The laptop is so much cooler now, but I have a problems, after reasempling the laptop and powered on, it says that the battery are not charging, and it can only start with the power cable in it!! O_O
Have I damaged something?
Kasper
Oh, I forgot to mention that it is a HP Pavilion dv7t-3000 laptop ☺ï¸
Benqazy
Please I followed the guide and had my laptop keyboard tag cleaned but it seems that the “tab key” is continuously working it only stops when I press the shift key a couple of times and start to do that again and i had to press the shift key a couple of times again and its really annoying me any time I want to type something on the keyboard it freaks out and its really disturbing . And also my left Shift Key is not working. I already had this problem before that’s why I followed this guide to get to clean the keyboard tag I thought it would work if I do that, but still same problem. ANY HELP PLEASE?! Thanks in Advance.
Daniel
Thanks for this, I was able to solve heating problems. Great tutorial.
Proxymity
This is awesome. Useful and detailed. After I disassembled my dv7-2055ew I learnt two things:
1. My keyboard has been installed on 1 screw instead of 4
2. Keyboard’s socket on main board wasn’t closed (as shown in step 12)
Chinese quality sucks…
Frannkg
I clean fan for my laptop. But I damaged black plastic lock for keyboard cable. See step 13. Can anybody tell me where I can buy this part? Or how to connect them correctly?
Bob
The cable connecting the palmrest/touchpad/top cover assembly (part #519268-001) to the motherboard in my Pavilion dv7-3173nr is cracked in half and must be replaced – most of the cables “under the hood” are in bad condition. HP cannot help me with a replacement cable. Do you know where I can get this cable ? (so that a 50 cent part is not compromising the performance of my machine). Thanks much.
Tom
I had a bunch of screws left over after reflowing my DV7-3057NR MOBO. Now I only have 3.
Great instructional. THANK-YOU!
Tnerp
David Soucie
thanx for this very good step by step disassembly of dv7-3000. the pictures assisted and i found my problem.
John
Would you know or photo of loavtion of bios chip?