
Today I show how to disassemble a HP Pavilion dm1 laptop.
I’m working on the following model:Â HP Pavilion dm1z-4000 CTO Entertainment Notebook PC.
My goal is replacing failed cooling fan which is mounted on the bottom side of the motherboard. It means I’ll have to remove most internal components in order to get access to the fan.
During the disassembly process I’ll go through the following major steps:
STEP 1-7: Removing the bottom cover. Accessing the hard drive, CMOS battery, memory slots.
STEP 8-18: Disconnecting and removing the keyboard.
STEP 19-32: Separating the base assembly from the display. Removing the top cover.
STEP 33-36: Removing the motherboard. Accessing the DC power jack.
STEP 37-38: Disconnecting and removing the cooling fan.
STEP 1.
Make sure the computer is turned off and remove the battery.
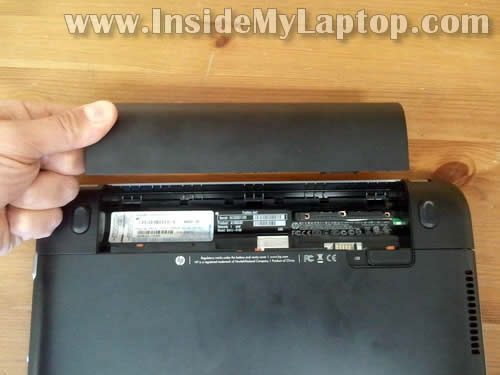
HP Pavilion dm1 has a bottom cover but no screws.
In the following three steps I explain how to remove the cover.
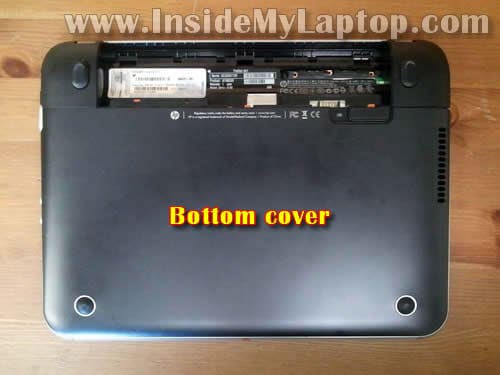
STEP 2.
Slide the battery locking latch to the UNLOCKED position.

STEP 3.
While holding the battery latch in the unlocked position slide the bottom cover to the shown direction.
I had to apply some force in order to slide the cover.

STEP 4.
Lift up and remove the bottom cover.
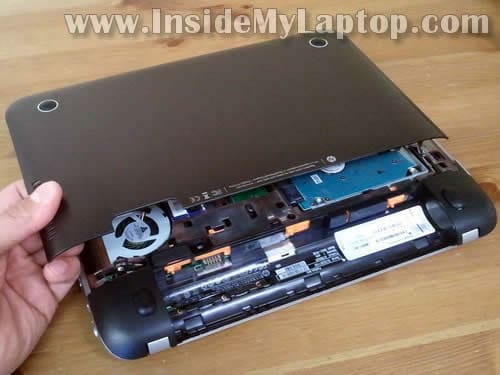
Under the bottom cover you’ll get access to the following components:
– hard drive
– wireless card
– CMOS battery
– memory modules
– cooling fan
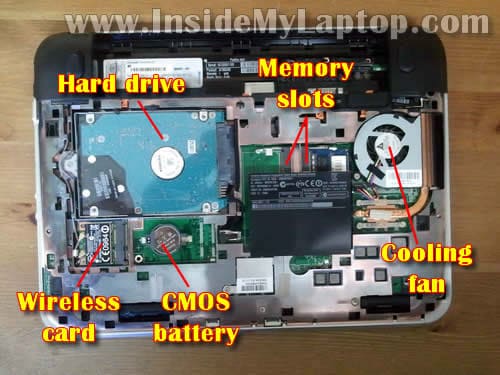
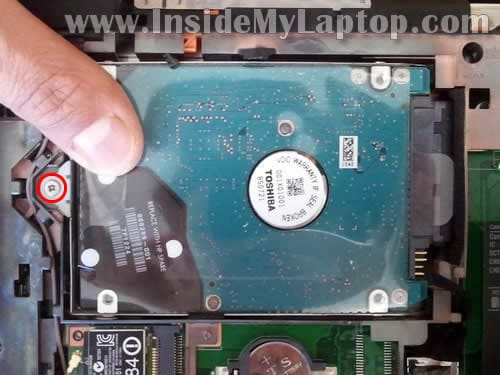
STEP 5.
Remove one screw securing the hard drive mounting bracket.
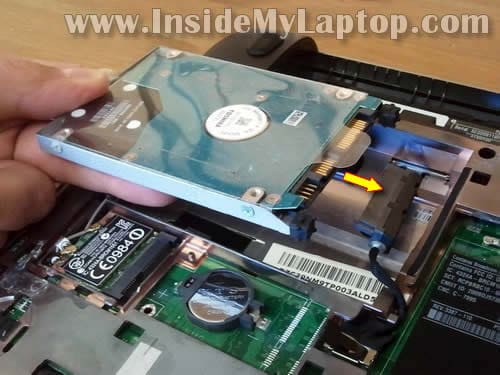
STEP 6.
Lift up the hard drive assembly.
Disconnect the hard drive cable from the hard drive.
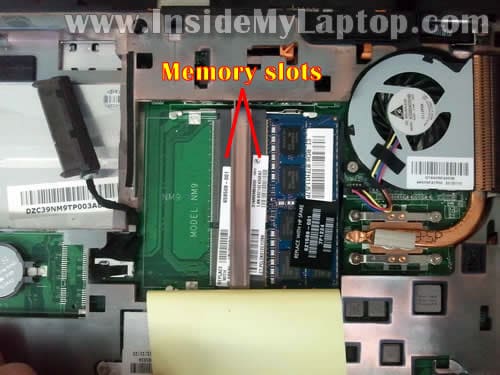
STEP 7.
Both memory modules located under the bottom cover.
My HP Pavilion dm1 had only one memory module installed.
It’s not necessary to disconnect the memory module for the purpose of my guide. I’ll leave it connected to the motherboard.
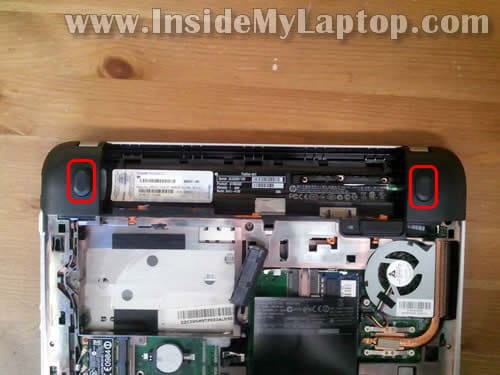
STEP 8.
Remove two rubber feet. You’ll have to lift them up with a sharp object.
Remove two screws found under those feet.
STEP 9.
Remove the left hinge cover.

STEP 10.
Remove the right hinge cover.

STEP 11.
Remove three screws securing the keyboard.
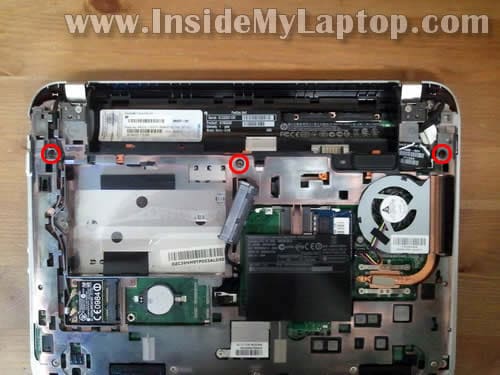
STEP 12.
There is an opening on the bottom through which you can see the keyboard. I’m pointing to it with the screwdriver.
Push on the keyboard with your finger.
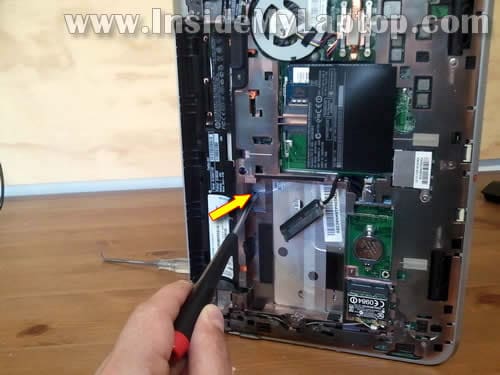
STEP 13.
When you push on the keyboard through the opening on the bottom, the keyboard should lift up a little bit.
It should be enough to insert your fingers under the keyboard as it shown on the following picture.

STEP 14.
Carefully lift up the top side of the keyboard until it separates from the top cover.

STEP 15.
Turn the keyboard upside down and place it on the palmrest.
Now you can access the keyboard cable connector.
In the following two steps I explain how to unlock keyboard connector and release the cable.

STEP 16.
Lift up the left side of the locking tab with the fingernail.
The locking tab will open up at a 90 degree angle.

STEP 17.
On this picture the same connector shown in the unlocked position.
Pull the keyboard cable from the connector.

STEP 18.
Now you can remove the keyboard.

STEP 19.
Disconnect hard drive cable from the motherboard and remove it.
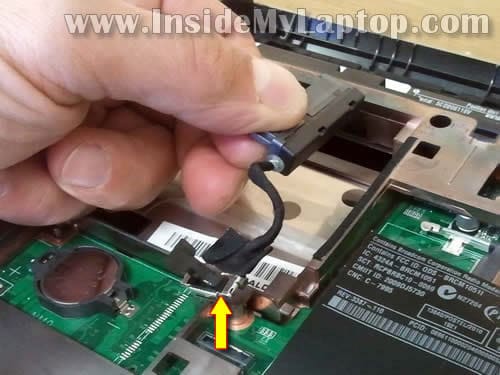
STEP 20.
Disconnect both antenna cables from the wireless card.

STEP 21.
Unroute both wireless antenna cables.

STEP 22.
Unplug the video cable connector from the motherboard.

STEP 23.
Remove two screws securing the display hinges.

STEP 24.
Lift up the base assembly and separate it from the display assembly.
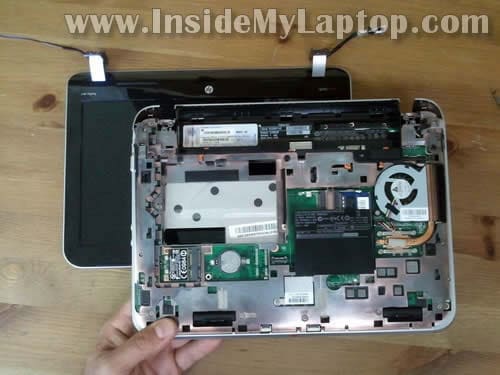
STEP 25.
Remove seven screws from the bottom.
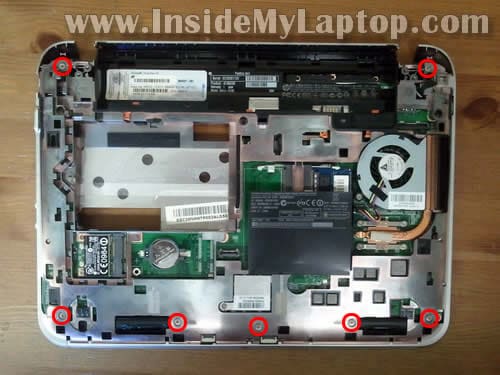
STEP 26.
Remove four screws from the top cover.
Disconnect the power button cable, touchpad cable and speaker cable.

STEP 27.
Unlock the power button cable connector and touchpad cable connector the same way as the keyboard connector.
Lift up the locking tab at a 90 degree angle.

STEP 28.
Pull the cable from the connector.

STEP 29.
The speaker cable has a regular male-female type of connector.
Unplug the speaker cable from the connector on the motherboard.

STEP 30.
Insert a piece of soft plastic (I’m using the guitar pick) between the top cover and laptop base and separate them from each other.

STEP 31.
Continue separating the cop cover assembly from the base.

STEP 32.
Top cover assembly removed.

Here’s the bottom side of the top cover assembly.
Here you can access the following components:
– power button board
– speakers
– touchpad
– touchpad button board

Now we’ll continue with removing the motherboard.

STEP 33.
It’s necessary to remove the wireless card in order to remove the motherboard.
Remove one screw securing the wireless card.
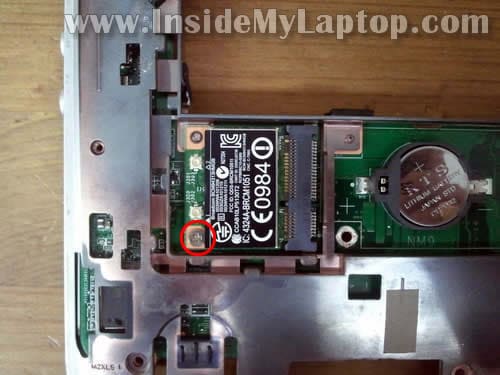
STEP 34.
Pull the wireless card from the slot and remove it.

STEP 35.
Start removing the motherboard from the left side.

STEP 36.
The motherboard removed.

Here’s the bottom side of the motherboard.
The DC power jack is not soldered to the motherboard. The DC power jack has a cable which is plugged into the motherboard.
If the DC jack failed, simply unplug it from the motherboard and replace with a new one.

STEP 37.
Remove two screws securing the cooling fan.
Disconnect fan cable from the motherboard.

STEP 38.
Lift up and remove the cooling fan.

Mike Herzog
DO you do repairs? Are you near Somerville NJ?
Matt Ridgway
Thank you for this, I have a different model of the dm1 but this guide helped me repair mine quite a bit none the less!!! you were very helpful keep up the good work.
Evren Yurtesen
It would have been helpful to see how to disassemble the lcd display also…
IML Tech
@ Evren Yurtesen,
What is your laptop model number? Probably you can find LCD removal instructions in the service manual.
Give me the full model number and I’ll try to find the manual for you.
paypwip
just what I was looking for, Thank You.
sp0rk
can i tighten the hinges this way because my hinge on the side of the power cord input is loose and im not quite sure on how to fix it
IML Tech
@ sp0rk,
Try tightening screws located under those covers shown in steps 9 and 10.
sp0rk
So do i have to remove the bottem cover to to get to the hinge area or can i remove the legs and the cover to tighen them in other words can i get to the hinge without removing the back cover and how would i put the legs back on if i did do this
Sheila
My problem now is that no matter what I do I can not get the bottom cover to slice back on! I have tried to do it with the battery lock on the unlock posisiton, in the lock position and half way inibetween but the cover just will not slide in to place! Any ideas?
Dave
Can you confirm how to tighten the hinges?
Mine are really loose.
This is the second time it has happened.
The first time it happened the screen surround snapped and came away but was covered by warranty,
prachir
how can i install additional ram…
Kindly post screenshot or guide me for that…
It ll b a great help
john c
Hi,
What a fantastic website. I am very handy and confident with making/assembly. I wondered if you might tell me how feasible it is to replace a faulty(dead) Audio controller on my HP Pavilion dm1-4108AU
I presume I will need to carefully remove (unsolder) the exisiting, obtain a new one, and install.
Having not as yet opened my computer, I also do not know where the audio contoller is located on the board.
I hope you can reply.
If this is beyond the scope of you help, any direction to other resources would be most appreciated.
Many thanks in advance.
IML Tech
@ john c,
The audio controller built into the motherboard. You cannot replace it at home.
I guess you can use one of those external USB audio adapter. You plug it into the USB port and use with external speakers or headphones.
Fred
Very helpful, thanks for all this
John
Thanks for showing this laptop disassembled. I managed to kill my daughters laptop when taking it off her it hit the wooden floor flat. The HDD needs replacing it has the click of death, my main concern is that the laptop won’t boot the CPU fan starts and the screen shows a grey scale of line about an inch and a half thick for each shade of grey, with the keyboards wifi and volume mute lights stuck one and not responding.
Battery is charging okay.
Could this be a loose cable / s to the video etc, or a broken board, any help is appreciated.
IML Tech
@ John,
First, I would try reconnecting both memory modules just to make sure it’s not memory related issue.
Also, test the laptop with an external monitor. Can you get video externally?
John
Hi IML Tech
Re
–First, I would try reconnecting both memory modules just to make sure it’s not memory related issue.
–Also, test the laptop with an external monitor. Can you get video externally?
I tried removing the memory no luck.
As for video I need to find a vga cable I’ll check at work, my main PC’s monitor is DVI and I had no luck with connecting to the TV through the the HDMI, though im not sure the laptop can boot from HDMI.
Thanks for your help.
IML Tech
@ John,
Try disconnecting the video cable from the motherboard and start with the HDMI cable after that (the video cable connector shown in the step 22). It’s possible the laptop cannot switch to the external video because it detect the internal screen.
John
Hi IML Tech,
Sorry for the delay, I came down with Pneumonia, anyway I have removed the monitor cable and put it back no difference, also I can’t see any obious damage. I removed the keyboard and check a few connectors I managed to get a muilticoulred line affect on the screen with the laptop beeping. Removing the RAM stops anything being displayed on the screen.
What do you think dismantle to the level you have and put the laptop back together, looking to issues as I go ?.
Wajahat Khan
What can I say other than thank you so much for sharing this with the world. Absolute life saver.
Marcus
I have the screen ……boot device not found.
Please install an operating system.
Tried to scan hard drive and says there is nothing.
Can’t get into bios.
Help please?
Steve
Hi
thank you for the perfect disassemble instructions
I shall be very grateful if you are able to give advise on the following-
The Pavilion dm1 -4300sr was completely dead on the LCD while the VGA output was working 100% / now with the LCD replacement the screen has a display but the backlight is not working.
What can be the reason ? Can it be the power feed on the m/b – the notebook was dropped by accident and that could either damaged the cable from the m/b to the screen or the feeding tracks/ circuits on the m/b ?
Many thanks in advance
IML Tech
@ Steve,
It’s hard to tell without testing the laptop with another screen or cable but this can be one of the following:
1. Bad connection between the cable and motherboard. It’s possible that reconnecting the cable will fix the issue.
2. New LCD screen is defective. Not likely but definitely possible.
3. Video cable failed.
4. Motherboard related issue.
Tom
Is cpu soldered to the motherboard?
Thx.
IML Tech
@ Tom,
Yes, the CPU is soldered. Cannot be removed and replaced.
T.J.
Thanks! This article help me fix my daughters laptop! Her pink screen turned out to be just a loose video cable.
rannel
thank you!
it really helps.
Dave
How to tighten my hinges they have worked loose?
Selina
What a well made article! About what level of these steps do I want to get to if I just want to go in and clean some dustbunnies?
IML Tech
@ Selina,
Steps 1-4 should be enough. When you remove the bottom cover, you can access the cooling fan and heat sink. Blow off dust using an air compressor or canned air. You don’t need to disassemble it any further.
Cristi
Thank you, I follow your instruction and my netbook is now dust free now! All the best from Romania !
JoseC
Thanks for the article, it was really helpful. My issue I believe is the same as the person who was asking about the loose hinges. The 2 small screws on each hinge screw into a built in nut in the laptop’s plastic case and after years of opening and closing, the plastic finally gave up and broke which left the hinge on 1 side not attached to anything. It seems as if the hinge is loose, but it is actually the hinge not attached to the laptop body anymore. Have you experienced this and have a fix?
IML Tech
@ JoseC,
I’ve seen a problem like that before on different HP models. The only solution will be replacing the laptop case. Otherwise you cannot security attach hinges to anything.
dostum
Hi there:
I’ve tried to factory reset. but still did not get sound on this laptop.
What should I do? should I check speaker or motherboard? is that possible to fix sound card or have to replace whole board? thank you.
teresa
Thank you for the disassembly instruction for hp pavilion dm1 4013nr notebook. Very helpful.
Kerrianne Fensome
hi there,can you provide with the part number for the copper base the motherboard is attached too please? My hinge screws have threaded so I need to replace the bottom cover the motherboard is attached to. I’ve searched high and low. Your help would be greatly appreciated thank you
Kerrianne Fensome
Sorry I have dm1-4027sa cheers.
Juan Valdez
how to disassemble the screen, I need replace all the cover because is broken
Dan Kelly
I can’t tell you how grateful I am for this guide. I’ve had the dm1z-4000 since 2012 and I absolutely love it. I reinstalled the OS immediately after I got it and configured it exactly to my liking. I love the size of it (my only complaint is that it’s a little heavy for its size).
Unfortunately, a while back I accidentally dropped it while traveling and the display assembly cracked. I was able to make a go of it for a while, but eventually had to remove the entire display assembly, at which point I was only able to run it at home with an HDMI-connected monitor.
I was able to find a complete display assembly replacement on eBay and I bought it, but I was having trouble figuring out how to replace it. I can do OS and software-related stuff, and I’ve replaced memory and done some other hardware maintenance on computers, but never a display assembly. Even HP’s own maintenance guide was no help.
Thankfully, I found your site and this guide. I followed your steps to the point of removing the display assembly and in a short time I had the replacement assembly in and my dm1Z-4000 was back to being a laptop again.
I plan to keep this computer as long as I can, hopefully at least until 2020 when Microsoft will no longer be supporting Windows 7. I don’t need the latest and greatest when it comes to computers (or anything in life for that matter) and, as I said, I absolutely love this little machine. And thanks to you, I’ll have it for at least a while longer.
I’ll be giving a donation right now…