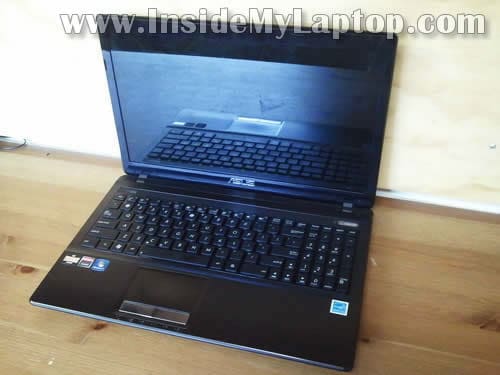
In this guide I explain how to diassemble an Asus K53U.
I’ll go though the following major laptop disassembly steps:
STEP 1-4: Accessing and removing the memory modules, hard drive, DVD drive and wireless card.
STEP 5-11: Disconnecting and removing the keyboard.
STEP 12-16: Removing the palmrest assembly. Accessing the CMOS battery.
STEP 17-21: Disconnecting and removing the motherboard.
STEP 22-24: Accessing and removing the cooling fan and DC power jack harness.
By the way, in the second guide I’ll explain how to remove and replace Asus K53U screen.
OK. Let’s take it apart. Make sure the computer is turned off before you start.
STEP 1.
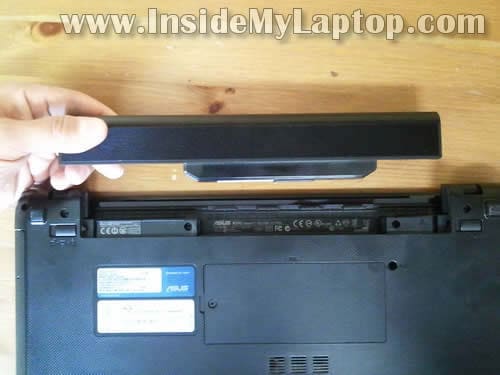
Unlock and remove the battery.
STEP 2.
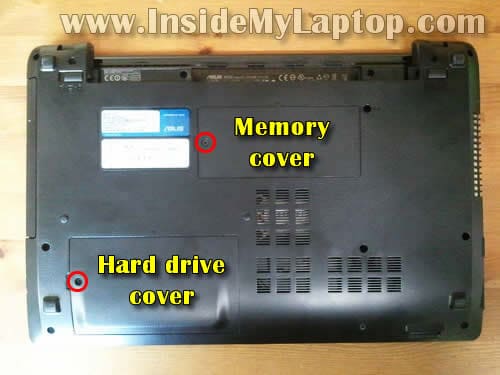
Remove two screws securing the hard drive and memory covers on the bottom.
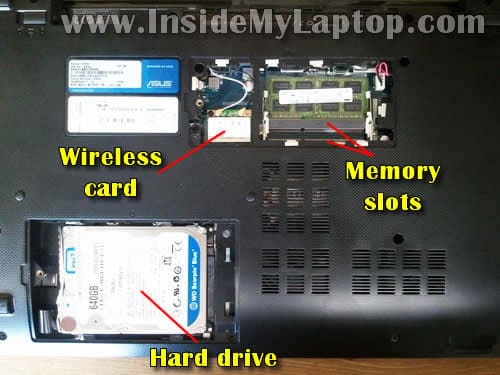
Under those covers you can get access to the hard drive, wireless card and two memory slots.
In my Asus K53U I found only one memory module installed.
This laptop can handle up to 8GB (2x4GB) DDR3-12800 SODIMM memory modules.
I’ll leave the wireless card and memory module connected to the motherboard.
STEP 3.
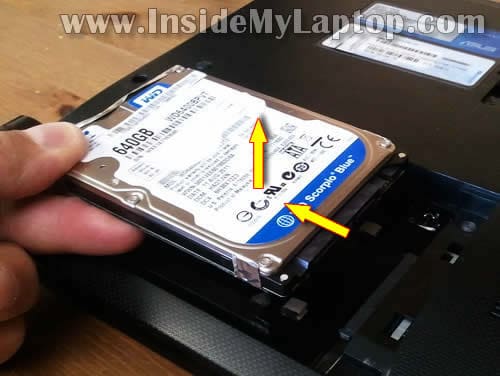
Slide the hard drive to the left to disconnect it from the motherboard.
Lift up and remove the hard drive.
Asus K53U has a regular 2.5″ SATA hard drive installed.
I recommend upgrading this regular (slow) hard drive to a 2.5″ SATA solid state drive. Installing a solid state drive will speed up your laptop significantly.
STEP 4.
Remove one screw securing the optical DVD drive.
Slide DVD drive to the left and remove it.

STEP 5.
Remove two screws securing the keyboard on the bottom.

STEP 6.
There are three spring loaded latches securing the keyboard on the top.
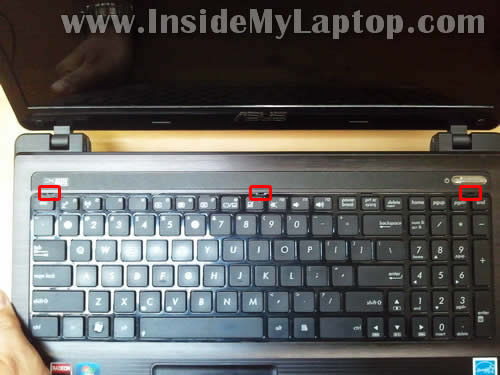
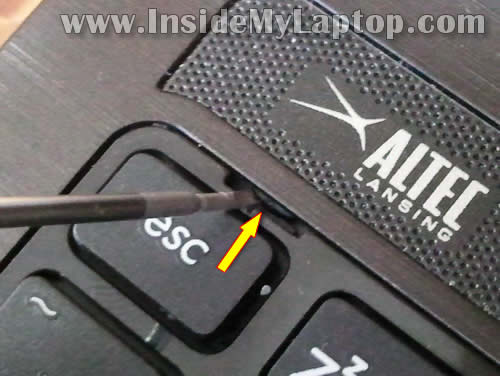
Push on the latch with a small screwdriver.
When the latch pushed in, the keyboard will lift up a little bit and the latch will not move back into the locked position.
Unlock all three latches.
STEP 7.
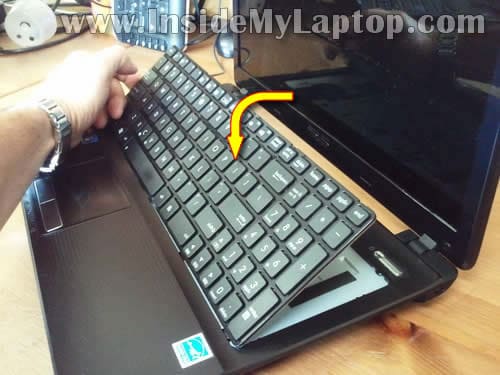
Now you should be able to lift up the upper side of the keyboard and turn it upside down on the palmrest.
STEPÂ 8.
The keyboard connector has to be unlocked in order to release the cable.
In the following two steps I show how to unlock the connector and remove the cable.
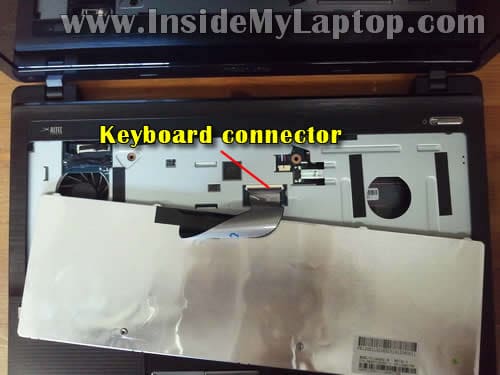
STEP 9.
Carefully lift up the left side of the connector retainer with your fingernail.
The retainer will open up at a 90 degree angle.
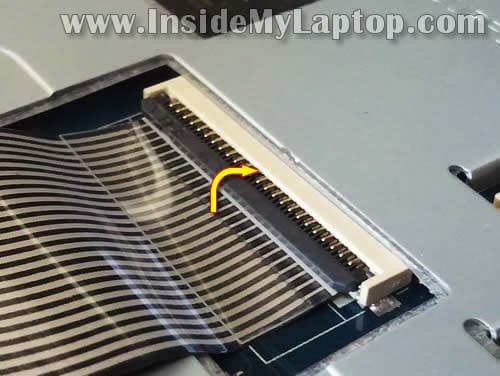
STEP 10.
Now you can pull the cable from the connector.

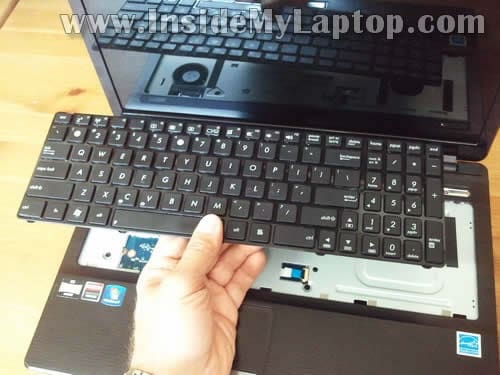
STEP 11.
Remove the keyboard.
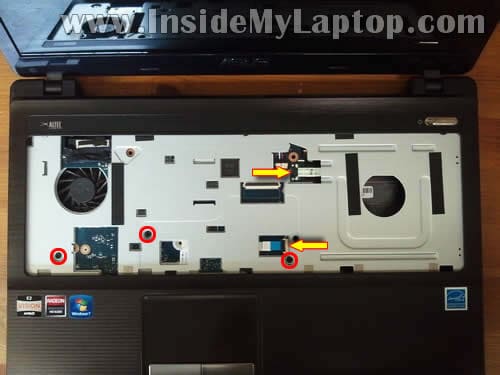
STEP 12.
Remove all marked screws from the bottom.

STEP 13.
Remove three screws securing the palmrest assembly.
Disconnect the power button board cable (upper arrow) and touchpad cable (lower arrow) from the motherboard.
You’ll have to unlock the touchpad cable connector same way you unlocked the keyboard connector in steps 9-10.
Here’s how to unlock the power board cable connector and remove the cable.
Carefully slide the white cable retainer to the right about 1-2mm. Do not apply to much force! The retainer must remain attached to the connector base.
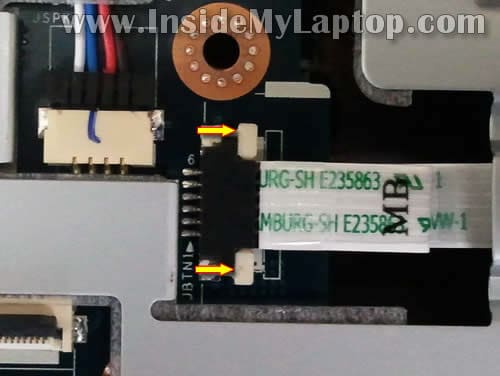
On the following picture the connector shown in the UNLOCKED position. As you see, the retainer still attached to the connector.
Now you can pull the cable from the connector.

STEP 14.
Start separating the palmrest assembly from the bottom cover.
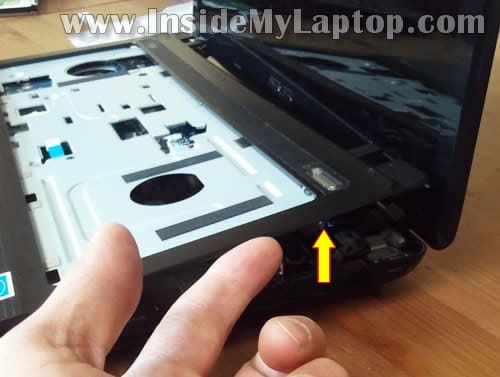
STEP 15.
Remove the palmrest assembly.
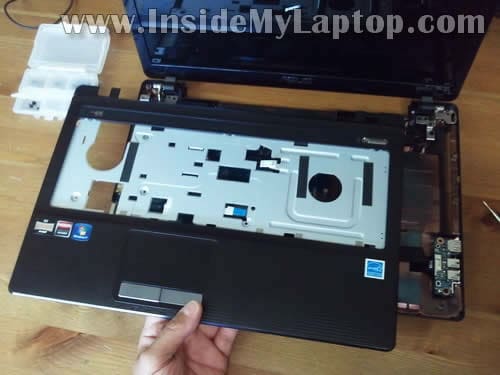
On the bottom part of the palmrest assembly you can access the power button board and touchpad.
NOTE: the left and right buttons are not part of the touchpad. In Asus K53U both touchpad buttons soldered to the motherboard (you can see them on the next picture).

STEP 16.
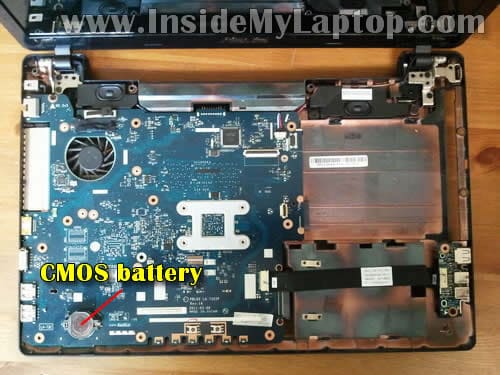
When the palmrest assembly removed you can access the CMOS battery.
It’s a regular coin battery which can be easily removed and replaced.
DISCONNECTING AND REMOVING THE MOTHERBOARD.
In order to remove the motherboard it’s necessary to disconnect the power jack cable and wireless antenna cables first.
STEP 17.
Unplug the power jack cable. This connector located on the bottom close to the memory module.

STEP 18.
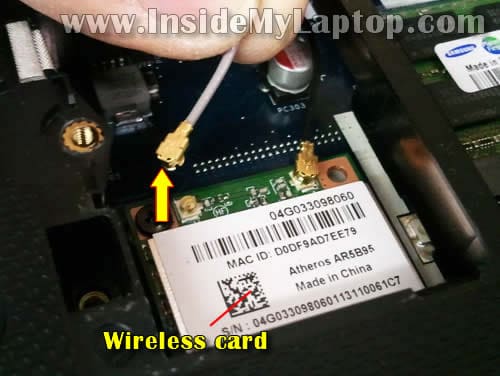
Disconnect both antenna cables from the wireless card.
STEP 19.
Remove one screw securing the motherboard.
Disconnect the video cable, speaker cable and USB board cable from the motherboard.
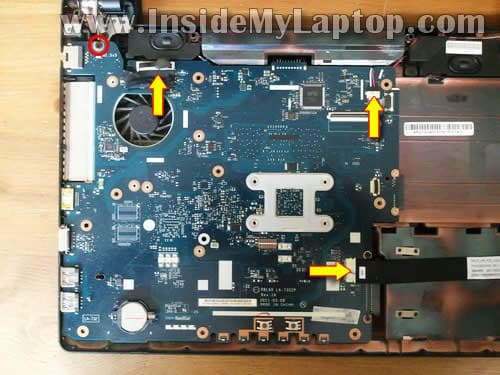
The speaker cable has a regular male-female connector. Unplug the speaker cable from the motherboard.

Unplug the USB board cable from the motherboard.
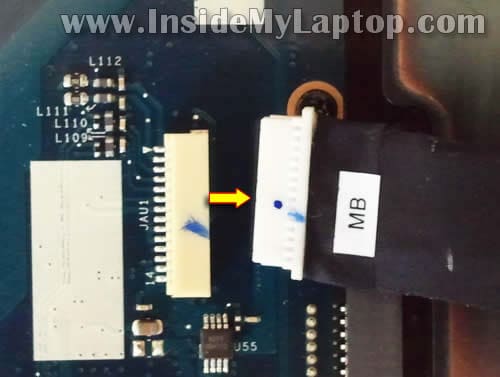
Lift up the video cable connector by the black belt on the top and disconnect it from the motherboard.

STEP 20.
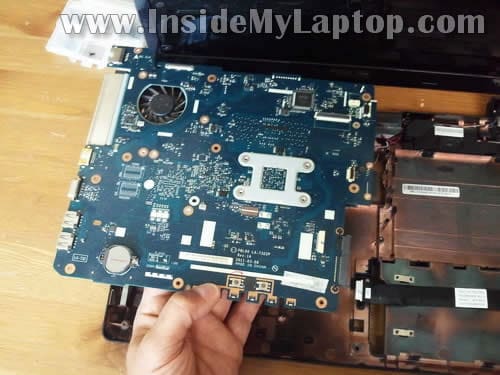
Start removing the motherboard from the bottom cover as it shown on the following picture.

STEP 21.
Remove the motherboard.
STEP 22.
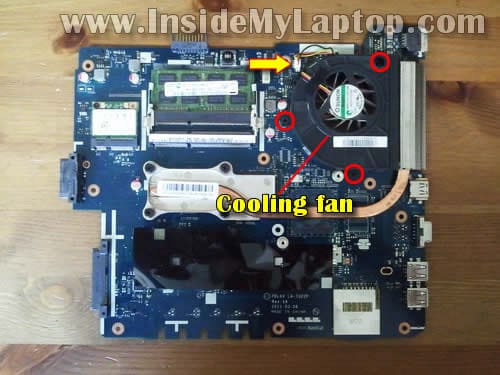
The cooling fan is mounted on the bottom part of the motherboard.
Yes, it’s necessary to remove the whole motherboard in order to access and replace or clean up the cooling fan.
Disconnect three screws securing the fan to the motherboard.
Unplug the fan cable.
STEP 23.
Lift up and remove the cooling fan.

STEP 24.
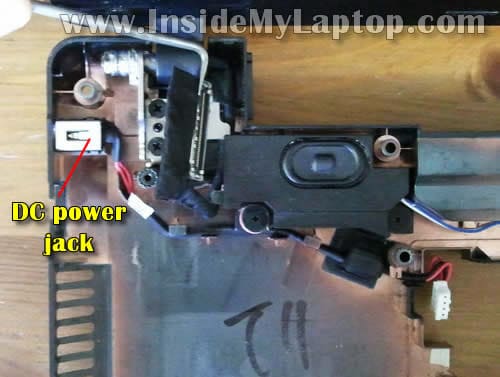
The DC power jack harness mounted in the upper left corner of the base assembly.
After the motherboard removed, the DC jack harness can be easily accessed and removed.
Phil Ozell
FYI – the touch-pad cable connector in step #13 also has a 90 degree swiveling latch that should be ‘flipped’ up before disengaging the cable, and conversely, flipped ‘down’ upon reassembly. I found this out quite by accident during reassembly, but the cable would not have gone back without the latch in the open position!
Otherwise this was a HUGE help in fixing our laptop which was not connecting to the power supply because the plug receiver had been pushed back too far into the case, and would not connect. The repair I made was simple, I did NOT wish to glue the socket into the case out of concern that if it was still ‘broken’, I’d have to replace it…which would be impossible if it was glued in. So, I cut a small block of wood: 0.3″ x 0.8″ x 0.8″ to uses as a brace between the rear of the connector and the metal hinge, and reassembled everything, and it works just fine! Thanks for the guide, donation made!
IML Tech
@ Phil Ozell,
This is correct. I didn’t mention how to unlock the touchpad connector because it’s same type as the keyboard connector.
Well… I just added it to the guide so there is no confusion.
Thank you very much!
dave horrocks
hi i have same problem as phil ozell, DC power jack pushed back into case, my question is do i have totally dismantle the laptop to repair this or can i leave some part in place, thank you.
Nenad
Can you help me to find the motherboard for this model ASUS K53U-SX191 AMD Dual-Core E450.
Thanks!
Handsome Dan
Seems this power jack issue is a common one, that’s what I have just fixed on my girlfriend’s laptop, with some cardboard from a pizza box…
In answer to Dave Horrocks’ question, you only need to go as far as step 15 to access the DC jack.
Also of note: the keyboard on my girlfriend’s laptop had 5 latches rather than 3 and was stuck down at the right hand side, it required a bit of force to remove.
Thank you very much for your expert instructions, I have made a donation, I can’t spare much but I guess every little bit helps…
kadlubek
hello
Does anybody know how to dissasamble ASUS B50A ?
I`m stuck on removing palmrest assembly ( upper cover ) ?
I need to check out my stereo jack and speakers…
thanks in advance
nastdude
hello awesome guides here. Just wondering is there a guide for a asus k53s ?.
it should be pretty similar to this no??.
Thanks heaps
Nathan
Joe
I have a A53U-ES21, and I’m about to open up the laptop to fix the power jack. In step 12’s image, I don’t see the top most screws by the screen hinge. Is it under the hinge? Is the hinge covering a screw because even in the image I don’t see where a screw could be and I definitely can’t see it on this model.
marko
thanks bro it help me a lot !!! i have asus k53u – cpu c50 2gb 6250 gpu hdd 320 !!!
Nik
Thank you for this guide. Can you answer: K53SD disassembling like K53U?
IML Tech
@ Nik,
Cannot tell for sure. It’s a different model but disassembly steps could be very similar.
martin
Hi there!
is there somehow i can change my laptop grafic card in this K53U-SX082V and i also want Another cpu, its to Little with 1Ghz
i need some help here
IML Tech
@ martin,
You cannot replace the graphics card or CPU. Both built-in into the motherboard.
Paul
Hi. Thanks for tutorial, was really helpful.
After I’ve changed bottom of the case, my touchpad wont work, small black connector fell off, so I thought its because of that, but than my touchpad buttons is not working, and they’re not connected to the actual touchpad.
Does anyone have an idea what might be a problem ?
Shawn
Hi. Thanks for this helpful tutorial.
I am replacing my palmrest and bottom cover since they both are broken where the hinges attach. How do I safely remove the touchpad circuit board from the palmrest without damaging it? It appears to be attached with a very strong adhesive.
IML Tech
@ Shawn,
You can try heating it up with a hairdryer or heat gun. It should soften up the adhesive and make it easier to remove. Be careful not to melt the plastic.
Brad
How does one remove the touchpad board when replacing the palmrest/cover
IML Tech
@ Brad,
I believe the touchpad is glued to the palmrest cover. You can try heating it up with a hair dryer. It will soften up the adhesive tape and make easier to separate the touchpad from the old palmrest cover.
Brad
The heat worked fine but will use as a spare. Knowing the person who owns this PC, it was better to spend $12.00 and get a new one.
Rhian
Hi! I have just used this guide to install a new DC! Was quoted nearly 200 pounds my a laptop repair company because apparently the motherboard was going to be damaged! Ha ha ANYWAY…. I’m thinking of upgrading the ram from 2gb so I can play Minecraft on it… Any tips?? Have no idea where to get the ram from.
IML Tech
@ Rhian,
You will need DDR3-10600 RAM. You can buy it online.
I believe this model (Asus K53U) can handle up to 8GB of RAM total (4GB RAM module per slot).
gyu
@Brad:
Will the touchpad adhese to the new palmrest after it cools down? Or how to fasten the circuit board into the palmrest? Was the new touch circuit pre adhesive or you have to use some type of glue? Thanks
Gilbert59
I need to replace the hinges on my asus k73 (looks the same as k53 but has 17 inch screen)
I have dismantled the cover, but it looks like I need to get into the base to replace the hinge – does anyone know if this is a total dismantle job or is the hinge base easy to access?
Thanks
Marc
Just a question: in order to disassemble the palmrest is it necessary to also keep unscrewed the screws that hold down the HDD and RAM slots lids, or can I screw the lids back shut once I am done with unscrewing those screws hidden inside of the slots (as indicated in steps 5 and 12)?
IML Tech
@ Marc,
You can screw the lids back shut once both hidden screws removed.