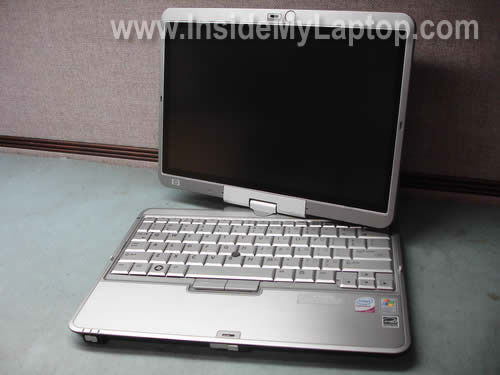
Today I will take apart an HP Compaq 2710p Tablet PC. I will explain how to access both memory modules, remove the hard drive and replace the keyboard.
RAM, HDD and some other components can be accessed from the door on the bottom of the notebook.
Turn it off and remove the battery before you start taking it apart.
Remove six screws securing the cover and remove the cover.
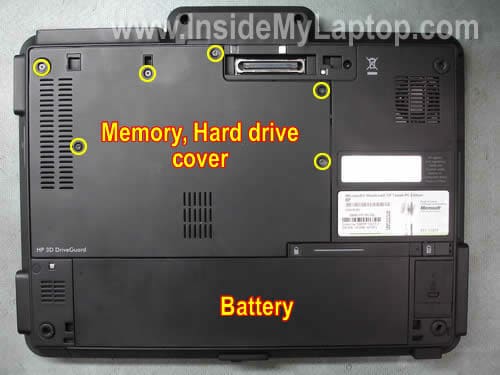
Under the cover you’ll find both memory modules, hard drive, WLAN (wireless LAN) module and WWAN (Wireless Wide Area Network) module.
In order to remove WLAN and WWAN modules, you’ll have to disconnect antenna cables from each card, remove two screws securing each card and pull each card from its slot. Each antenna cable has a lable with the connector number. All connectors on the cards are marked too, so there shouldn’t be any confusion where each antenna cable connects.
In order to remove the memory (RAM) module, simply spread latches on both sides of the slot until the memory module pops up at a 20-30 degree angle. After that you can pull the memory module from the slot by the edges.
HP Compaq 2710p Tablet PC can take up to 4GB RAM total. You can install up to 2GB RAM module into each slot
Use PC2-5300 DDR2 667MHz or faster RAM.
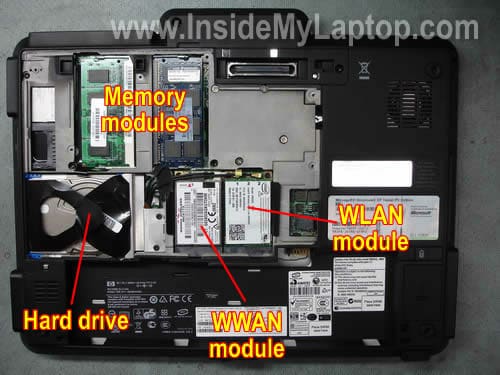
Here’s how you can remove the hard drive.
Remove two screws securing the metal plate covering the connector. Lift up and remove the plate.

1. Disconnect the HDD cable from the connector on the motherboard.
2. Slide the HDD assembly to the right (towards the WLAN and WWAN modules).
3. Lift up the hard drive from the notebook.
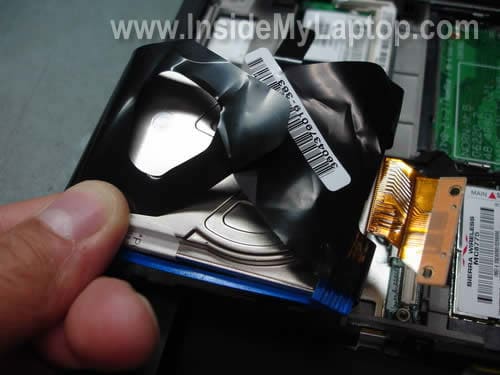
Remove it from the rubber shock protector.
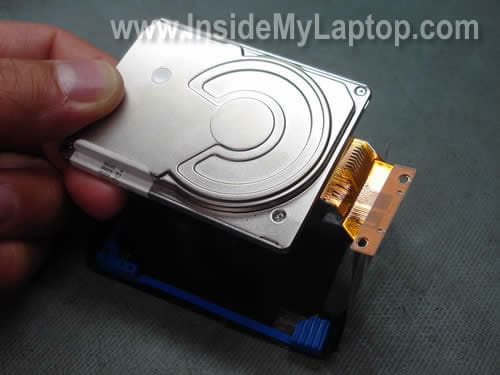
Remove sticky tape securing the cable.
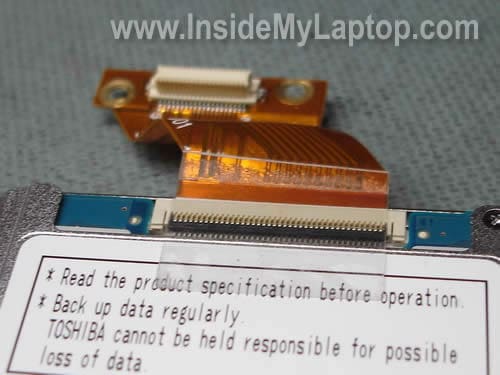
Very carefully unlock the connector and pull the cable from the hard drive.
The locking clip opens up at a 90 degree angle as it shown on the picture below. Be very careful with the connector.

Now you can replace the hard drive with a new one if necessary.
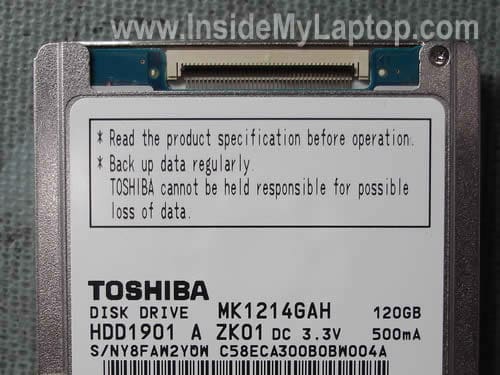
HP Compaq 2710p uses a smaller 1.8″ Toshiba MK1214GAH drive (same drive found in some iPods).
Now we’ll go through the keyboard removal steps.
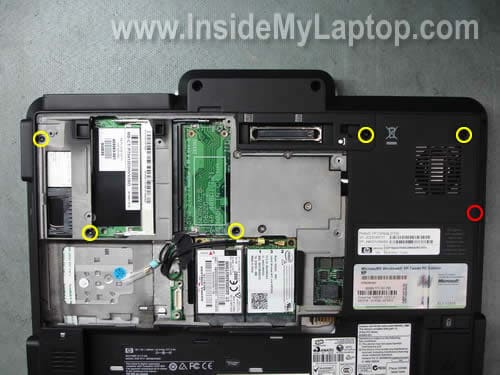
Remove six screws securing the keyboard. One of the screws I marked in red because it’s hidden under the rubber screw seal.
You can remove the screw seal with a sharp object.

Insert a small flat head screwdriver between the keyboard and notebook base and lift it up as shown on the picture below.

You’ll find a few small plastic latches securing the keyboard on the top and both sides. Here’s one of them above the F11 key.
Carefully lift up the keyboard and force it through the latches.

When the keyboard is released, you can access connectors underneath.
There are two cables connected to the motherboard.
On the picture below I marked the pointing stick cable, you’ll have to disconnect this one first.

1. Unlock the connector by moving the white clip to the direction shown by two arrows. You have to move the clip about 1-2 millimeters, not more. The clip must stay attached to the connector base.
2. Pull the cable from the connector.

Turn the keyboard upside down and place it on the palm rest.
Now you can access the second cable.

Again, before you can pull the cable you have to unlock the connector.
On the picture below the connector is shown in locked position. Open the locking clip with your fingernail. The clip opens at a 90 degree angle.

On the next picture the connector is shown in the unlocked position.
Now the cable is released and you can pull it from the connector.

Finally, you can remove the keyboard and replace it with a new one if necessary.

Leon
Thanks! You instructions are better and more clean than I found on HP site.
Jack Battaglia
Hello, I have a Compaq Presario 500. The sliding latch that removes the battery broke off at the sonic weld joint. I tried to actuate the slide manually, but do not want to force it. I need to remove the battery to upgrade the memory. I would like to remove the back of the case , thus releasing the battery , I hope.
Can you provide some tips on removing the back and dislodging the slide latch. I am somewhat familiar with electronic hardware and have access to anti-static wrist band etc.
Thanks for any help.
Jack B
IML Tech
Jack Battaglia,
Did you mean Presario F500?
I believe in get access to the latch you’ll have to remove the motherboard.
Take a look at this guide for Compaq Presario F700, I think it’s similar to Presario F500.
If not, you’ll find help in the service manual. It has disassembly instructions.
balaji
This site is very well.I like this site please insert more futures
e.m.fields
Replacing hard drive on HP without the Disk Bay:
Hey! Could you help me figure out how to connect an internal 2.5″ 44-pin ATA drive in an HP that hast lost its disk bay? There is not a connector to connect this new hard drive to the pins – what do I need?
This is on a Compaq/HP model nc6120, attaching an internet 2.5″ 44-pin ATA drive.
If you could help, I would be quite appreciative, as there seem to be no answers out there to what seems like a basic question: How to connect hard drive without an adaptor? I am sure this is a problem that would be useful to other people.
Thanks!
flyriderg
I love the way you doid this, I just still could not figure out how to unlock the connector and pull the cable from the hard drive.
The locking clip opens up at a 90 degree angle , But I must say this is still great and I will be making a donation.
mark
how would i replace the screen?
Harvey
Mark, you should take a long hard look at the service manual.
Its very easy to remove the screen, but it requires a small Phillips screw driver and a plastic pry-bar (or old credit card).
Wedge the pry-bar / credit card in between the left & right sides. Careful, on the the top-right, when you unlatch the wireless (wifi) antenna, inside, there are 2 screws holding the faceplate together. After removing the faceplate, there are numerous screws you need to remove. But, its very visible and easy to do.
Be very, very careful when removing the plastic faceplate, the pieces holding it in place can easily break off. Take some time and be gentle.
I’m in the process of adding a webcam to my HP Compaq 2710P. (just waiting on the long overseas delivery of my upgrades…)
Mayur
Thanks so much for putting up this info. Especially the hard drive information. Was about to buy a 2.5 off Ebay but your info helped. Also, the service manual link in the last comment was useful to confirm the type of drive needed.
dahutchss3
hey thanks for your work awesome tutorial on this little machine i love it just installed windows 8 and new hard drive thanks again
eligsuli
Is it possible to upgrade the processor on the HP Compaq?
IML Tech
@ eligsuli,
It depends on the model of your laptop but in most laptops the processor soldered to the motherboard and cannot be replaced or upgraded.
Carl
Hello,
Wondering if you can help me with my HP2710p. I have a noisy cooling fan which may need to be cleaned. I have followed your tutorial so can remove the lid and can see the fan, but unable to lift it off. Can you assist with how to get it out of the Laptop so I can clean it. Many thanks.
GVS
Hey can I change Hp Compaq 2710q’s RAM…I mean to say to a higher version…
Gen
Hello,
Is it possible that my hp compaq 2710p hard drive dies?
I have this computer and believe me that has helped me to basic things like write, but recently I turn off and now each that turn my it screen goes black and says “disk error”
What does mean? do I have to replace the HDD?