
Today I will dismantle a Dell XPS 15z.
According to Dell website XPS 15z model also has another name XPS L511z.
My goal is replacing the keyboard. This model allows you to replace the keyboard only after you disassemble the entire laptop.
Here’s a short description of all major steps I’ll be going through:
STEP 1-5: Removing the bottom cover. Accessing both memory modules.
STEP 6-10: Disconnecting and removing the battery and hard drive.
STEP 11-15: Disconnecting and removing the CMOS battery, DVD drive and DC power jack.
STEP 16-21: Disconnecting and removing the cooling fan, heatsink, power button board and wireless card.
STEP 22-26: Removing the motherboard.
STEP 27-30: Removing and replacing the keyboard.
STEP 30-33: Disconnecting and removing touchpad assembly.
STEP 1.
Remove all screws securing the bottom cover.

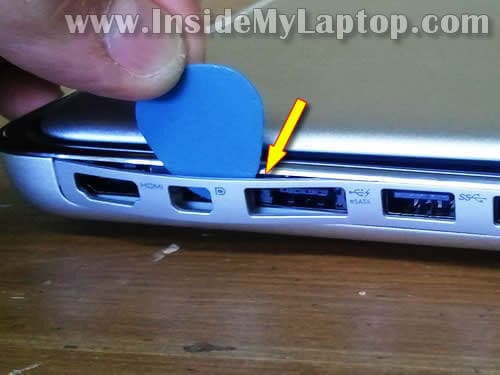
STEP 2.
Insert a piece of soft plastic (I’m using the guitar pick) between the expansion ports cover and bottom case and pry it out.
STEP 3.
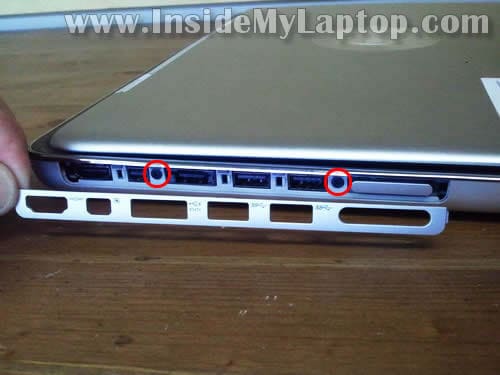
Remove the expansion ports cover.
Remove two screws located under the cover.
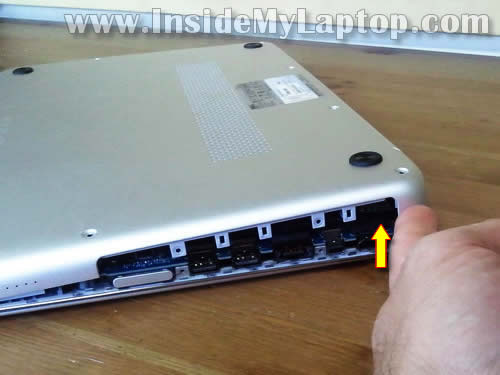
STEP 4.
Now you can start separating the bottom cover.
STEP 5.
Remove the bottom cover.
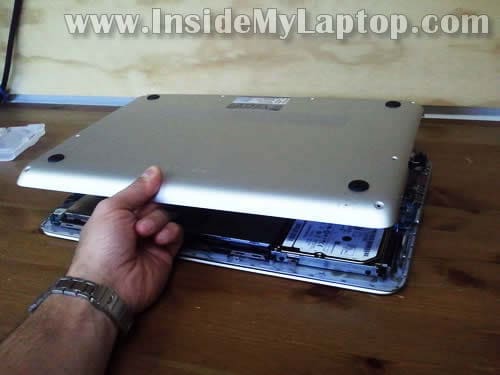
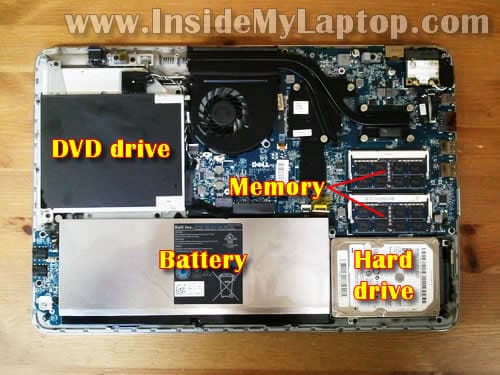
When the bottom cover removed you can get access to the following key internal components:
– main laptop battery
– hard drive
– optical DVD drive
– both memory modules
also the DC power jack, CMOS battery, cooling fan and wireless card.
Let’s remove all above mentioned components one by one.
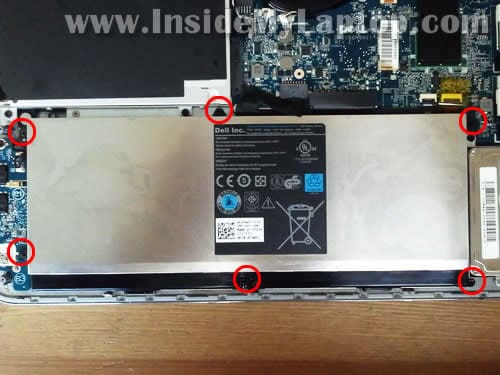
STEP 6.
Remove six screws securing the battery.
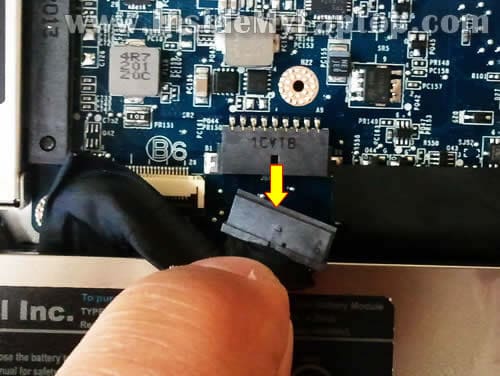
STEP 7.
Disconnect the battery cable.
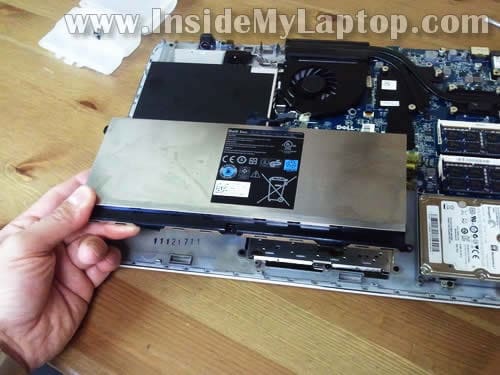
STEP 8.
Lift up and remove the battery.
STEP 9.
Remove four screw securing the hard drive mounting bracket to the case.

STEP 10.
Lift up the hard drive assembly and disconnect it from the cable.
My Dell XPS 15z laptop had a regular 2.5″ SATA hard drive installed.

STEP 11.
Disconnect the CMOS battery cable.
Remove the CMOS battery.
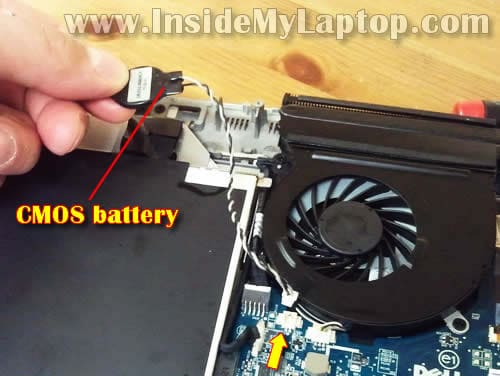
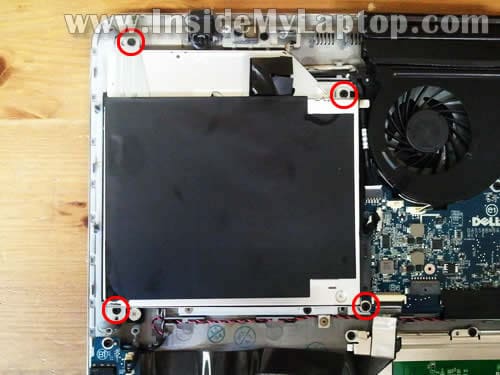
STEP 12.
Remove four screws securing the optical DVD drive.
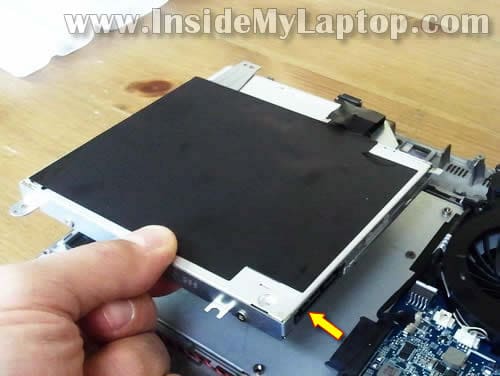
STEP 13.
Disconnect the DVD drive from the motherboard and remove it.
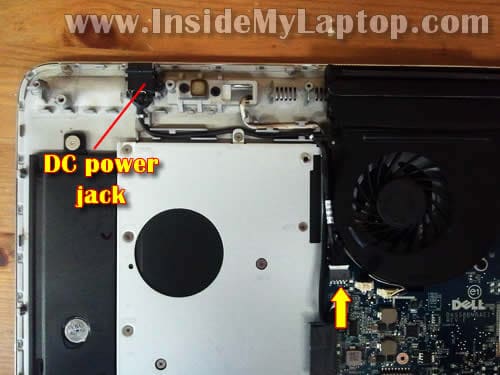
STEP 14.
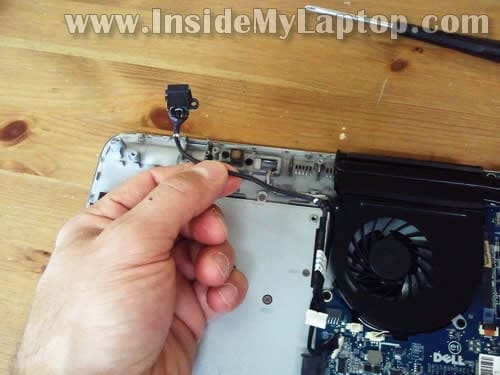
In Dell XPS 15z the DC power jack attached to a cable.
Disconnect the DC jack cable from the motherboard.
STEP 15.
Remove one screw securing the DC jack to the laptop case.
Lift up and remove the DC jack harness.
STEP 16.
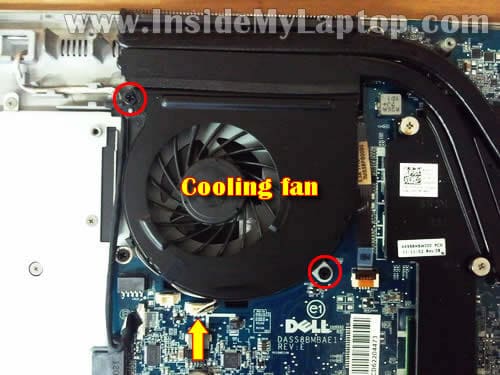
Remove two screws securing the cooling fan.
Unplug fan cable from the connector on the motherboard.
Lift up and remove the cooling fan.
STEP 17.
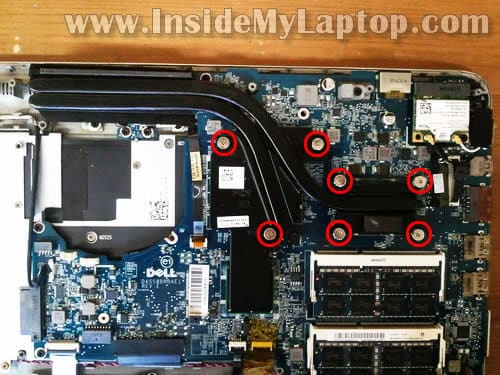
Loosen seven screws securing the heat sink.
STEP 18.
Lift up and remove the heatsink.
NOTE: in my Dell XPS 15z the CPU was SOLDERED to the motherboard. You cannot remove, replace or upgrade the CPU if it’s soldered.

STEP 19.
Remove two screws securing the power button board.
Disconnect the power button board cable.
In the following two steps I explain how to unlock the connector and release the cable.
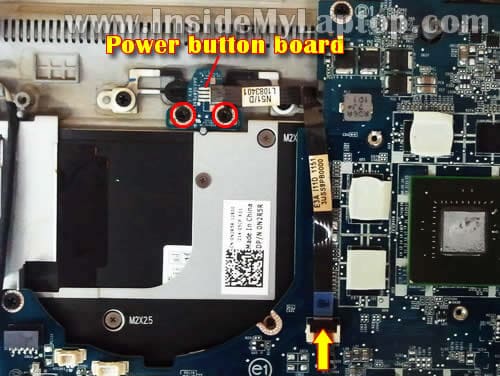
Carefully lift up the left side of the locking tab with your fingernail.
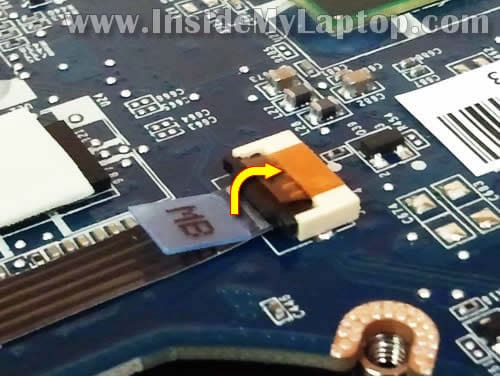
The locking tab will open up at a 90 degree angle.
Now you can pull the power button board cable from the connector.
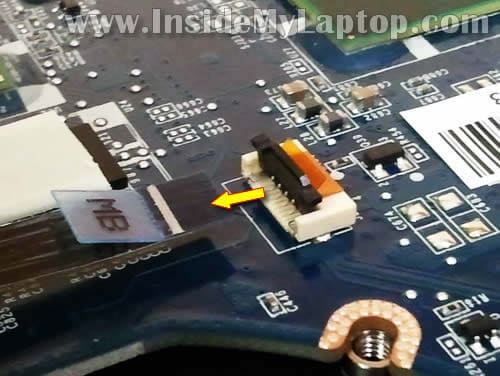
STEP 20.
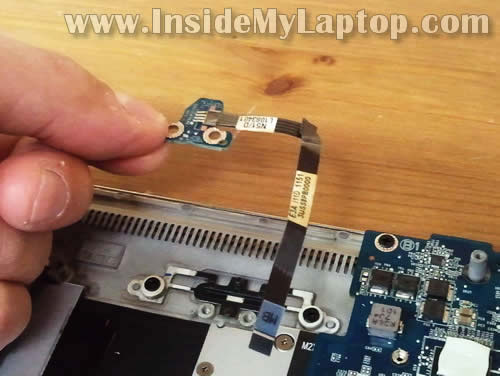
Remove the power button board.
 \
\
STEP 21.
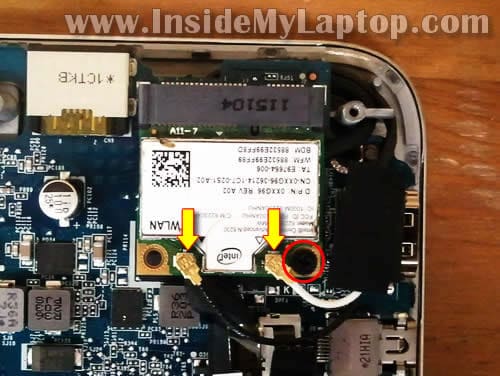
Disconnect two antenna cables from the wireless card.
Remove one screw securing the wireless card.
Pull the wireless card from the slot and remove it.
STEP 22.
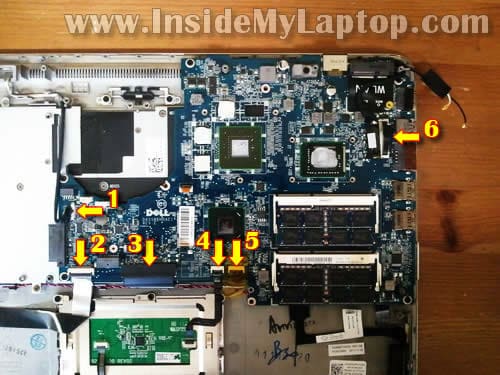
Disconnect the following cables:
1. Camera cable.
2. Audio board cable.
3. Keyboard cable.
4. Touchpad cable.
5. Keyboard backlight cable.
6. Video cable.
You disconnect cables 2,3,4 and 5 using same technique as shown in the step 20.
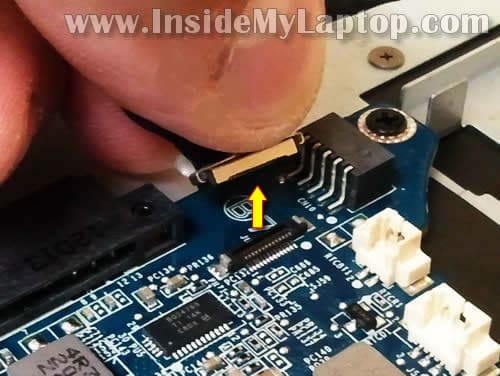
Here’s how to unplug the camera cable.
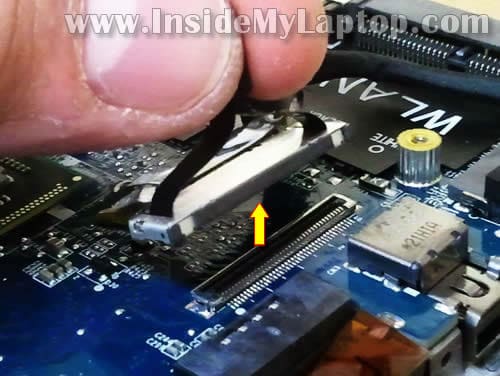
Here’s how to unplug the video cable connector.
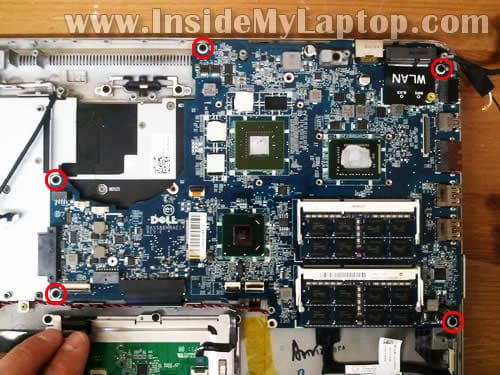
STEP 23.
Disconnect all screws securing the motherboard (I hope I didn’t miss any).
STEP 24.
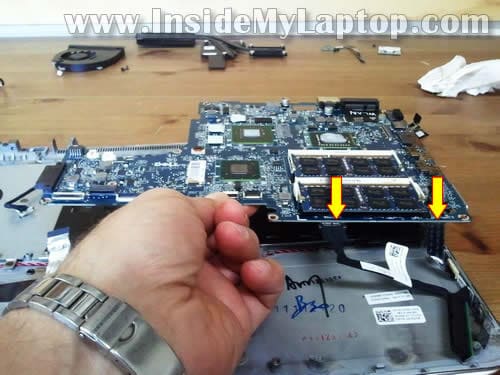
Start removing the motherboard from the case.
Be careful. There are two more cables connected to the bottom side of the motherboard (pointed with two arrows).
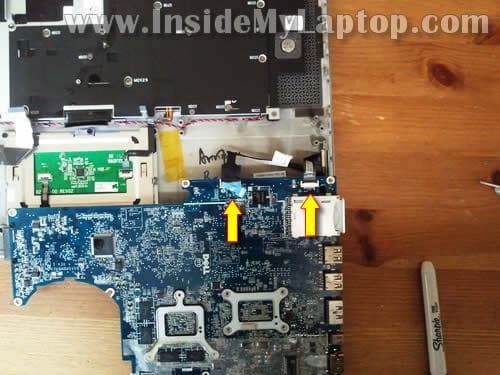
STEP 25.
Turn the motherboard over and disconnect the hard drive cable (left arrow) and the battery status-light-board cable (right arrow).
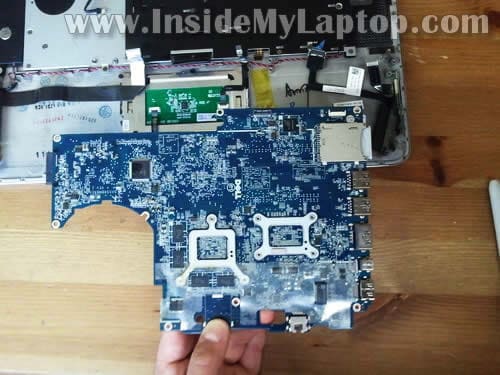
STEP 26.
Remove the motherboard from the case.
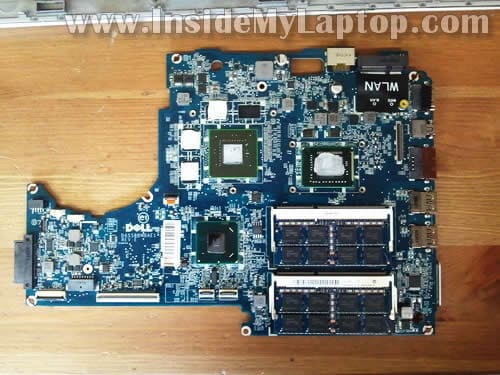
Here’s the other side of the motherboard.
As you see, I didn’t remove memory modules because it wasn’t necessary for the purpose of my disassembly.
STEP 27.
Remove all screws securing the keyboard cover.
I would mark all holes with a marker so you know where to install screws when you assembling it back together.
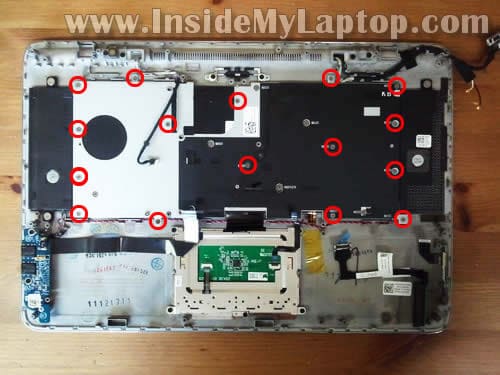
STEP 28.
Remove the keyboard cover.
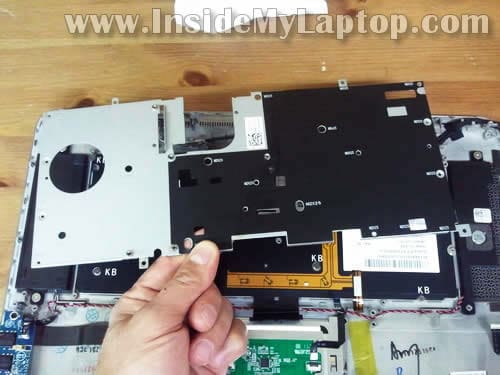
STEP 29.
Now remove all screws securing the keyboard.
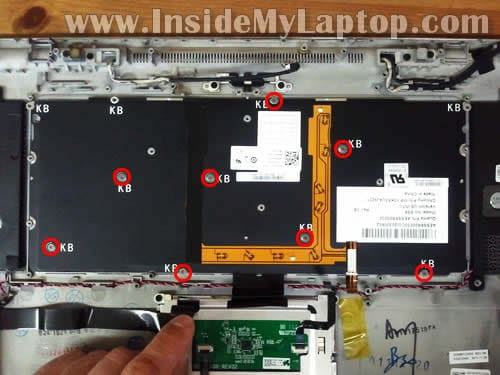
STEP 30.
Remove the keyboard.
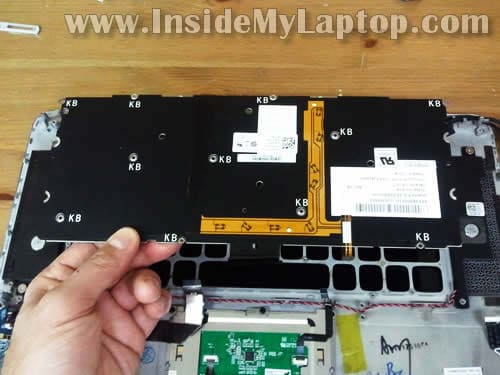
Now the keyboard is ready for the replacement.

STEP 31.
Just in case I’ll show how to remove the touchpad assembly.
Disconnect the touchpad cable using same technique as shown in the step 20.
Remove the touchpad cable.
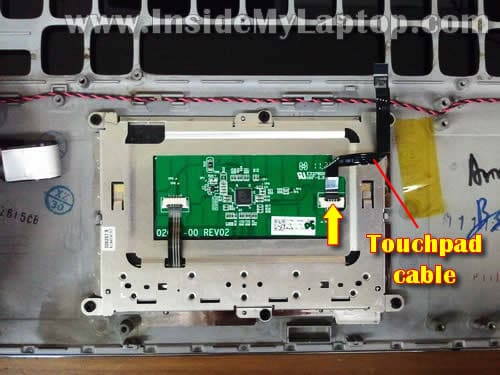
STEP 32.
Remove six screws securing the touchpad mounting bracket.
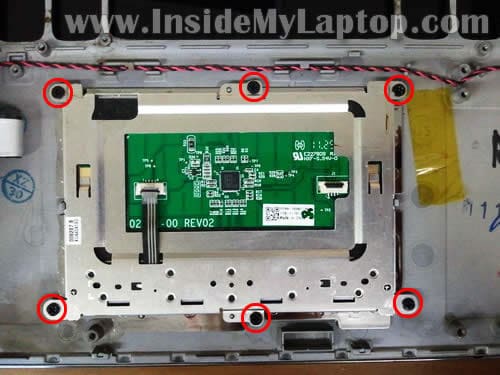
STEP 33.
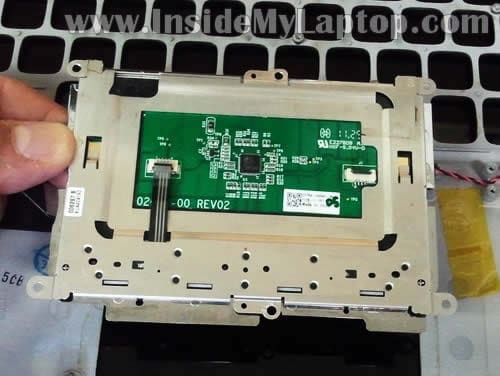
Remove the entire touchpad assembly from the laptop.
Raghav
Awesome instructions, thanks.
Chris
Where is the Graphics card and the CPU?
kevin lee
Thanks for the guide. I am currently using the 15Z, however it greats really hot when I play CS Go:. Also the silver trim keeps coming off. Other than that, how about replacing the screen. It looks pretty hard to remove.
Also, where do you get so many laptops? Are you a repair shop?
IML Tech
@ kevin lee,
Remove the bottom cover and clean up the fan. Probably it’s clogged with dust.
Take a look at this page. It will help you to remove the screen.
I work in a repair shop. 🙂
Spencer
Hi, seems I have some sugar based substance under my main mouse button, you advise a good old wash out with purified water, repeat as required? or some non conductive solvent, 33 steps is ALOT to unsticky a key I can replace with a mouse 😉
Spen
Simon
I’ve been using that laptop for a year and it’s awesome. But i bought it with the standard keyboard and i was wondering if i can replace it by a backlit keyboard?
Jeff
Instructions seem very clear. The ONLY thing I cannot seem to find is the replacement battery. A protracted dell chat told me it’s a 61yd0. Other sites say something else. This ia a Dell XPS 15Z. It currently has a 64hour, Lithium Ion 8-cell battery…which – after it dies – we were told that batteries are “expendables” and not covered by warranty.
I’d greatly appreciate some guidance.
klajdi
My battery was damaged.I bought a new one and replaced it.after that my lap top never turned on.>i tried with the old battery but nothing.Somebody can help me?no lights,no nothing.With and without charger no lights in the board.
Jo
Thanks heaps for the instructions.
Someone poured beer over my keyboard and this helped me big time repairing it 🙂
Keep up posting these, they really help people.
Cheers from down under,
Jo
Johnny Shivers
How does the ODD Connector, the cable from the SATA HDD, attach to the motherboard?
My 15z is currently apart, waiting on that part from Dell.
dubakur
wow….. awesome excellent upclass guys
Dralex
I really like this guide, so many thanks for your effort. I’d like to ask you how can I know if a GPU is compatible with the motherboard of this notebook and if it is sufficient to know that it is PCI express 2.0 compatibile. Moreover I kindly ask you if you know anyway, futher than cleaning, to foster the cooling system (I don’t know if there are any sort of more powerful compatible fans).
Thank you for the time tha you may spend to answer this post
IML Tech
@ Dralex,
You do not understand your question about the GPU. In this model the GPU is soldered to the motherboard and cannot be removed and replaced.
You can try replacing thermal grease. I don’t think “more powerful compatible fans” are available at all.
Dan
Hi,
I’ve knocked over my water bottle yesterday and a small gulp of it spilled all over my keyboard and some of it went down into the keyboard crevices and speaker holes (right side).
The computer was running just fine, then the touchpad started to stop working. [I know. Only after reading the forums I learned that I was suppose to immediately shut down, unplug, and remove the battery]. Then my keyboard suddenly stopped working after a few minutes.
I decided to use the usb keyboard but nothing was typing on the screen. Other buttons besides numbers and letters, like esc caplock space enter, were working fine (only on the usb keyboard). Then the direction buttons became opposite and number 6 key got stuck, like on the inside if that makes any sense.
I waited the next morning to let it dry and see if I dismantle the keyboard, since that”s where most of the fluid went. I was able to remove the battery, dvd drive, and hard drive thanks to this very helpful tutorial. But in order to take out the keyboard, I needed to remove the motherboard? Wouldn’t that erase all the photos and documents I have currently on my laptop?
Is there a way to access the keyboard without having to dismantle the motherboard? Or which part of the motherboard would wipe out all the information if I remove it?
I’m not to good with computers as you may tell, so please explain to me like I’m a 5 year old. I apologize for this very long text. I’m a student and I currently have a class going so I need this fix asap. I would really appreciate all the help I can get!
IML Tech
@ Dan,
Unfortunately, this is not the easies model to disassemble.
All your personal data (pictures, music, documents, etc…) is stored on the hard drive. Removing the motherboard will not erase anything from the drive.
After liquid spill the laptop has to be disassembled and all internal components inspected.
Take a look at this tutorial for liquid spill on a Mac.
It’s a different model but will give you the idea.
Do not use it until everything is dry and clean.
If the laptop is gone, you still should be able to access your personal data on the hard drive via USB enclosure.
naga
very useful
Sunny
Hi ,
I have problem with my Hard Drive . Can i replace it with any 2.5″ hard drive available in market ? May be upgrade some specifications ? Currently it is Hitachi 500 GB with 7200 RPM
IML Tech
@ Sunny,
Yes you can.
You can replace it with a larger capacity 2.5″ 7200RPM drive.
If you really want to speed up the laptop you can install a 2.5″ SSD but they are not cheap.
Juan
Hello great step by step,now my 15Z L1511Z has a blinking orange light and the laptop only works when plugged in is it the battery or something else just cause the batterys are so costly ,i just don’t want to purchase a battery and i would be wrong?
IML Tech
@ Juan,
You cannot tell if this is battery or motherboard related problem without testing the laptop with another battery.
Have you tried reconnecting the battery? This connection shown in the step 7.
Andres
Can this model take a mSATA SSD drive?
Thanks for the great instructions!
jed
I was able to fix my hardware issue (disconnected hdd power) using this article. Thanks for the great information!