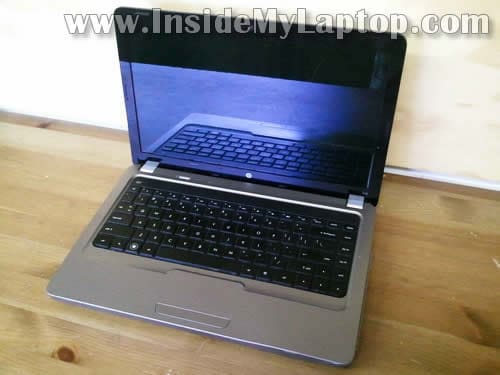
In the following guide I explain how to disassembly a HP G42 or Compaq Presario CQ42 laptop.
Both models are very similar and all following disassembly steps should be the same or very similar for both models.
In this particular case I’m taking apart a HP G42-303DX model.
I will walk you though the following major disassembly steps:
STEP 1-6: Removing the hard drive, DVD drive. Accessing both memory modules.
STEP 7-13: Removing the keyboard.
STEP 14-20: Disconnecting and removing the palmrest assembly.
STEP 21-27: Removing the display assembly. I’m explaining how to take it apart and remove the LCD screen in this HP G42/Compaq Presario CQ42 screen replacement guide.
STEP 28-33: Removing the motherboard. Accessing the cooling module and DC power jack.
Make sure the computer is turned off before you start taking it apart.
STEP 1.
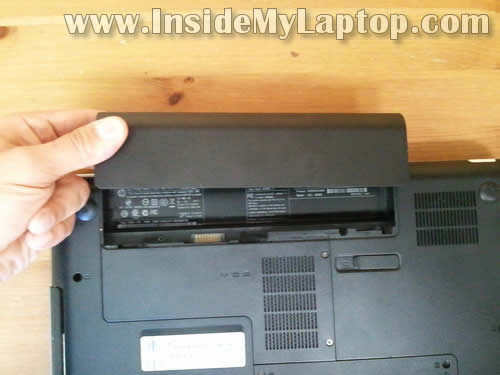
Unlock and remove the battery.
STEP 2.
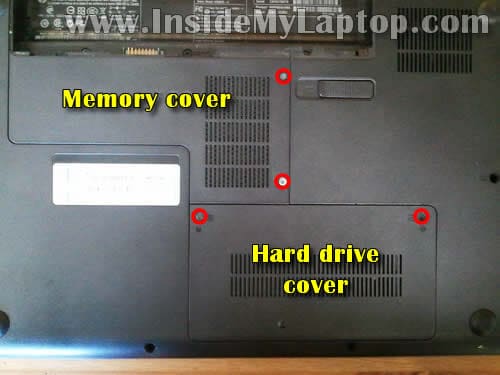
Loosen screws securing the memory cover and hard drive cover.
Lift up and remove both covers.
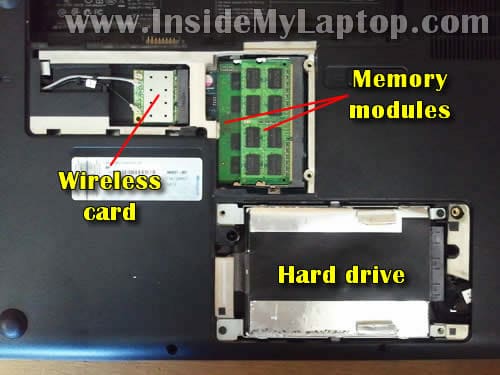
Under those covers you can access the following internal components:
– Wireless card.
– Both memory modules.
– Hard drive.
This laptop can handle up to 8GB (2x4GB) DDR3-12800 SODIMM memory modules.
STEP 3.
Remove screws securing the hard drive mounting bracket to the case.
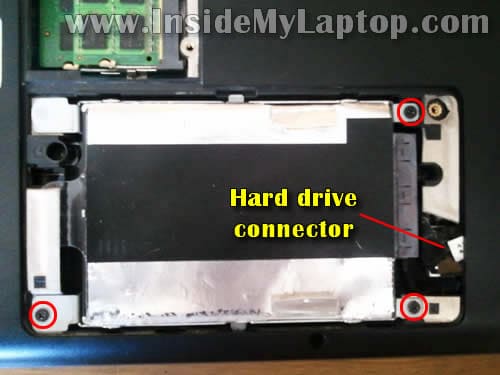
STEP 4.
Unplug the hard drive cable connector from the motherboard.
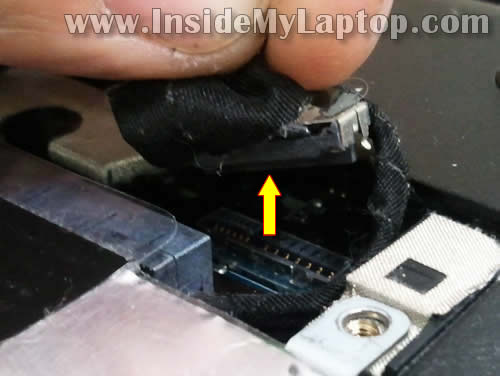
STEP 5.
Lift up and remove the hard drive assembly.
I recommend upgrading this regular (slow) hard drive to a 2.5″ SATA solid state drive. Installing a solid state drive will speed up your laptop significantly.
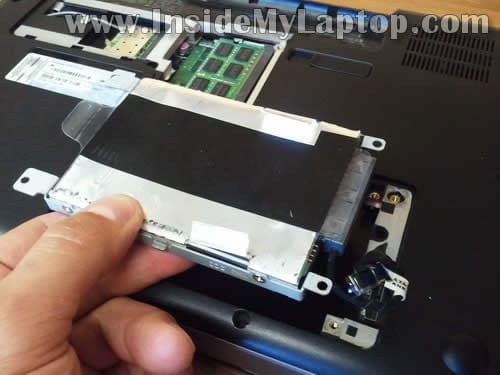
STEP 6.
Remove one screw securing the DVD drive.
Push the DVD drive with a screwdriver.
Pull and remove the DVD drive.
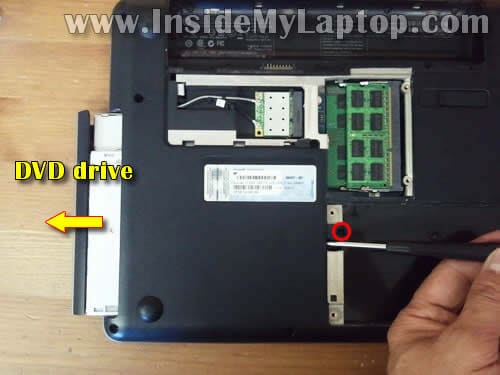
STEP 7.
Remove screws securing the keyboard on the bottom.
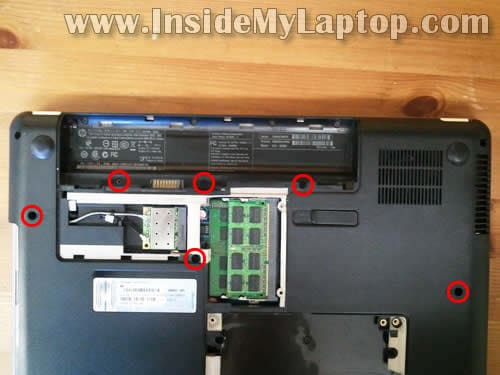
STEP 8.
Insert a thin and sharp object between the keyboard and top cover assembly and carefully lift up the keyboard.
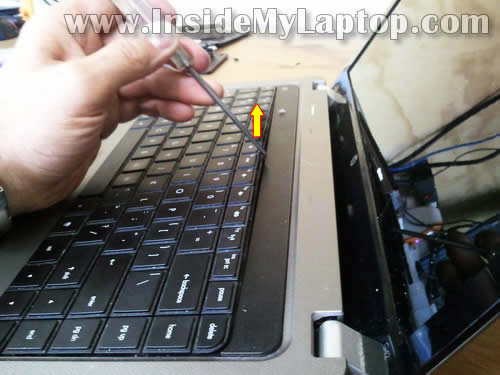
STEP 9.
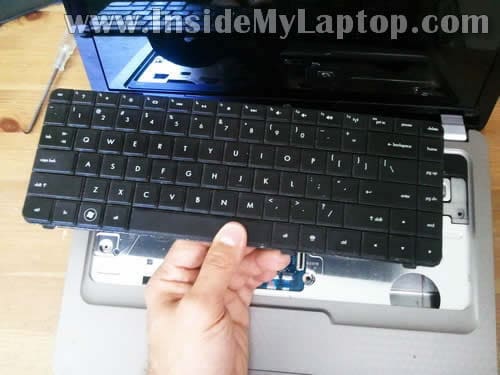
Lift up the upper side of the keyboard and turn it upside down.
Place the keyboard on the palmrest.

STEP 10.
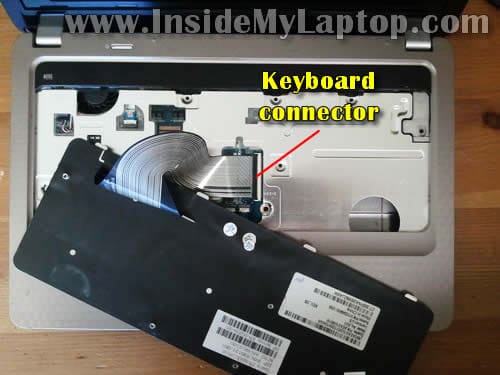
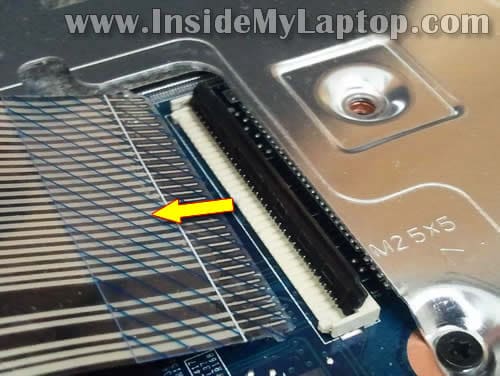
Now you can access the keyboard cable connector which is located underneath the keyboard.
In order to remove the cable it’s necessary to unlock the connector first.
STEP 11.
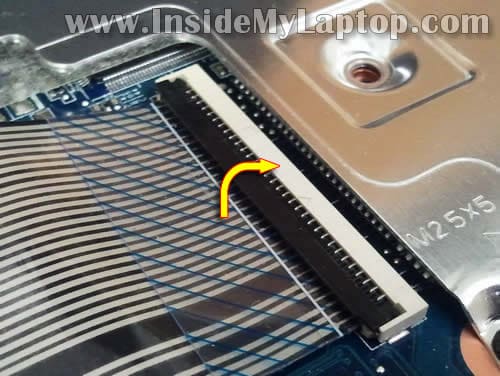
The keyboard cable is secured inside the connector by the retainer.
Lift up the left side of the retainer with your fingernail. The retainer will open up at a 90 degree angle.
STEP 12.
Now you can pull the keyboard cable from the connector.
STEP 13.
Remove the keyboard.
STEP 14.
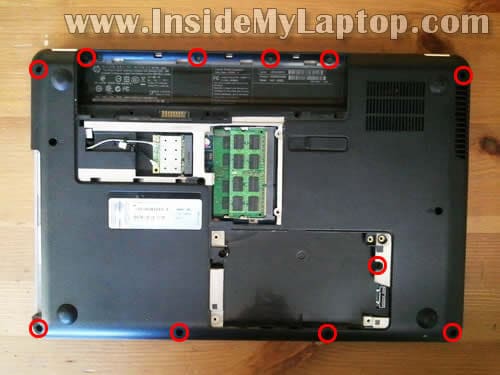
Remove screws from the bottom.
STEP 15.
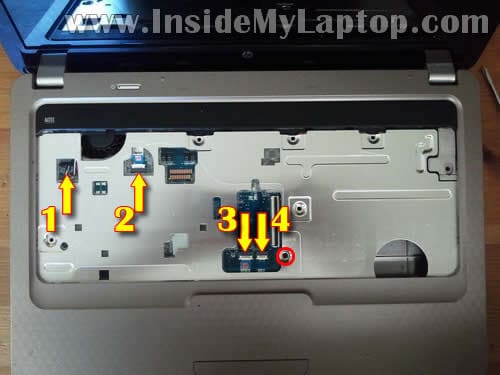
Remove one screw securing the palmrest assembly.
Disconnect the following cables from the motherboard:
1. Speaker cable.
2. Power button board cable.
3. Touchpad cable.
4. Touchpad button board cable.
STEP 16.
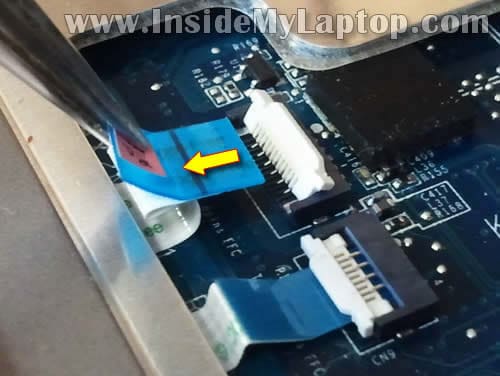
Disconnect the touchpad cable, touchpad button board cable and power button board cable the same way you disconnected the keyboard cable in the steps 11-12.
Unlock the connector retainer.
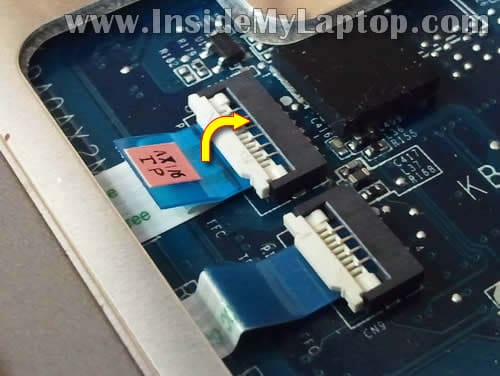
STEP 17.
Pull the cable from the connector.
STEP 18.
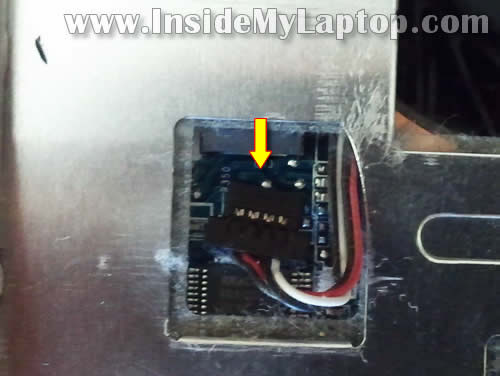
The speaker cable has a regular male-female type connector. Unplug the male part from the female part.
Do not pull by the wires. Disconnect it by the connector edges.
STEP 19.
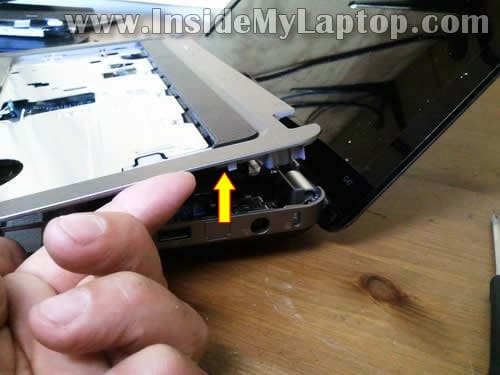
Start separating the palmrest assembly from the bottom cover.
STEP 20.
Remove the palmrest assembly.
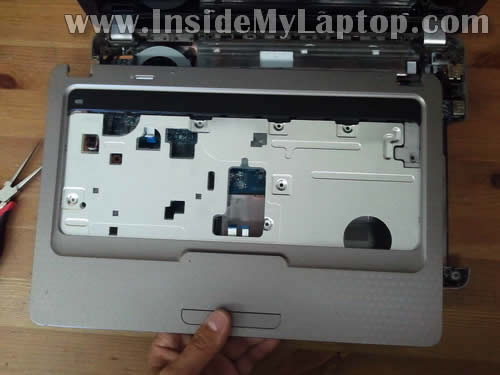
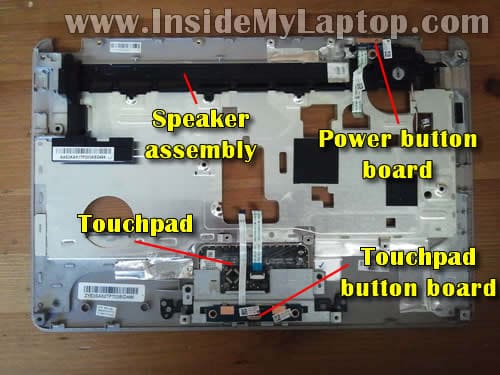
On the bottom side of the palmrest assembly you can access the following laptop components:
– Speaker assembly.
– Power button board.
– Touchpad.
– Touchpad button board.
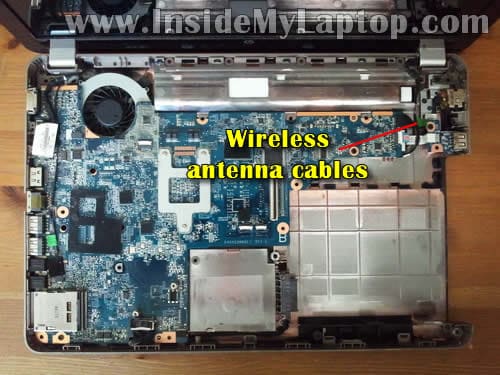
STEP 21.
Start removing the display assembly with disconnecting and unrouting the wireless card antenna cables.
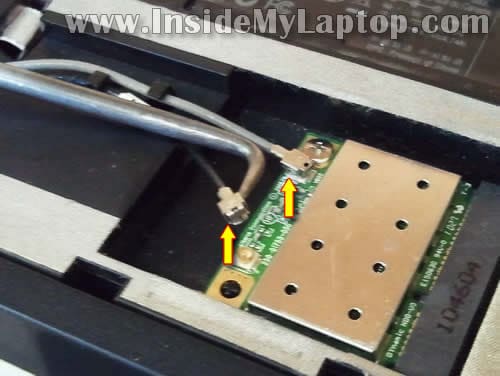
STEP 22.
Disconnect both antenna cables from the wireless card.
STEP 23.
Remove one screw securing the wireless card.
Pull the wireless card from the slot.
NOTE: it’s necessary to remove the wireless card in order to remove the motherboard.
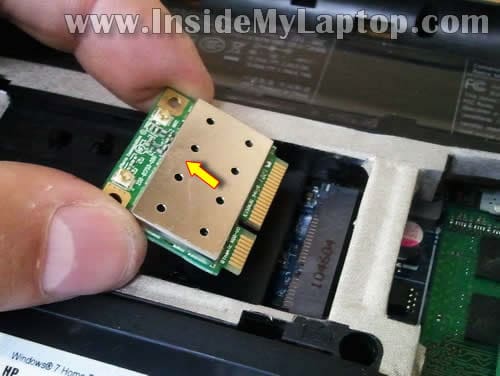
STEP 24.
Pull the wireless card antenna cables though the opening.
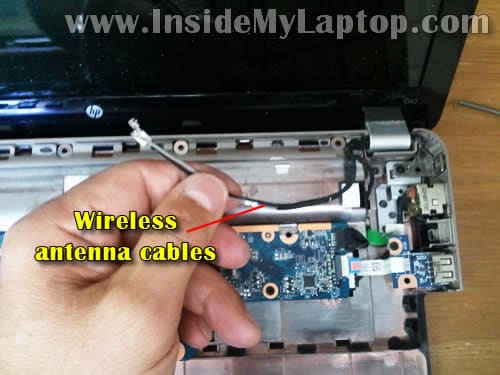
STEP 25.
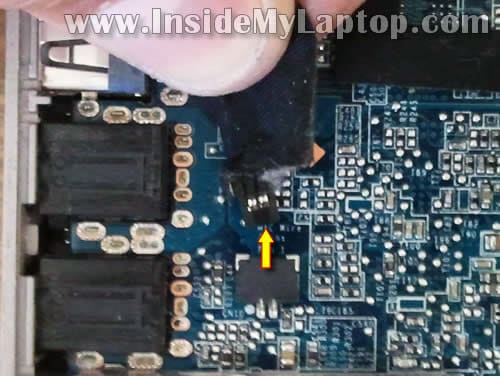
Disconnect the following display cables from the motherboard:
1. Video cable.
2. Microphone cable.
3. Web camera cable.
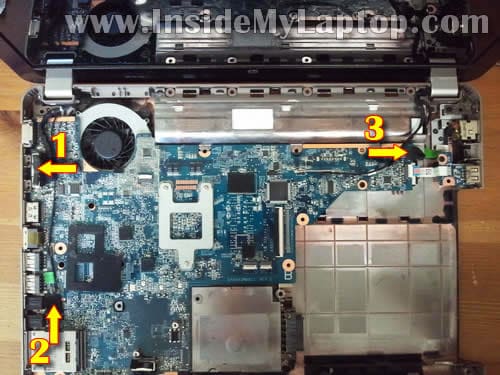
Lift up the video cable connector by the black belt and disconnect it from the motherboard.
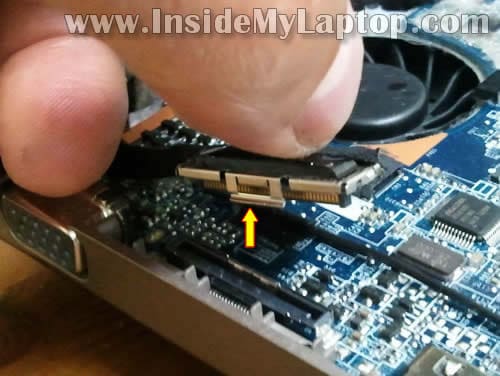
Disconnect the microphone cable and web camera cable same way you disconnected the speaker cable in the step 18.
STEP 26.
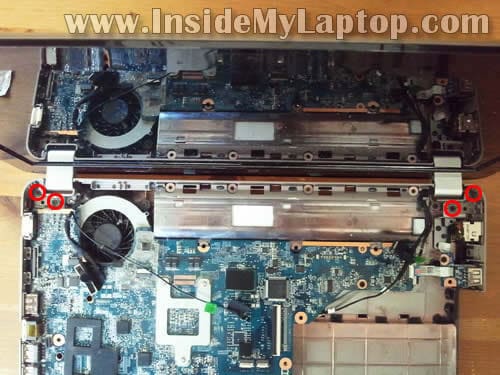
Remove four screws securing the display hinges.
STEP 27.
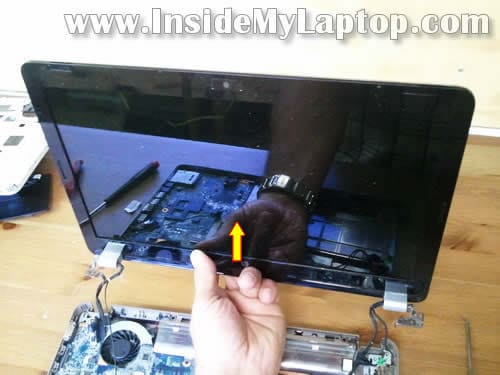
Lift up and remove the display assembly.
STEP 28.
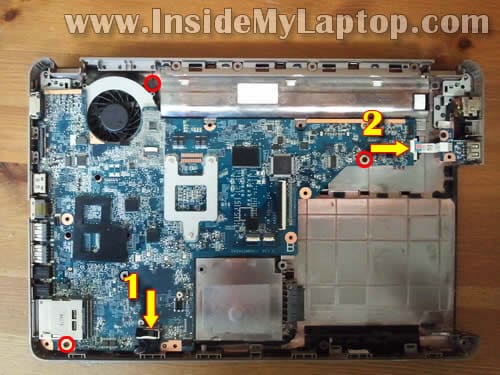
Remove three screws securing the motherboard.
Disconnect the following cables from the motherboard:
1. Optical drive (DVD drive) cable.
2. USB board cable.
STEP 29.
Lift up the right side of the motherboard and disconnect the DC jack harness cable.
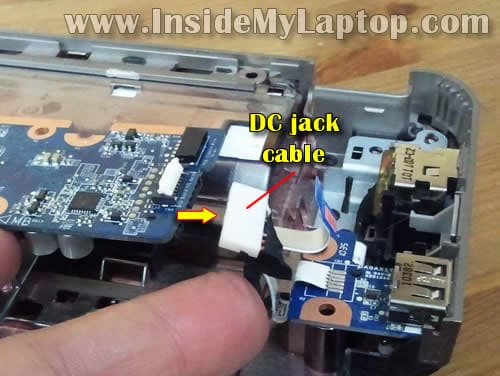
STEP 30.
Lift up the right side of the motherboard and start removing it from the bottom cover.
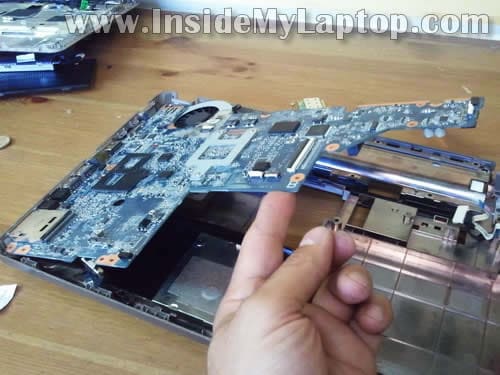
STEP 31.
Remove the motherboard.
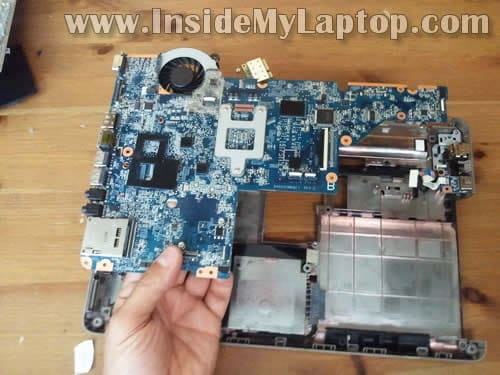
STEP 32.
The cooling fan assembly (fan and heatsink) is mounted on the bottom side of the motherboard.
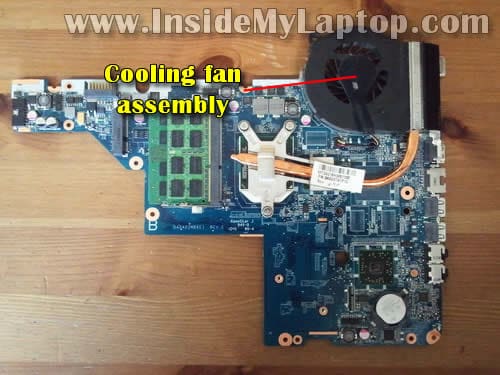
STEP 33.
The DC power jack is mounted in the upper right side of the bottom cover.

Anon
Hey, i need to know where is the bluetooth card dor this type laptop? Because i noticed when i power on after disassemble, my bluetooth gone ) :
Karpet
Amazing!!
Irvin Balagosa
Hi there. I managed to get the keyboard out bu t I have a hard time removing the motherboard. My laptop is just 1year and 8 months btw. I have a question;
1. My laptop displays that the fan is not working. Does this mean I need to buy a replacement or should I just lubricate the fan? Is there a way to make sure if the fan just needs cleaning?
IML Tech
@ Irvin Balagosa,
It’s hard to tell if the fan has to be replaced and cleaning would be enough. It’s possible the fan got blocked by dust.
Here’s what you can try.
When you remove the keyboard you get some limited access to the fan. Find an air compressor or buy canned air and blow it into the fan. Make sure all dust is gone.
Test the laptop again. If the error is still there I guess you’ll have to replace the fan.
Also, turn on the laptop with the keyboard removed and look at the fan. Does it start spinning at all?
DAN ENGLAND
Hello, I dropped my laptop, it broke the screen. I tried to save the hard drive but the data was corrupt. So Ive replaced the hard drive like for like, and also replaced the LCD screen, turns on ok, fan goes, keyboard lights, blue power lights, but nothing on screen, I have tried disconnecting and reconnecting the screen and checked wiring cable between motherboard and lcd, it seems ok but still no joy. I have tried a HDMI external monitor to see if the laptop is booting, but that just goes to sleep. What do you suggest, I am not sure if an external monitor would boot given the carnage my laptop has now incurred.
Thanks
IML Tech
@ DAN ENGLAND,
Check the laptop memory. Maybe it’s not seated properly. Try reseating memory modules and test the laptop again.
Anon
Thanks man 😀
Juan
Hi, first of all thanks for your great site, helped me a LOT!!!
My problem: I have an Compaq CQ42-121LA with a failed bios update, it starts, display the red boot screen with COMPAQ logo for about 2 seconds and then goes black screen… (if you pause at red screens it stays there…) any solution to this problem??
best regards!!
Juan.
Sameer Singh
Hi, I’m glad to think that at here my problem might be solved. I’ve a CQ42 modal PC in the both whole of headphone place, a small things is gone by unknowingly and it is not coming by my navish effort, and thus I’m unable to plug in of my any speaker,headphone,earphone…plz help me how can it be solved?
a
At least the cq42 403ax has ati hd 4200 and hd 6300. Can you disable or the other in the motherboard- because it is not possible in the bios?
R4to0
Hello! First, sorry about my english… Second, i sucessfully disassembled a G42-271 just to clean cooler, and assembled it. Notebook boot up, but after windows boot, screen goes black. I have no idea what is causing that, and i can’t access bios anymore (no “press esc for boot options”). Using an external display also works.
Thanks!
umayanga39
Tanks lot………..that is correct path of disassembly a HP G42 or Compaq Presario CQ42 laptop.
amazzing…….
tankz.
R4to0
Nevermind, screen back to normal. Thanks for the tutorial!
Jeff
Is it possible to replace the keyboard with a backlit one? Does it have an extra ribbon attachment to support backlit? i was wondering if the keyboard of an hp dm4 would fit as the size is the same.
james
Love your website and tutorials!!!!! 🙂
samantha
So to simply replace my dc power jack do i have to go through ALL the steps above to do that?
Steve
My display intermittently remained blank and then stopped completely. I opened the screen assembly and reseated the LCD cable – screen worked for another day. Does this sound more like a display issue OR a cable issue? Replacing the LCD screen seems pretty easy. However, replacing the cable seems like I’d need to disassemble everything to get to the motherboard – is that correct?
JAOS2008
I change the bottom case and re-ensemble all parts but it doesn’t turn on, I tested the AC plug and is correct
I need support
PyroStorm
Wait, are you telling me that to remove the back cover from the laptop (I need to clean the cooler fan), I have to remove the hard disk and keyboard first? Or do I need to take it apart completely?
Ricardo Reza
Hello, I just want to replace the screen of my presario CQ42-228LA since is broken. What are the required steps to follow of this tutorial so that a can continue with the other tutorial (screen replacement). in other words, is it necessary to remove the mother board?
IML Tech
@ Ricardo Reza,
No, it’s not necessary to remove the motherboard but you’ll have to remove the palmrest assembly and separate the display assembly from the laptop base as it shown in the step 27.
After that you follow this LCD screen removal/replacement guide.
Patrick C
Step 14 is incomplete, there is another screw in the hard drive bay that must be removed in order to remove the palm rest assembly.
leandro
you are awesome
karthikeyan
unmaiya sonna super side thanks thanks thanks lakhs of thanks
JuanC.
Thanks for the TUT very easy to follow. Now I have a big question.. Can you tell me how and if I can replace my sound card on HP G42-363LA?
Also, where could I order it from?
Thank you.
prashanth shetty
Gud demonstration sir,.nice work..it was very helpful,..thanks a lott
regards
prashanth shetty
Mikayla
I have a problem. I took apart my computer and put it back together and everything works except my keyboard. Only a few keys work and have tried disconnecting and reconnecting it from the motherboard. Please help! (I am using a compac presario ca42 if that helps)
Gabriel
Hi.
I’ve broken the motherboard’s speaker plug. How to connect the speaker again without the plug?
Markos Suarez
Saludos
desmonte mi portátil y lo monte pero no enciende
q puedo hacer ??
gracias
raffy
thanks a lot for this tutorial. i saved a lot of money
Garry
This instruction is excellent. Just put a new motherboard in my Granddaugthers G42t-300. The heat sink pictured is not correct any longer the current one has 4 legs on it instead of three. And i missed the 3 screws holding the motherboard secure on the reinstalled. oops caused some start up failures but me in a looping chkdsk on the harddrive. Shut it down and reinstalled the system and every thing is just hunky dory now. It was a good recovery from the house cat spilling water on the system. thanks for the great help. PS had already recovered all of her pictures and docs on a DVD. so now she gets a clean system back.
dinesh
thank you very much sir with your help i was able to open it very easily. it has over heating issues
Ajelet
one little part of my computer been unsoldering
is this
http://subefotos.com/ver/?5a51d8e40d06bbb98c7d6f41e5b6acc9o.jpg
i think it unsoldering from here
http://subefotos.com/ver/?2a74f82bc021dd0b19ceb3bc82a4a87eo.jpg
you can help me with picture of mother board of same place that I show you, for be sure
of where belonged this parte
Javi
Hi ! Excelent tutorial… Just one question…. Where is de CMOS battery? Is easy to replace like memory chips or HDD ? Thanks!
Abdul K
very good and systematic for learners.
Good job!
mahoilct
FINE THANK YOU
Arya
My cq42 do not accept the RAM in spare slot, only one slot accepts either 1 or 2 GB. Is there any connector on MB or have to change values in Bios? Pl answer. Arya.
IML Tech
@ Arya,
There is no connector on the motherboard. Also, there are no special settings in the BIOS.
The new memory module should be detected and configured automatically. If your laptop doesn’t see any module in that slot, most likely it’s bad slot.
I assume your new memory is compatible and not faulty.
Kazaro
Thanks… easy for people to follow~
nishant labh
thanks to you. enough information to genuinely disassemble laptops.
i couldn’t believe i had done it myself.
there was screen flickering problem.
Fernando
The most stupid thing about this laptop is that you have to disassemble everything to replace the CMOS battery…
harry555
Thanks i have completly clean my fan of laptop it was giving problm but coz of ur pics n suggestion i have done it .its working fast now thanks for the help.god bless u buddies
Brad
Thank you very much for posting these instructions!!
RAJU KUMAR
My cq42 do not accept the RAM in spare slot, only one slot accepts either 1 or 2 GB. Is there any connector on MB or have to change values in Bios?
There is no connector on the motherboard. Also, there are no special settings in the BIOS.
The new memory module should be detected and configured automatically. If your laptop doesn’t see any module in that slot, most likely it’s bad slot.
I assume your new memory is compatible and not faulty.
Cesar
What about bluetooth card???
IML Tech
@ Cesar,
What is your laptop model number? I can try to find the Bluetooth card location in the service manual.
Alfredo
thanks for your post, I could replace easily the fan cooler of my HP notebook G42, but still it doesn´t turn on, what else can I do?
my laptop give me a message that the fan cooler is not working and it will turno off to prevent damage
IML Tech
@ Alfredo,
Did you buy a new fan or used one? It’s possible your replacement fan is bad.
Maybe you just forgot to plug the fan cable into the motherboard?
You can purchase another fan and try replacing it again. Fans are not expensive.
If you still have the same problem with another fan, most likely this is motherboard related issue.
Joy
Hi there. I just wanted to say a great big THANK YOU to all who compiled this guide.
It’s BRILLIANT !!!! The best on the net. Great, easy to follow instructions and diagrams make it a dream for a novice like myself. Thanks so much 🙂
manoj
Sir,
I opened my laptop to clean fan , after that I am trying to switch on the laptop ,but only its fan and power button light is working and display is showing nothing.its black .pls tell me solution.
Thankyou
Chirag
Thank for the help bro. Actually I have a problem, I damaged the socket lock of touch pad button wire. Touch pad buttons not working now. How can I fix it ?
vikram gautam
Sir,
I did follow the same to clean fan but now there is no display just power button is on and heat dissipation observed.
surya
sir, pleae help me to tell about my laptop, in which powersuplly is on fan is on, but no display in monitor.