
In this guide I explain how to disassemble a Dell Inspiron E1505 or Inspiron 6400 laptop and replace the cooling fan.
In my case the fan started making lots of noise. The fan mounted inside the case, so the whole unit has to be disassembled.
Make sure the computer is turned off before you start taking it apart.
STEP 1.
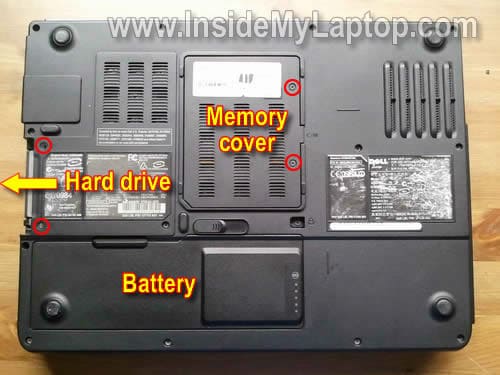
Remove the battery.
Remove two screws securing the hard drive assembly and pull it out.
Remove two screws securing memory cover and remove the cover.
STEP 2.
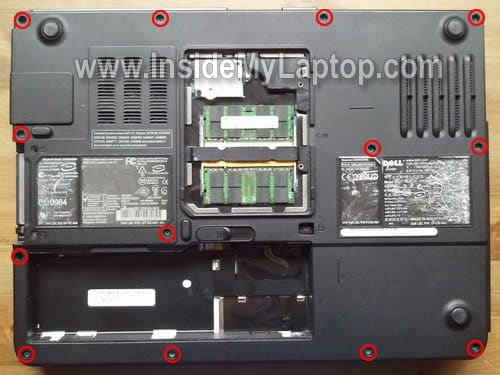
Remove all screws from the bottom.
STEP 3.
Remove one screw securing the CD/DVD drive.
Push the drive from the laptop case with a screwdriver.
Pull the optical drive out.

STEP 4.
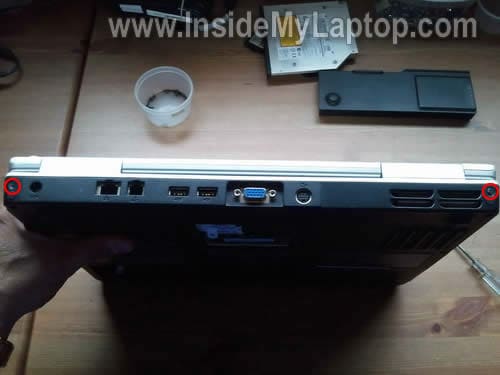
Remove two screws securing display hinges on the back.
These screws are hidden under screw seals.
On the following 7 steps I’ll be removing the keyboard.
By the way, it’s not necessary to go through all previous steps in order to remove the keyboard. Simply follow steps 5-11.
STEP 5.
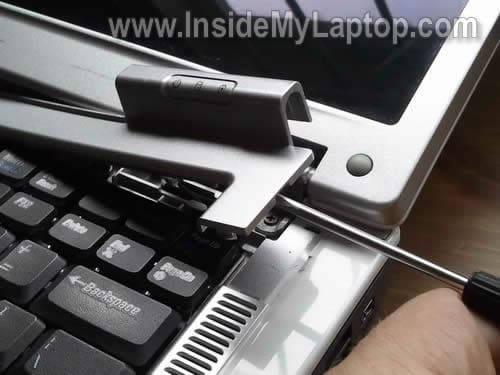
Lift up the right side of the power button board cover with a screwdriver.
STEP 6.
Remove the power button board cover.

STEP 7.
Remove two screws securing the keyboard.
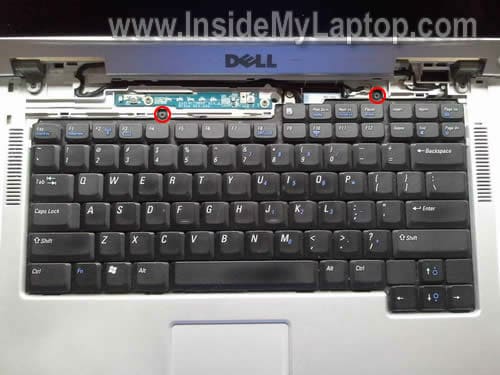
STEP 8.
Lift up the keyboard and carefully separate it from the top cover.

STEP 9.
Access the keyboard cable connector underneath.

STEP 10.
Unlock the connector and remove the cable.
On the following picture the connector is shown in unlocked state.

STEP 11.
Now you can remove the keyboard.

STEP 12.
Disconnect the video cable connector from the motherboard. Remove one screw securing the video cable.
Disconnect two antenna cables from the wireless card.
Remove two screws securing display hinges.
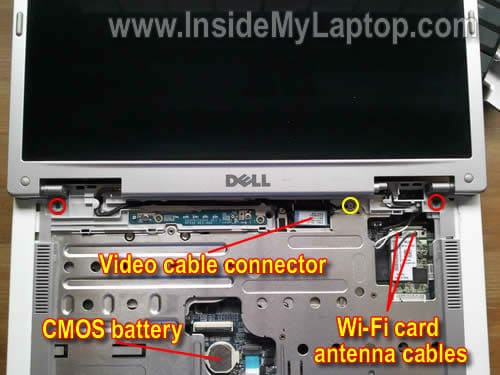
STEP 13.
Remove the display assembly.
By the way, here’s how to remove the screen.

STEP 14.
Remove two screws securing the power button board.

STEP 15.
Carefully lift up and disconnect the power button board from the motherboard.

STEP 16.
Disconnect the lid close switch cable.
Disconnect the touch pad cable.
Remove one screw securing the top cover assembly.

On the following picture the touch pad connector shown in unlocked state.

STEP 17.
Separate the top cover assembly from the laptop bottom.

STEP 18.
Remove the top cover assembly.

The top cover has been removed.
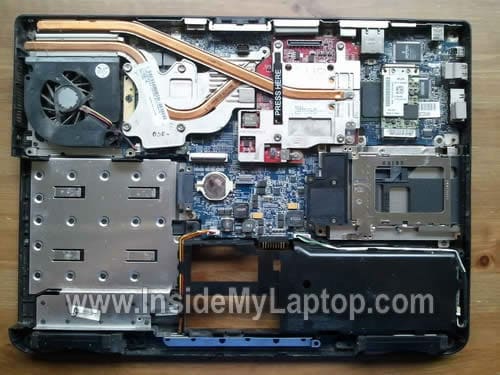
STEP 19.
Remove two screws securing the cooling fan.
Unplug the cooling fan cable from the motherboard.

STEP 20.
Now you can remove the cooling fan and replace it with a new one.

Neill
Thanks so much for posting this. I was finally able to disassemble my E1505 and get that nasty heat sink cleaned out. Reassembly was a snap and it’s running much cooler now.
IML Tech
Neill,
Marco
That was just exactly what I was looking for, thank you so much for this guide. Saves me from buying a new laptop just to avoid the noise 😉
palabine
This is awesome thank you! I was trying to figure out to get in there!
Dan
Thanks, This was very helpful
Guillermo
Hey! great post!!!!
Do you happen to know where I can get a new LCD cable? My brightness is nonexistant and they told me that’s what was faulty….
thanks!
Guillermo
Kris
Hi!
I just found your website, which I thought is very clear and well done (the picture are very usefull!)
I’m looking to change the back cover (of the screen) of my Dell Inspiron 6400 and I can’t seems to find clear instructions, even on Dell site. The problem is quite common : the back cover is splitting from the bezel at the bottom of the display assembly. I got a new cover from Dell but I’m not sure that I got all the replacing pieces (do I need separate hinges or the ones attached to the cover are the only ones needed ?) and also, I’m not sure if I need to remove the keyboard and how I can separate the back cover from the bezel (is it just “snapped” ?).
I can send pictures of the problem is needed.
I need my laptop every day for work so I’m hoping to be able to do it myself…
Thank you very much in advance for the help !
Kris
p.s: Hope my english is ok and things are clear.. .I usually write in french 🙂
steve
Thank you great info. I need to replace my sound card looks like fun getting into the computer..
Karen
I tried the steps above (thru #11), however after putting the laptop back together, now it will not start. The green light comes on where the power is connected, but it doesn’t sound like it is getting power at all, and nothing happens.
The parts that I had to re-connect (and I double checked all these), the keyboard and touchpad ribbons, lid close switch, wi-fi card cables, and the video cable connector. I did not remove the fan or anything from step 12 beyond.
My question is: is it possible I may have neglected to re-connect something (power-related) that would cause this? Or is it more likely that I fried something while messing around in there?
Appreciate any advice you can offer, I made the mistake of trying to help a friend with his laptop, and now I am going to have to figure out how to fix this myself (including any costs I will incur if it needs to be repaired). You know what they say, “no good deed goes unpunished”. :-\
Thanks in advance!
IML Tech
Karen,
Did you remove memory modules? Make sure both memory modules seated correctly.
It’s possible the laptop will not turn on because memory modules installed incorrectly.
Tiffany
I successfully disassembled the laptop and reassembled it, however, there is now no picture. Any idea what I did not do? The picture was never a problem. I wanted to clean the fan and that is complete, but no picture? 🙁 Help?
Thanks!!
Tiffany
Jim
Thank you sooooo very much. I took my computer apart and could not figure out how to put keyboard connector and touch pad connector. You saved me from throwing out my Laptop. I am very grateful. Bless You.
Respectfully Yours,
Jim
bob herald
thanks for the great site. i do have a question about replacing the power jack. I can’t seem to get the solder on the jack connections to flow so i can evacuate them with the solder pump. I have a good deal of experience with soldering but it seems like the metal cover on the old jack is sinking the heat away from the connectors. I am using a weller soldering station set at about 800 F. thanks for any help
rjherald
IML Tech
@ bob herald,
I know, it’s a pain to remove DC jacks on some Dell laptops.
Usually I apply some fresh solder over the existing solder before removing it with the solder pump. Applying fresh solder helps to melt old solder.
Can you increase temperature to 850F ( I have 850 F max on my Weller station).
Also, you can cut off the old DC jack and try removing pins one by one.
Joe
Hi,
Thanks so much for posting the detailed outline with pics! Definitely helped me a lot in understanding the insides of my Dell 1501. I actually had taken it apart earlier today for the first time (though not as elegantly as you’ve done here). I did it to switch out my CPU for an upgrade to a dual core AMD Turion TL-68. Everything seems to have worked and it recognizes the new processor, which is great, but now my touchpad doesn’t work. I tried uninstalling and re-installing the driver for the Synaptics TouchPad but with no success. I’m concerned I may have interfered with one of the connections from from the touchpad to the motherboard. My main question is this: Is that little blue tab just above where the touchpad is located the only place where it connects to anything? Because there were other parts I inadvertently disconnected and then re-connected but I don’t seem to be experiencing any other problems. I specifically recall accidentally disconnecting what you seem to have labeled as the WiFi Card Antenna Cable (the left one to be exact) and also the Lid-Close Switch Cable (I think – it’s kind of hard to make out in the picture you provided but I remember it was a white plastic connector that I had to re-attach). Anyway, as long as neither of those could be mistaken for anything related to the touch-pad, then I think I just need to open it back up and check on the connection for the Touch-Pad Cable. Do you have any suggestions regarding the proper attachment of that cable and whether I should do anything specific after re-assembling, or should it just work as long as it’s properly connected? I sincerely hope this is the reason for the problem that I’m having as it’s driving me absolutely NUTS that I can’t use the touchpad (my USB mouse isn’t the most graceful option when using the laptop on the couch or in bed). Thanks again for your input and feedback!
IML Tech
@ Joe,
Yes, that’s the only connection for the touchpad.
Maybe you accidentally pulled the touchpad cable from the connector on the other end? If nothing works, remove the top cover and make sure the cable properly connected to the touchpad itself.
Brent
Thanks for the great guide. It took me less than 30 minutes to take apart and put back together! My fan was so gummed up from dust it was crazy
Frank
Great instructions and pictures.
Seems like there should be an easier way to clean the fan, but thanks so much.
Mike
Great instructions! Thanks! I never would have figured that out on my own.
Pravin Dave
I ran in to How to dis assemble Dell Laptop while searching for Dell Inspiron mother board driver since I did not get local area connection.
Thank you so very much. Iam 68 yr retired civil engineer and i went through your Laptop removing cooling fan.It is very well illustrated with clear photos very comprehensibley.
I got Blue Screen.Hence I reformated C drive and installed WXP again. Could not get net Local Area Connection for internet.Dell Inspiron E1505 provided driver for net connection that too failed and continued getting Blue Screen. I realised that HDD was becoming very hot . I don’t know whether it is normal or it has to do with fan.
Your article prompted me to write to you and ask you whether fan is required to be cleaned or
HDD has problem?
Pleas let me know and help.
Thanks a Lot
Pravin Dave
Shrikant
Hello, very useful guide I must say. However, I have a question related to the kind of issue I am facing with my laptop.
My Dell laptop ran out of warranty
The other day about 3 weeks back, I forgot and left the laptop running overnight. Probably that heated up the system.
The other thing probably happened is that when I placed the laptop on the floor while it was on, it probably bumped the floor ;just a little bit more’ than I imagined
I was too sleepy to remember if the laptop was running on battery or power but I remember wife telling me that she saw the red indicator on one of the LEDs – probably the power LED I think – so assumed it was on battery.
The next morning, the first thing I did was to start the system and I got a message to the effect that some probably the system restore is corrupt so I will have to restart.
Which I did and immediately, the screen started displaying colored pixellation.
I shut down by pressing the power and restarted and since then, only the 2 LEDs on the panel keep blinking for about 1 min and the system shuts down.
Now my main concern is to take the backup of the hard drive.
I am hoping that the hard drive is not corrupt and that the 2 LEDs blinking indicate a RAM problem but I am not sure. I can’t test the system since the screen also is not working.
If the hard drive is not corrupt, I need to backup all the data by removing the drive out and somehow getting it backed up.
I might not be able to use the system again since the parts seem to be very expensive now in India but just the hard drive backup should be ok for me
How best can I do in this scenario? please share any pointers that could help!
many thanks.
Shrikant
Ruslan (Ukraine)
Thanks, This was very helpful :))))
Dell Sux
@Shrikant
Your video chip is cooked and the laptop is now a paperweight!
bryan pentland
Hello I fitted a new fan to my dell inspiron 620 but it seems the fan driver has gone as the fan still does not work and I do not want to take it all apart again. So to keep the old girl going on my desktop I will provide an external supply to the fan – BUT does anyone know what the 3 wires are for ? which one is pos and and neg and what does the third one do ? also what would the voltage likely to be ? Thanks any help would be useful.
kolisa freeman
thank u so much for this outline.!!!
Amanda
Thank you for publishing this. My 7 year old computer was getting so hot it actually burned me and left blisters. I can’t afford a new one so I figured I would try to clean it with no great expectations of it fixing anything. It had another problem that something was malfunctioning around the power jack and it would shut itself down if I did t adjust te cord. It’s not the cords problem, but something else.
I am glad I found this because I assumed I could simply remove the bottom without going through the keyboard. I would have broken something for sure!after getting it all open, there was a 1/4″ layer of filth blocking the air intake. I cleaned that and the fan. The only problem I ran into was that unplugged the fan and the lid switch by the white plugs. I didn’t know they wouldn’t go back in. I had to pull the wires out and fix them on manually. Hope they stay. A note about not removing the fan unless you are replacing it and to take the lid switch off by the screw rather than clip would have saved me about an hour of frustration.
Got it all together and it powered up beautifully. I put it through the heavy paces with programs and games and the fan hasn’t kicked on once. I can’t tell you how excited I am. Also, it looks like tightening everything down fixed the loose part that was causing the reboot. Hallelujah!
Thank you again. This was wonderfully helpful!
Lex
Thank you for this step by step solution.
I also had a roaring fan and a computer that are continuous are too hot.
Because the fan at all speeds still good spinning and because I felt no backlash, Have i the fan cleaned only.
I have no credit-cart If you have a Paypal account than I like to donate a small donation.
If you have no Paypal account think about it? It is simply to create and it is worldwide accepted.
Sincerely.
A.J.P. from the Netherlands.
IML Tech
@ Lex,
I have it and there is a Donate button after each post on my site. 🙂 Thanks.
Shine
Was having overheating issues. Thanks for the great guide. Helped me to remove the heat sinks and clean them. The heat sink closest to the fan was almost completely blocked with dense dust. After cleaning, seems to have dropped the CPU temp from 145 F to 115 F.
I would recommend adding to step 8 that there are clips on both sides of the keyboard (a small flat head screwdriver moves these out of the way nicely). Also the top cover assembly has 4 clips. Two located in the top center and 2 on the bottom center.
clyde bloomfield
hello,
I don’t have any of the problems you show however I need some pics of the piece that goes around the screen its broken and the part that holds the screen itself will not let me open and close the laptop correctly can u tell me if I can order these two parts if so whats the correct terminology for them if I had a way to send u some pics that would certainly make this a lot easier.
Thanks again,
second attempt to contact u……………………..
Clyde
IML Tech
@ clyde bloomfield,
It’s not clear what part is damaged.
Here’s what you can do.
Check out the official Dell service manual for Inspiron E1505/6400 laptops.
Find the name of the part and search it on eBay. Most likely you’ll find it.
Jeff
Your tutorial was invaluable. Thanks so much for helping me get my laptop back to cool-running condition Saturday.
The fan was running constantly and the computer was running slow … I suspected that protective circuits were derating the CPU performance to keep it from burning up and some internal filter needed cleaning.
That all proved to be correct – a thick collection of “junk” that collected from years of use was blocking the cooling fins. A few shots of 90 PSI air and all’s well! I hope others whom your article has helped have thrown a few bucks in the kitty as I did.
IML Tech
@ Jeff,
I’m glad it worked for you.
Thank you for your support!
JM
Hi there, my dell 6400 has some power adaptor issue. When its on battery, everything works as usual. However, the moment you plug in the adaptor, the screen goes black. And I am not going to pay a couple of hundred bucks to replace the major parts. Can you guide me on this? I can’t find any info on such cases.
IML Tech
@ JM,
Please provide more details.
Can you see a very dim image on the screen when it goes black?
Also, try this. Boot the laptop on battery power. Go to the screen settings and change the screen brightness to minimum for the mode when it’s plugged in.
Try connecting the AC adapter after that. Does it still go black?
JM
@IML:
WOW! You got it all correct! Actually this is my second attempt on taking a look at my laptop. At first I did not realise it but I DO see the very dim image of my desktop. Then when I turn on the laptop on battery, everything works fine. The laptop starts up and loads the windows. The moment I plug in the AC, everything goes black :S
Another scenario would be, when I plugin the AC, the laptop is able to start but the moment it needs to load the windows, the screen goes black again.
I can’t do further test now as I have pry open my laptop 😛 PLEASE HELP
JM
Do you have the answer to those weird symptoms?
eatup
Hi, is it possible to perform step 5 (remove the power button board) without removing any screws to the side or bottom of laptop? I just want to see what’s causing the laptop close switch to make my screen go black sometimes….