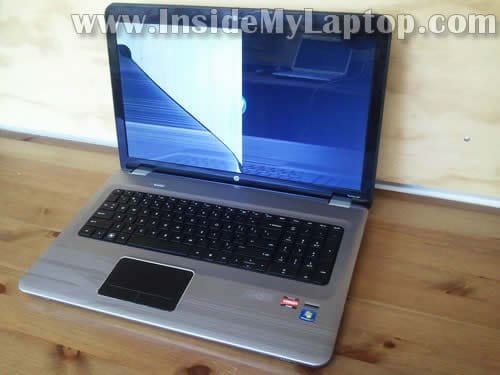
On this page you’ll find complete disassembly instructions for a HP Pavilion dv7.
This is my second guide for HP Pavilion dv7 series.
In this particular case I’m taking apart a HP Pavilion dv7-4177NR model.
I believe this guide should work for the all dv7-4000 series too.
READ THIS: I found that HP Pavilion dv7 come in different body types. If your laptop doesn’t look like one shown in this guide, check out my other guides. You’ll find links to other guide at the end of this post.
As you see I have a cracked screen. My target is replacing the damaged screen but I’ll do a few extra steps and show how to disassemble the entire laptop.
It’s not easy to replace the LCD on this HP laptop. In order to do so it’s necessary remove the palmrest assembly (STEPS 1-19), separate the display panel from the body (STEP 20-25) and only after that disassemble the display and replace the LCD (STEP 33-48).
Also, I show how to remove the motherboard and access the cooling fan (STEPS 26-32) but it’s not necessary to go though these steps in order to replace the LCD.
STEP 1.
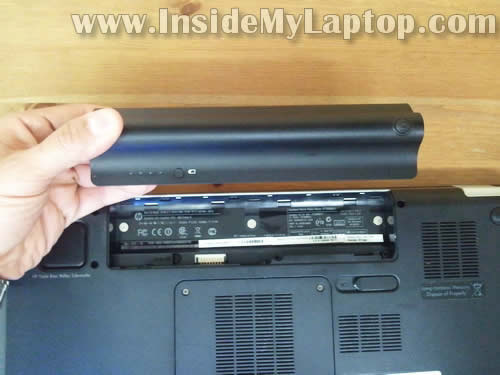
Make sure the computer is turned off.
Unlock and remove the battery.
STEP 2.
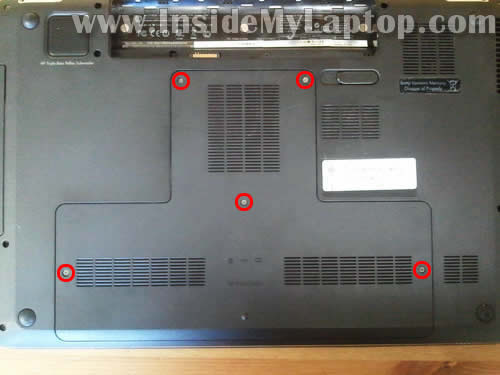
Loosen five screws securing the bottom hatch.
Lift up and remove the hatch.
STEP 3.
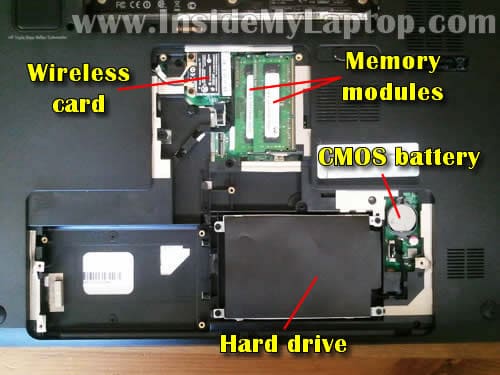
Under the bottom hatch you can access the following internal components:
– both memory modules ( I’ll leave them connected to the motherboard).
– wireless card.
– CMOS battery.
– hard drive.
This laptop can handle up to 8GB (2x4GB) DDR3-12800 SODIMM memory modules.
HP Pavilion dv7 has a bay for the second hard drive but in my case I had only one hard drive installed.
STEP 4.
Remove screws securing the hard drive assembly.
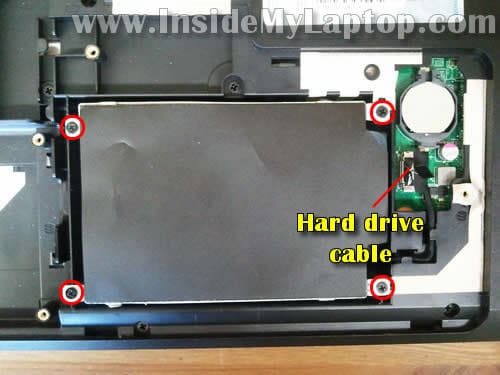
STEP 5.
Unplug the hard drive cable from the motherboard.
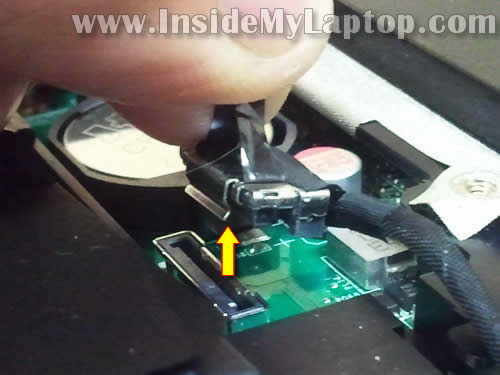
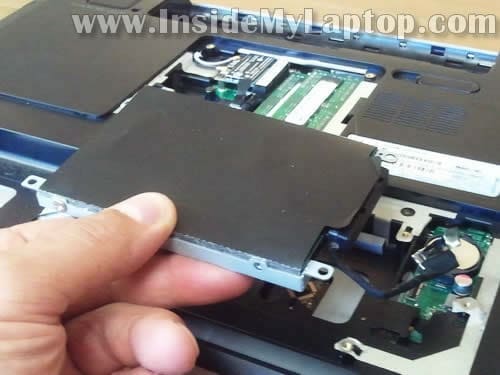
STEP 6.
Lift up and remove the hard drive assembly.
I recommend upgrading this regular (slow) hard drive to a 2.5″ SATA solid state drive. Installing a solid state drive will speed up your laptop significantly.
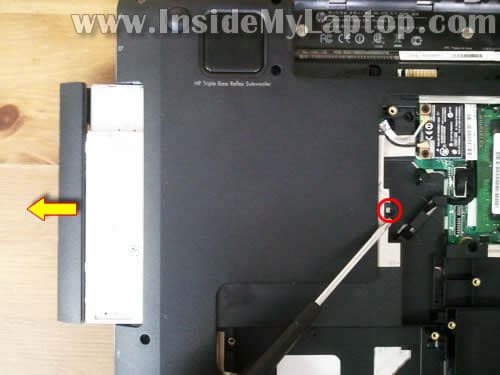
STEP 7.
Remove one screw securing the DVD drive.
Pull the DVD drive to the left to disconnect it from the motherboard.
Remove the DVD drive.
STEP 8.
Remove two screws securing the keyboard on the bottom.

STEP 9.
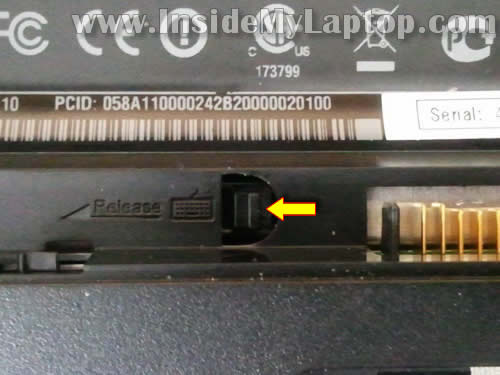
Slide the keyboard release button to the left.
This button located in the  battery compartment, on the left side from the battery connector.
STEP 10.
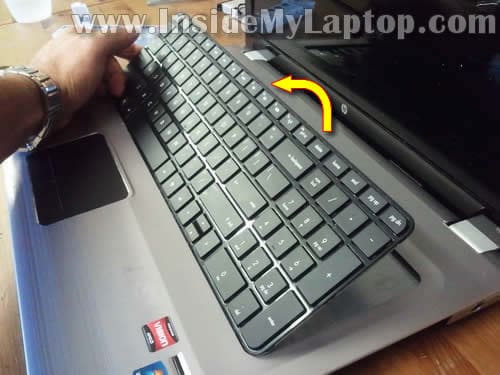
After that you should be able to lift up the upper side of the keyboard.
STEP 11.
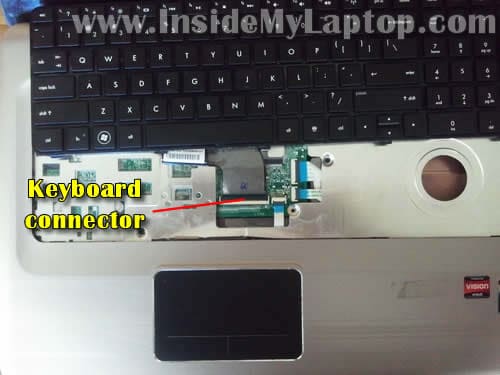
Move the keyboard towards the display assembly so you can access the cable connector underneath.
In the following two steps I explain how to unlock the keyboard connector and release the cable.
STEP 12.
Carefully lift up the left side of the connector retainer with your fingernail.
The retainer will open up at a 90 degree angle.
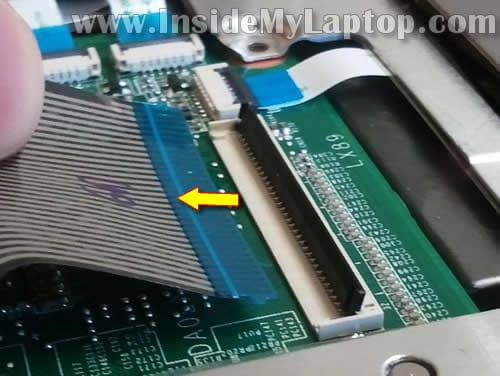
STEP 13.
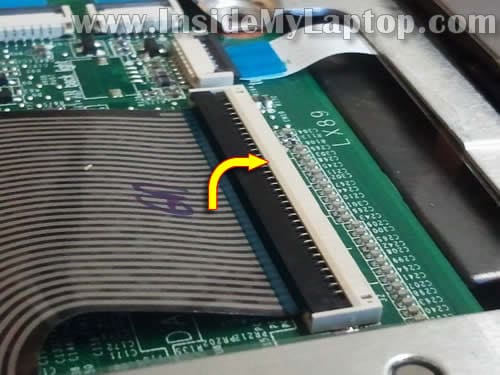
On this picture the connector is shown in the unlocked position.
Now you can pull the keyboard cable from the connector.
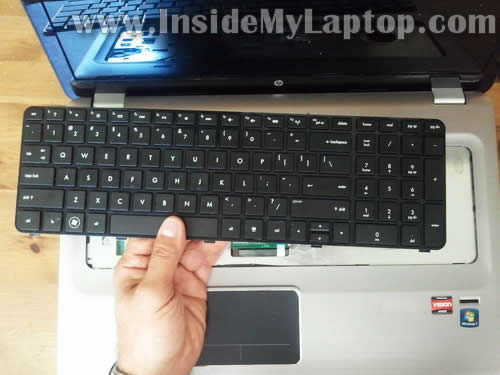
STEP 14.
Remove the keyboard.
STEP 15.
Remove all marked screws from the bottom.
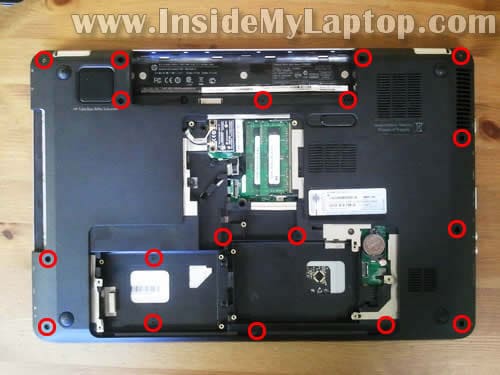
UPDATE: Thanks to Just a Guy (comment 6):
On step 15 wait to remove screw with blue circle and SPECIALLY screw with yellow circle. Another note there are also screw ping circle to remove!
Remove yellow and blue ONLY on step 18 having laptop in SAME position of step 18 image. THIS IS IMPORTANT!!
So it why? Seeing step 24 image u can see that display hinges screw remaing are only 2! It leave it very weak and can damage screw plastic part near cooler.
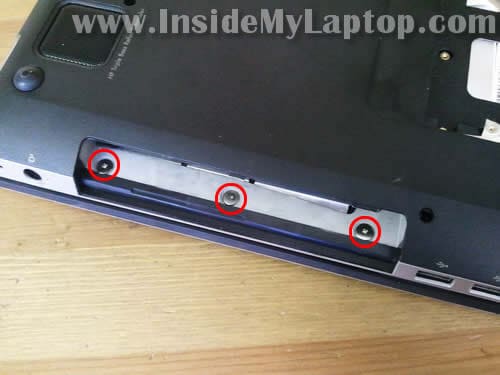
STEP 16.
Don’t forget to remove three screws in the DVD drive bay.
STEP 17.
Remove two screws securing the palmrest assembly.
Disconnect the following cables:
– wireless card cable.
– touchpad cable.
– finger scanning device cable.
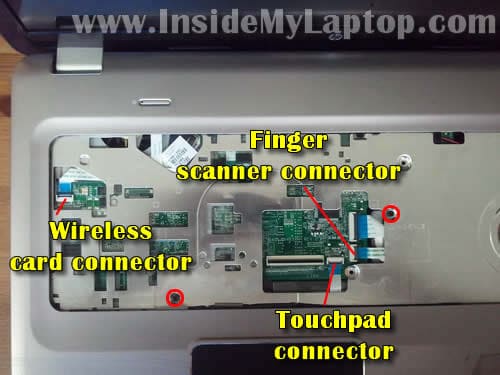
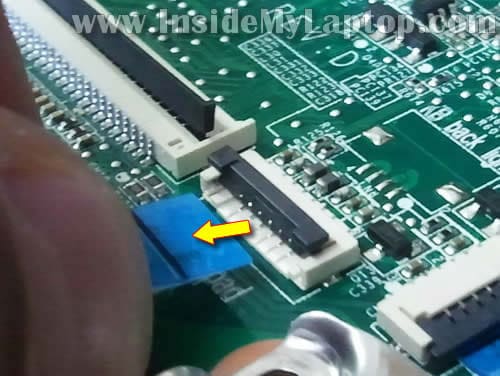
You unlock all three connectors using the same technique as for unlocking the keyboard connector.
Lift up the connector retainer.

Pull the cable from the connector.
STEP 18.
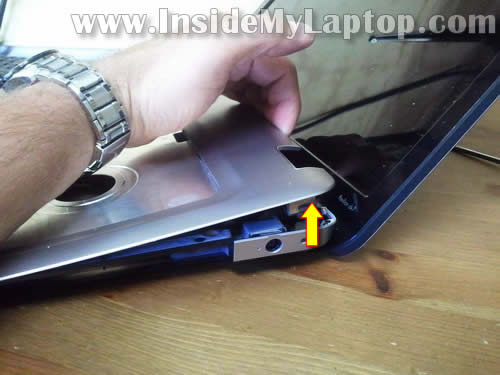
Now you can start separating the palmrest assembly from the bottom cover.
You’ll have to wiggle the palmrest in order to unlock hidden latches.
STEP 19.
Remove the palmrest assembly.
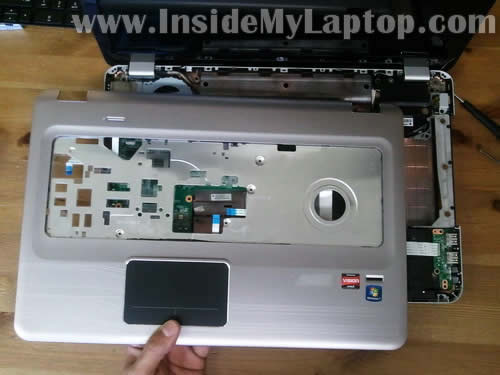
On the bottom side of the palmrest assembly you can access the following components:
– power button board.
– finger scanning device.
– touchpad.
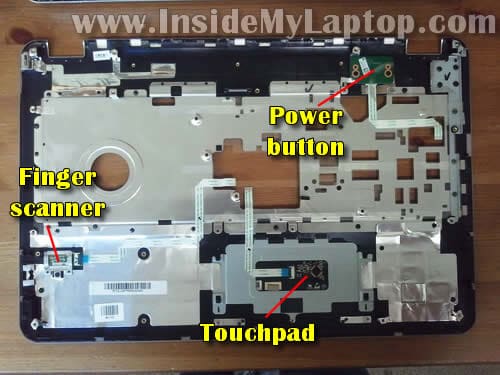
STEP 20.
Now we are going to separate the display panel from the base.
First, we’ll release the wireless card antenna cables and then unplug the video cable.
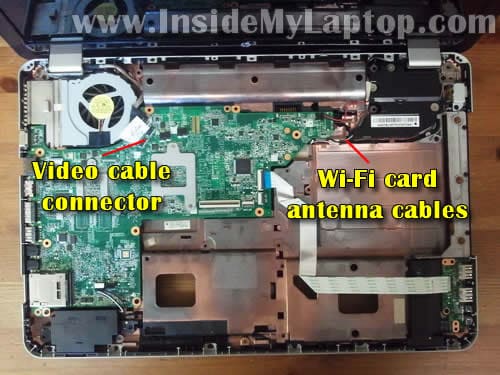
STEP 21.
Disconnect two antenna cables from the wireless card which is mounted on the bottom.
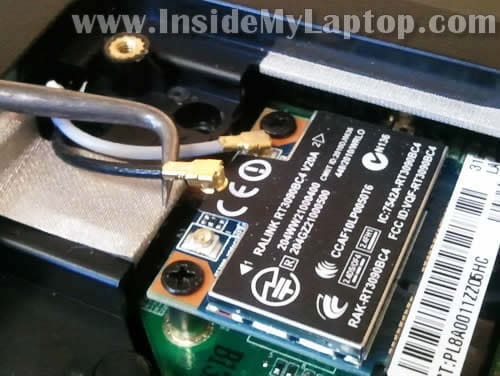
STEP 22.
Unroute both wireless card antenna cables.
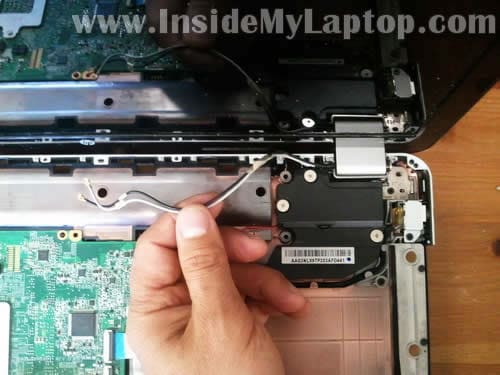
STEP 23.
Unplug the video cable connector from the motherboard.
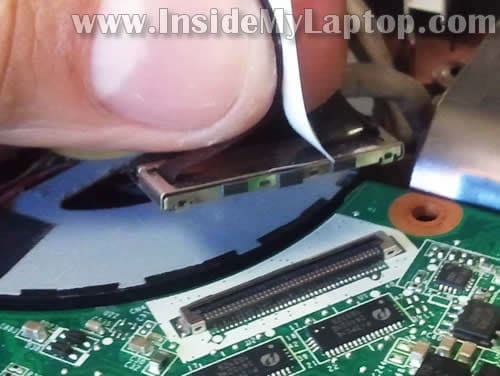
STEP 24.
Remove two screws securing the display hinges.
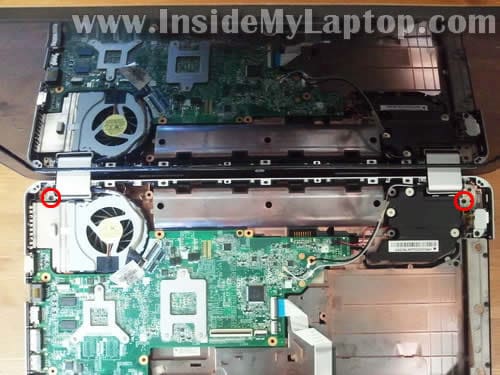
STEP 25.
Lift up and separate the display assembly from the base.
I will continue taking apart the display assembly and removing the screen in the step 33.
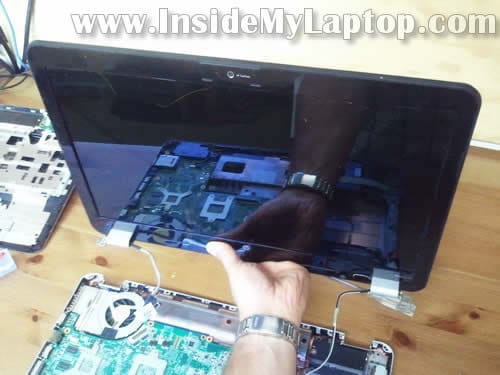
Laptop motherboard removal.
STEP 26.
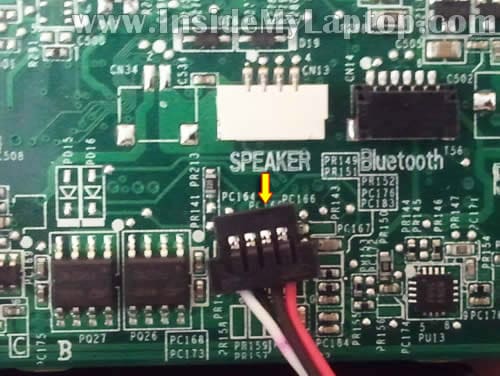
Remove two screws securing the motherboard.
Unplug the following cables (left to right):
– left speaker cable.
– USB board cable.
– right speaker cable.
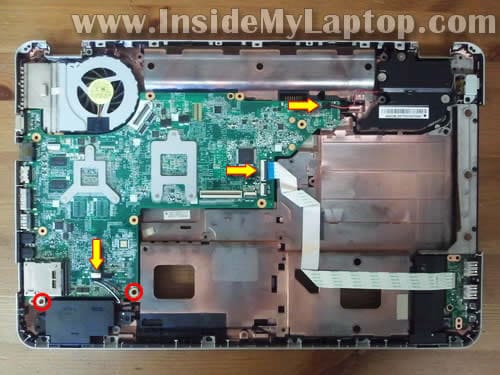
Both speaker cables have a regular male-female connector type.
Unplug the male part from the female part. Do not pull by the wires.
STEP 27.
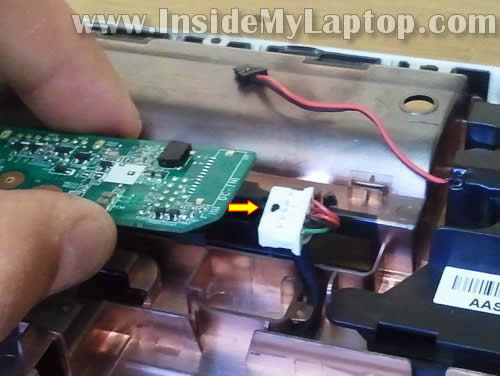
Lift up the right side of the motherboard a little bit and unplug the DC jack cable from the motherboard.
STEP 28.
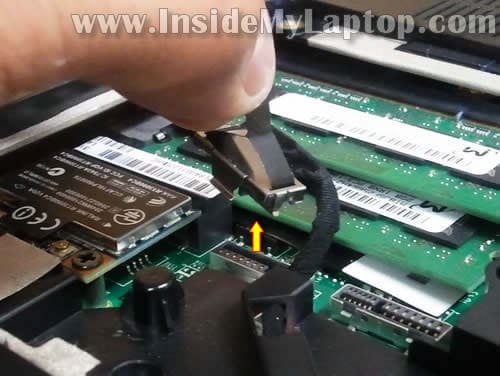
Also, in order to remove the motherboard, it’s necessary to unplug the hard drive cable.
You’ll find this connector on the bottom side of the laptop close to the memory modules.
STEP 29.
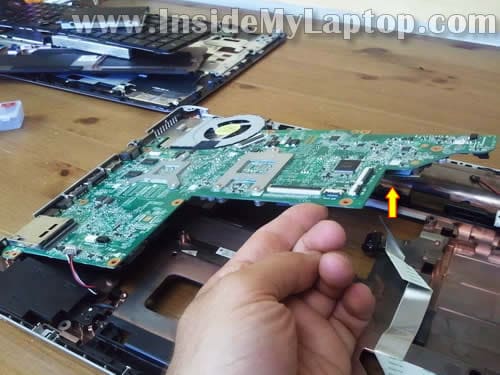
Start removing the motherboard from the bottom cover as it shown on the following picture.
STEP 30.
Remove the motherboard.
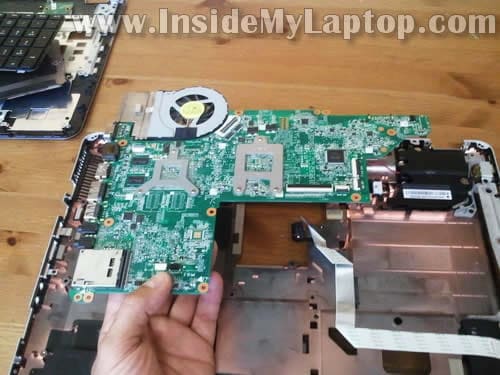
STEP 31.
The cooling fan assembly is mounted to the bottom side of the motherboard.
Yes, it’s necessary to remove the whole motherboard in order to remove and replace the fan.
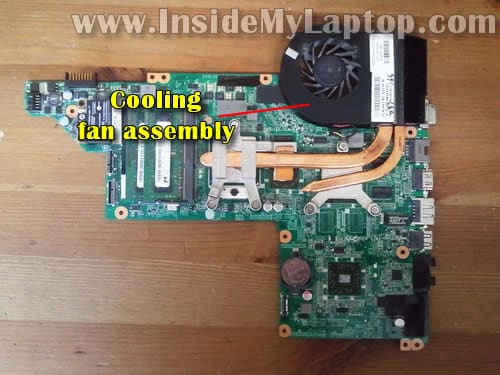
STEP 32.
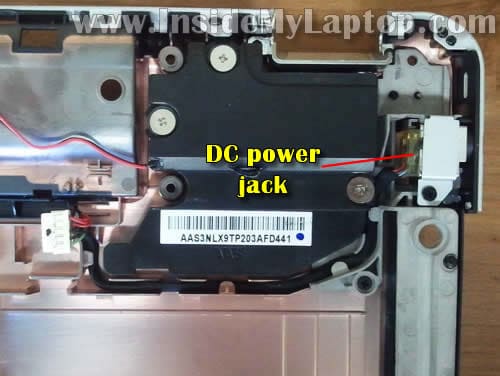
The DC jack is mounted in the upper right corner of the base.
The DC jack harness can be easily removed after you remove one screw securing the DC jack bracket.
LCD screen removal and replacement instructions.
As I mentioned before, in order to replace the screen it’s necessary to separate the display panel from the base as it explained in steps 1-25.
STEP 33.
You’ll find two screw covers located in the lower left and right corners of the display bezel.
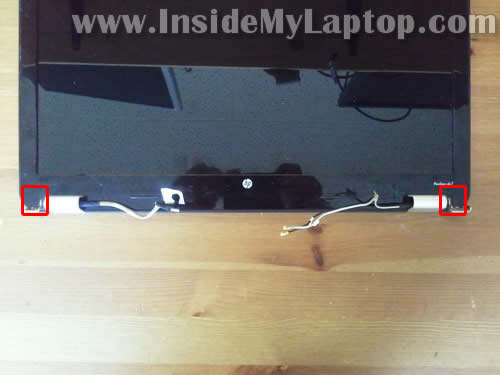
STEP 34.
Remove both covers with a sharp object.
Remove two screws found under those covers.

STEP 35.
Start separating the bezel from the display back cover. I’m using the guitar pick for that (you can use a piece of plastic).
Insert the guitar pick between the bezel and display back cover and move along the side. This will help you to unlock the hidden latches.
Also, the bezel is glued to the screen with sticky tape. You’ll have to apply some reasonable force to separate the bezel.
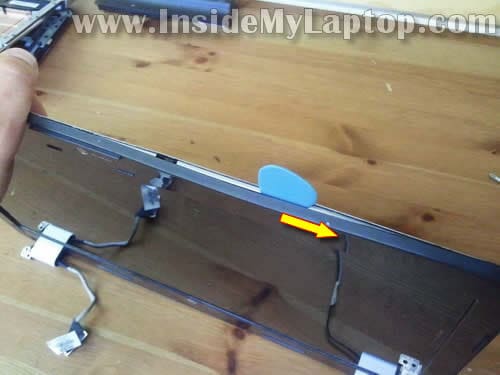
STEP 36.
Continue removing the bezel on the upper part of the display assembly.
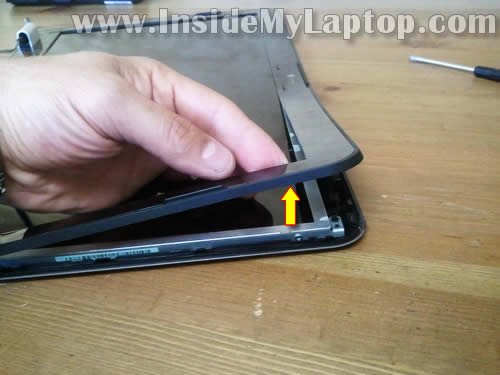
STEP 37.
Lift up and remove the right hinge cover.
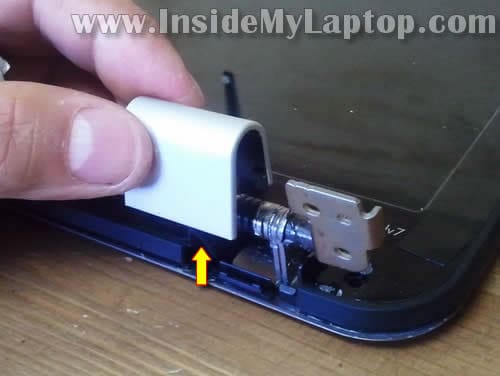
STEP 38.
Lift up and remove the left hinge cover.
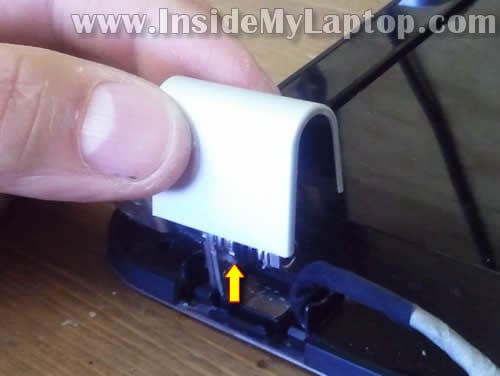
STEP 39.
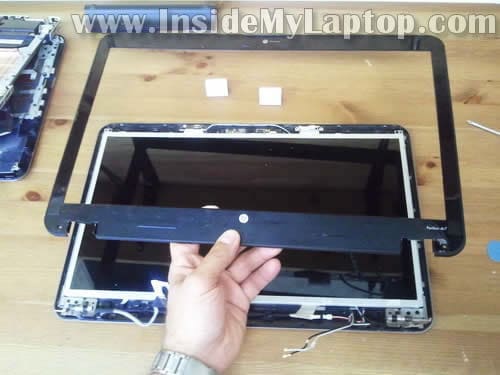
Remove the screen bezel.
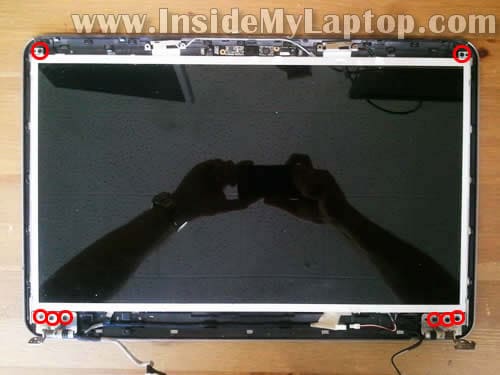
STEP 40.
Remove eight screws securing the LCD assembly to the display back cover.
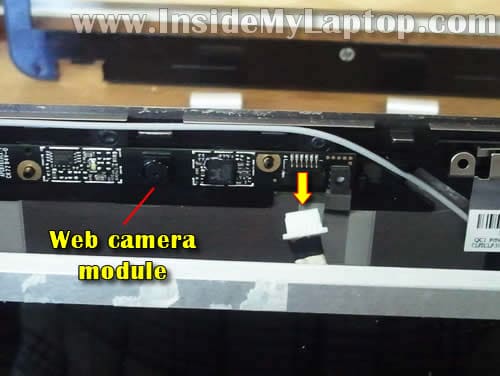
STEP 41.
Disconnect the cable from the web camera module.
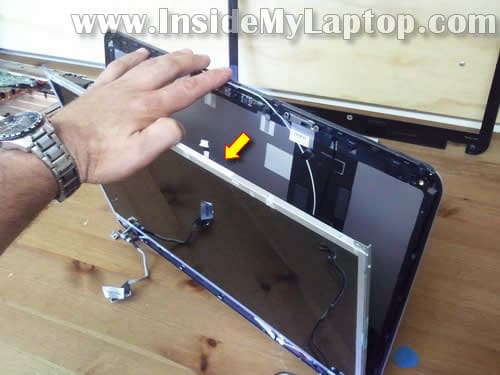
STEP 42.
Now you can separate the LCD assembly from the display back cover.
STEP 43.
Place the LCD face down on the table.
On the back side you can access the video cable and web camera cable. Both cables bundled into one harness.
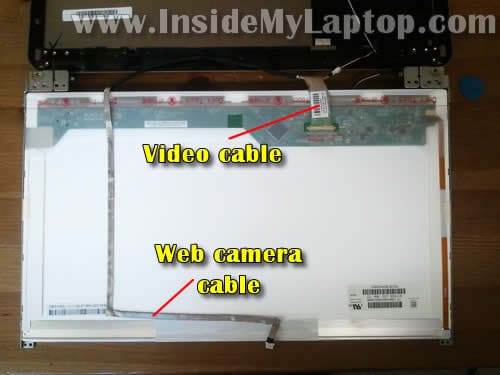
STEP 44.
Unglue the web camera cable from the back of the LCD.
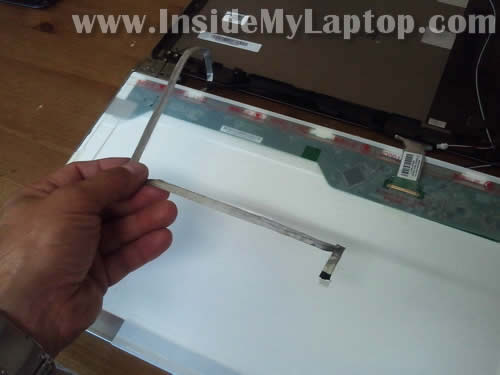
STEP 45.
Disconnect the video cable.
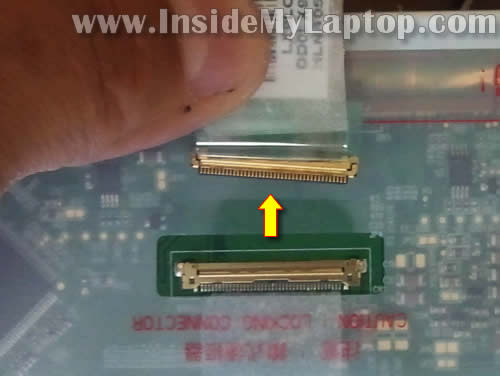
STEP 46.
Remove the LCD assembly.
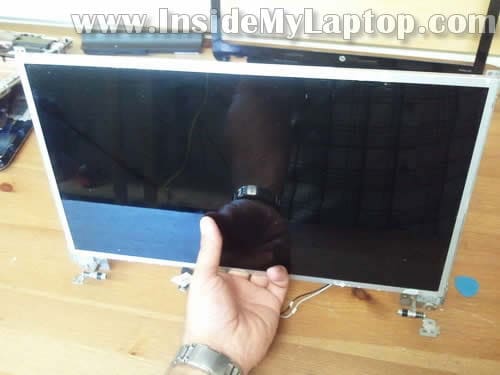
STEP 47.
Remove two screws securing the right hinge mounting bracket. Transfer this bracket to the new screen.
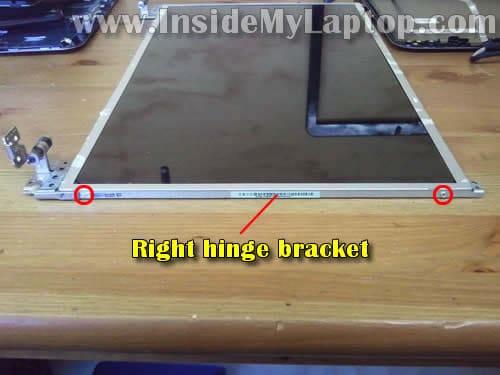
STEP 48.
Remove two more screws securing the left hinge mounting bracket. Transfer this bracket to the new screen.
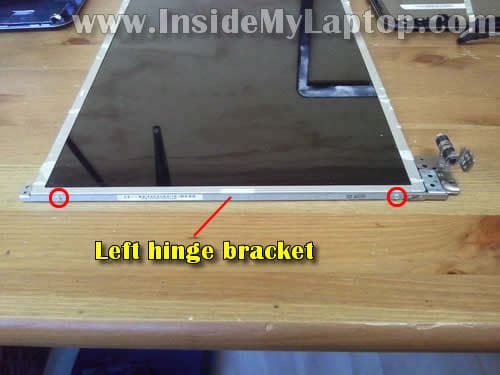
Now you can replace the damaged/failed LCD and assemble everything back together following this guide in the reverse direction.
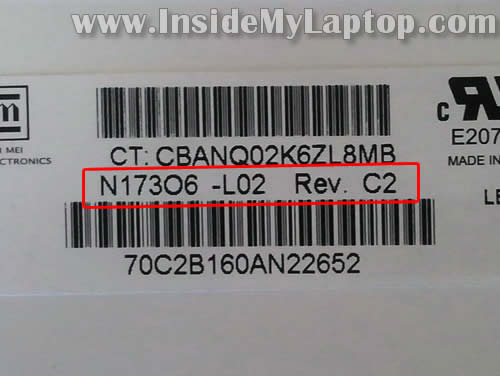
The best way to find a new replacement screen is searching by the model number.
The model number printed on the back side of the screen. In my case this is model N173O6-L02 Rev.C2
When you search for a new LCD make sure the video connector on your new screen located in the same place as on the old screen.
Related posts:
First HP Pavilion dv7 disassembly guide (for dv7-1000 series)
Third HP Pavilion dv7 disassembly guide (for dv7-6000 series)
Fourth HP Pavilion dv7 disassembly guide (for dv7-2000 and dv7-3000 series).
Chris
My two HP DV7’s were both overheating and I found this instruction a very big help to open up the laptops and clean out the dirt in the fans. There is one issue with step 15 were there are three screws at the bottom of the battery compartment that must be removed but is not indicated in this instruction. Thank for your help.
Juan Naranjo
I have a question. I am about to undertake this because it seems the GPU is dead on mine. Is it integrated or is it a different card all together? Reason being is because I get the black screen of death and the drivers aren’t working. Can you give me a step in the right direction?
IML Tech
@ Juan Naranjo,
The GPU is integrated into the motherboard.
Just a Guy
Hi, i’ve disassembled it; i’ve just an advice for all.
On step 15 wait to remove screw with blue circle and SPECIALLY screw with yellow circle. Another note there are also screw ping circle to remove!
Remove yellow and blue ONLY on step 18 having laptop in SAME position of step 18 image. THIS IS IMPORTANT!!
So it why? Seeing step 24 image u can see that display hinges screw remaing are only 2! It leave it very weak and can damage screw plastic part near cooler. I solved with no problems with a bit of plastic glue but basically it is dangerous do not follow my advice. My 2 cent 🙂 Thx for author of this guide.
A grateful reader
Thank you for this guide – it helped me take apart a laptop – now if I could just find reasonably priced parts, I would be set!
Natzem Lima
What kind of tools will I need to undertake this?
IML Tech
@ Natzem Lima,
Probably one PH1 Phillips screwdriver would be enough.
David
Just a Guy, Oh My God, I wish I saw your comment a bit sooner!!! a tiny metal/plastic piece broke off from where the monitor attached to the left side of the body…
I was so scared thinking I broke my $1200 laptop… I managed to put it back together, and it seems to be working fine…
I am not opening it again… will try vacuum the vent… This is too risky 🙁
IML Tech
@ David,
I copied his comment into the main guide. I hope it will help other DIY-ers.
Chuk Gleason
IML Tech –
Excellent site; I’ve fixed two HP laptops for my daughters; Pavilion DV6 & a DV7; clear directions, good pictures. Top notch.
In retrospect, both laptops had similar problems with the hinge tension being too tight; as I replaced the appropriate parts each time I also loosened the tension; involves holding one side of the hinge & backing off the tensioning nut about 1/2 to 3/4 turn, each side. In the DV7 it can be found under the hinge cover that’s removed in Steps 37 & 38. Too much tension had caused the lower body case around the screw in the upper right of pic in Step 15 to break (yellow circle in Just A Guy’s picture).
On the DV6, the problem manifested itself as broken hinge metal.
Just a clue to other people coming to your site for help.
Thanks, bunches!!
Chuk
Jim
I recently replaced the CPU fan in my dv7-4165dx laptop. Prior to replacing the fan, my laptop battery was working fine…charging to full capacity. However, after replacing the fan and re-assembling the laptop, the onscreen battery information shows that the battery “will not charge”.
There was one screw in the battery compartment that would not tighten when I re-assembled the laptop. Other than that, both the disassembly and the re-assembly went well…and, I followed these steps to-the-letter.
I did not see any information above that related to the battery connections (internally) in the laptop so, I’m not sure how to trace the path to see if something may not be connected inside.
Anyone have any ideas as to why the battery isn’t working? All thoughts would be appreciated.
IML Tech
@ Jim,
I would make sure all screws are installed correctly. It’s possible the laptop case is not assembled correctly and the battery doesn’t make good contact with the connector on the motherboard. Make sure it’s seated correctly.
Jim
@IML Tech says, “I would make sure all screws are installed correctly. It’s possible the laptop case is not assembled correctly and the battery doesn’t make good contact with the connector on the motherboard. Make sure it’s seated correctly.”
Thanks for the quick response. So, can I assume:
1) That the battery makes its connection to the motherboard through the DC Jack Cable shown at step 27 ?
And
2) If the DC Jack Cable is making a good connection with the motherboard, then I will be looking at a battery replacement?
mike v
@Chuk Gleason…OMG!! That is exactly what happened! The left side clip where the screen connects broke off because of the tension. As a result, at some point when the top was opened the screen got cracked. I asked my daughters what the heck happened and they claimed they have no knowledge of anything happening. I figured they left it on one of our fold out tables and the cats knocked it over. They didn’t know anything and now it makes sense why. I sent my computer in for repair and they would not do anything because of the cracked screen…which is not covered under warranty. So I bought another screen and put it in….thanks to this site! I’ve never worked on laptops. I had no clue until I saw this site. Thanks so much!
With all that being said, this is my question…who do I take this up with? The warranty people will try to get out of it because of whatever reason. So do I push up the ladder with them, or do I take this up with HP directly? There was no fault on my / my daughters parts. It is a manufacturer’s default and my stuff got broke as a result of it. Is this a well known issue with HP? I had to pay for the screen. I also bought a new set of rails because I thought the left side was broken. But it was in fact due to the fact that HP tightens the stuff too much.
Lomardi
Thanks a lot man for this tutorial ! your saved my life !
Kiro
Thank you for the guide! It works perfectly. The part with the two bolts for the display hinges is really important.
I would like to tell you about a fan problem I had and how I fixed it. It may help other people.
I had problems with my fan. I used compressed air to blow the dirt from the outside without disassembling the laptop but it kept overheating and there was even a warning that “a fan is working incorrectly and the system will shut down in 15 seconds”. It was true – the fan was hardly moving (only 2-3 revolutions and stopping again). I decided to disassemble the laptop.
After I reached my fan I saw no dirt at all!!!
Then I removed the fan from its motor and put grease on the shaft of the fan and inside the motor opening. Turned the fan by hand to spread the grease and assembled everything back.
When I started the laptop it was working perfectly, no noise from the fan, no overheating.
Thanks again to the author of the guide and good luck to the users. Don’t be afraid, just be careful.
Cody
Thanks for the guide! My fan stopped working so I took it apart and removed an insane amount of dust from the fan. So now everything is working fine.
Salient
This is a wonderfully thorough guide. Thanks for writing it.
Anyone who owns a dv7 knows they run hot — putting a Radeon GPU and i7 CPU in a laptop is insane, given how hot they both get. I’ve finally solved my overheating problem — sort of — by literally cutting the case with a utility knife, removing the lattice in front of the GPU fan (upper right corner when looking at the back of the laptop). If any other readers do this, also get four pegs to stand the laptop on — the fan just can’t get any airflow otherwise. (This was after disassembling the unit cleaning the fan.)
To other dv7 owners looking to solve the “slows to a crawl and gets red hot” problem: Best of luck to you. Seriously, you’re basically f**ked. Propping up the computer from underneath to improve airflow bought me about 5-10 degrees Fahrenheit improvement, and cutting the lattice got me another 5-10 degrees cooler. Finally I can *do* shit without the computer slowing to a crawl… for a couple hours, at least. Once you’ve done that, disassembling the CPU fan unit and installing new thermal paste on the heatsink is your next best heat-improvement task, but unless you’ve done that kind of thing before, it’s probably best to let a pro do it — getting heatsinks right takes some practice.
My next plan is to cut the top of the case near the power button, to get some top-to-bottom airflow. But that’s a larger project; a utility knife won’t cut it, so to speak. 🙂
Edmund
Hey, great tutorial, thanks! In order to just clean my fan, is there a simpler way? Isnt it possible to loosen the screws on the back and clean it by the back? Thanks
IML Tech
@ Edmunds,
Find an air compressor and blow air into the fan grill on the bottom of the laptop. After that blow air into the grill on the side. Do it until all dust is gone.
Just make sure the air pressure isn’t too high or you can damage the fan.
Terry
I would like to know some info about removing and replacing the actual CPU.. not just the fan.. but the CPU itself..
IML Tech
@ Terry,
In order to access and replace the processor you’ll have to remove the motherboard as it shown in the step 31.
After that you loosen screws securing the heatsink and remove the heatsink.
Finally, you open the lock located on the socket and remove the processor.
Robert
Excellent instructions and good photos. Thank you.
I followed this guide to fix an overheating problem.
Dust gathers inside the fan cowling at the cooling fins – it is not visible before disassembly.
Remove the fan cowling side cover (4 screws) and vacuum/brush out.
Jason
What steps would be required for replacing the left hinge, and how can I get a replacement?
IML Tech
@ Jason,
You’ll have to remove the screen bezel as it shown in the step 39. After that you should be able to replace the hinge.
When you remove the top cover, as it shown in the STEP 19, take a closer look at the hinge. It’s possible the hinge itself is good but mounting bracket on the case is broken.
Amy k
I have this exact notebook, I’m not overly unexerpianced with taking computers apart but this is my first laptop. is it nessary to have a “clean” room for this? (static/dust free room) Im afraid to do anything with my laptop as I cant afford to replace it, and its not under warrenty anymore. Its over heating every 15 mins or so even though I blew out the fan from the vent.
Also what is the purpose of the “mesh” that covers the access panels vents?
Hans
Thanks for the detailed instructions. very helpful esp notes about the cooling fan and overheating. these hp dv7 laptops get crazy hot. side note for anyone with similar heat issues, I picked up a cooling base that plugs in via usb. keeps it much cooler.
Domi
merci beaucoup pour toutes ces explications …qui m’ont sortie de la galère bravo pour tout le boulot que cela a représenté de faire un tuto comme ça…. encore mille fois merci à vous Domi
Andre Lourens
Very comprehensive. Very well done.
Alex
Thx a lot for your tuto
I was able to clean this damned laptop
Next is a pro book 4520s now
Seems all hp have fan issue…
Regards
Matt
Thanks For the Guide!!!
I wanted to find out though, Have you ever had an experience with the laptop overheating?
Specifically the section where the graphics card is located?
Do you perhaps know how to solve this, it is Driving me insane!!!
Shashen
wow i followed this step by stek and after cleaning a very dirty, totally blocked fan of dust and getting rid of old paste and putting some new paste i getting a constand 57°c-60°c ,,,,, wow,,,,,,
Tips
unscrew the screws that is mounted on springs that is marked 1-7 and also unscrew them in that order (now you also will have to clean the heatsinks and cpu’s, look on youtube to do it the correct way. Now you can finaly work with the fan. To get to dust of the fan unplug it first then unscrew 4 very very tiny screws out and it flips open. But be carefull,,,its very tiny screws. Voila.
Good luck and just take your time. I did it in 2 hours and it was my first time.
Jens Hessel
Hi – Thanks for a nice instruction. I have bought a new motherboard, and there is a “100 EFK K11” on my old one, that is not on my new motherboard.
I wonder if I can mount the new motherboard even if?
The placement of “100 EFK K11” is on the bagside of the SD-slot…
Can you advise me?
Marcianne
Thanks so much! I just successfully replaced a broken screen thanks to you.
Keith Baker
This was great – thanks so much I used it to disassemble and reassemble my laptop to clean the fan and to reapply thermal past. I didn’t remove the screen all the way but I did encounter the issue in step 15 where one of the plastic screw mounts broke that holds the monitor. Doesn’t seem to have adversly affected it though.
One piece of feedback – before step 18 you need to remove the 3 silver screws in the battery compartment. They were not listed in the guide above but when I got to step 18 I couldn’t get the palm rest off and thats when I realized those screws need to come out too.
Other than that though, an excellent guide – thanks!!
Quick question though! Do you or anyone else have any recommendations to keep dust out. I mostly use my laptop like a desktop with an external kbd and monitor so it sits on a hard desk surface normally. I’m wondering if I should raise it up on something and if there’s anything I can use to keep dust from getting sucked in to the fan that wouldn’t adversely impact the air flow for cooling. That’s said, the laptop is 4 years old – maybe they just need a good clean out every few years??!!
Oh and one more thing – there’s a BIOS setting to have the fan be “always on†which was enabled and which I just disabled – any input on that? I thought the fan would just run as needed when the processor and graphics chips get hot!
Thanks so much for your help – I feel pretty proud of myself too – my first time to take a laptop apart and put it back together and I couldn’t have done it without your guide!
Ariel Dormeau
Thank you so much, without your help,it was impossible.
Ariel from FRANCE.
Best Regards
Michelle
Wow, I really shouldn’t be looking at this. I now want to take apart both my laptops, nothing to fix but would be so cool!
Maybe next vacation!
Ed Massie
I had the same issue as Keith Baker. I disassembled this 4000 series laptop due to the palm rest being separated at the left hinge and the screen died at the same time. Im doing the repair for a friend. The bottom shell is broken where the screw for the hinge mounted and the outside screw has broken through the case. I think they may have dropped it.
35
Keith Baker August 27th, 2014 at 1:08 pm
One piece of feedback – before step 18 you need to remove the 3 silver screws in the battery compartment. They were not listed in the guide above but when I got to step 18 I couldn’t get the palm rest off and thats when I realized those screws need to come out too.
Mike
I had the exact same issue as a couple of others. Someone is having me fix a 4000 (4286dx) series with the a cracked case and the bracket anchoring the left side of the screen ripped out of the case. The laptop worked except for the video to the monitor. I went through and took apart the monitor case and found that the video cable connecting to the back of the screen was partially disconnected.
I plugged it back in and it worked. Protip – just connect the power cable and the video cable to test the monitor without having to completely reassemble the laptop. The laptop will start without a keyboard detected.
As for the case itself, the plastic anchor ripped completely out. It looks like a flaw in the design of the case because the air vent is in between the vga and the corner and the other side of the laptop is solid. That being said, if you’re going to drop the laptop, try not to drop it directly on that corner.
There doesn’t appear to be a legitimate way to fix the case once it has been broken. There would have to be some innovative jerry rigging to get that bracket to open and close without breaking again.
A couple of helpful tools for anyone else with this issue:
http://h10032.www1.hp.com/ctg/Manual/c02666747.pdf – manual for 4000 series
The bottom half of the case is called a base enclosure. The part numbers are 615443-001 for silver finish 605345-001 for finishes other than silver.
Geoff G
Ok, so I’ve followed the instructions, stripped it down & it looks like I have the broken plastic for the hinge problem. Short of getting a new base is there anything I can actually do about this? Also, if I just left it with the gaping hole in the casing would I totally screw up the laptop if say, I just left the laptop open all the time?
IML Tech
@ Geoff G,
If the base assembly is damaged you’ll have to replace it with a new one.
No, you should be fine unless you spill something on it. 🙂
Noman Rais
Where is bluetooth card ???
Computerdesk
A way I have dealt with the bottom casing flaw is if you have all the broken parts, try to super glue them in there original space. Let it set good. Then take an epoxy glue, spread it all around the plastic parts. Let it set overnight and it should be good enough to mount your screen and use all the screws. It will continue to cure as you put it back together and start using it. I’ve done this with more than the DV7 – 4,000 series, saves the customer a lot of expense for something that was the design fault of the casing.
jason9922
Thank you for posting these walk through’s. It’s really nice being able to look at you go through the whole thing with detailed instructions and pictures compared to just a black & white service manual which are usually hard to understand the pictures.
@Computerdesk – That’s one good method but not very strong unless you have enough room to layer the composite about 4 times. I instead use original, not plastic or quick cure, only ORIGINAL JB Weld. What I do is mix the activator at 60% to 40% steel (it will get warm). Wearing powdered latex gloves (or add some extra baby powder) I’ve rebuilt many broken hinge supports on many different models of laptops (usually brand new ones when parts are impossible to find or insanely expensive). What I do is get a bunch of q-tips with a little cup with rubbing alcohol, and after placing the JB-WELD onto the bottom base, let it get a little stiff, then I use my fingers covered in powder to mold what’s broken or support what’s broken. Then after quickly putting on fresh gloves, I use Q-tips soaked in rubbing alcohol to push and finish molding and forming the JB WELD. Also they work great to remove any excess JB WELD that doesn’t look stock. I usually throw the piece in my oven set at 90’F for the rest of the night. Next day I carefully drill out holes for screws if there were any (start with a super small bit and work your way up to the size hole you need. If you want (I always do to make it look stock) I will touch up any rough spots in the steel hard JB WELD with jewelry files ($$3.00 eBay) I also quickly take some black matte craft paint and even put a couple coats of craft paint over the JB WELD. When all said and done the repaired areas are usually stronger than they were originally. I’ve made a decent amount of money fixing brand new laptops (especially Toshiba’s) that aren’t covered by warranty using this exact method mostly because there are no replacement parts out there yet or if there are they are crazy expensive. The last one I did this to was a Toshiba and they only replacement base on the entire internet was listed at $200! Just for the empty plastic base. Just thought I would share my method. Hope this helps someone.
Robin M.
Thank you for a magnificent tutorial. Your instructions are clear and easy to follow, your photos — with marked locations of screws and connectors — are perfect. I needed to remove the motherboard NOT to replace it but, rather, to be used onstage as a prop in a professional theatre production. [ I’d acquired a laptop that was on its way to be recycled anyway… ] I could never have figured out how to access the motherboard without your help. Thank you much.
Tammie
Very helpful. I replaced the cable for the display and it’s working again. A certain repair service couldn’t get the part and wanted to replace other stuff that was cosmetic. Ordered part through Amazon for $20 and fixed it myself. I work in IT, but in software, so this was my first laptop repair.
masum
how to disassembly my hp laptop 2000 2d29TU.
masum
My display shutter lock broken.How to repair?
Ania
These are so useful, but unfortunately my model doesn’t seem to have that D-shaped keyboard latch used to open it up… I can’t seem to find any instructions whatsoever online on how to open the keyboard without it! Could any kind soul help please?
Mark
I have an HP DV7-1020US and unfortunately it doesn’t have the normal cheesy plastic bezel in the front like the hundreds of other laptop screens I’ve replaced. Instead, when you unscrew the two bottom screws it allows you to remove the top cover and everything is done from the back of the LCD. The part where I’m stuck is that with this stupid model, there is a plastic/glass screen that is in front of the lcd and it’s actually GLUED in place with standard strip tape that goes on all 4 sides. I have NO IDEA how to pry the LCD screen apart from the front screen-bezel. Any ideas/suggestions/links Thanks.
IML Tech
@ Mark,
Here’s the service manual I was able to find for HP dv7-1020us laptop.
http://h10032.www1.hp.com/ctg/Manual/c01918142
Display disassembly starts at the page 77.
If the front bezel blued to the screen, I guess you can use a hair dryer to warm up the bezel and soften the adhesive.
Jim Durand
Worked perfectly. Cleaned the fan and back together again in an hour. awesome. I missed the step about the keyboard lock release because I was on the wrong model, but didn’t matter, all good
Danny
Thank you for the guide, I used it to disassemble the DV7-4165DX laptop because the left hinge keep on opening. I replace the palmrest and assemble the laptop back together, but now there is a blue hue/tint. FYI, I can still see through the blue tint, it’s just the blue covers over everything. Everything still works, the new touchpad, power button, etc. wireless and everything works, but I don’t know what causes the Blue tint. I’m about to take it off again, but I wonder if anyone knows the cause and fix for it.
Tom H
Great instructions, thanks. I replaced my CPU fan on DV7t-4000. Well worth my $20 contribution via paypal.
IML Tech
@ Tom H,
Thank you very much for your generous contribution.
rschwaag
Thanks for the great instruction how to disassemble this type of notebook. Without this instruction it would be more or less impossible. 🙂
First I had no video signal and I redisassembled the laptop and saw that the pin of the fan was not plugged in for 100%, just for 90%. After that everything is working and im happy with it!
Thanks so far,
rschwaag
Laptop User
will the machine still work if the monitor is removed and everything else is put back together without the monitor at all? just want to use the computer and keyboard with a larger monitor…
Thanks,
S S Ragte
HP Pvilion DV6 series : Is there shortcut way : Kindly brief servicing sticky key board only; Without dissembling full laptop.
Lee
My Pavilion dv7 has been randomly shutting down both while I’m using it and when I stop using it and sometimes makes groaning sounds when I turn the machine back on. I’ve babied this computer and no drops or damage and still has original tags as new. Does it sound like the hard disk needs replacing? Or what? It is i7-3610QP model CPU 2.3Ghz 64bit open system. Thanks for suggestions
rob
Update to step 15 and comment 6. The original link provided for the picture is dead. Managed to get it from the archive and reuploaded it to 2 different hosts.
http://imgur.com/xMmgJ1A
http://postimg.org/image/rmb0rtfu5/
Ted Crosses
Hi,
Thnxs very much for your excellent work. Very clear and good illustrations.
Together with all the hints and suggestions from the comments that came after your first publication of/on it.
Far better than all the BS stuff about cleaning fans videos etc. on youtube and HP support sites.
From your publication, I have made some kind of manual out of it just for my personal use, in case of, I have to go for it, then I could use it as some kind of reference.
Have a nice day and keep up the good work.
Regards, Ted