On this page you will find a few laptop disassembly tips intended mostly for beginners. If you are just getting started with DIY laptop repairs, I would suggest reading these tips and hopefully they will help you to avoid some expensive mistakes during your laptop disassembly and reassembly.
Using right tools for the job
Always use right tools for the job. Your main tool will be a screwdriver. Make sure the screwdriver tip fits the screw head perfectly and is not too big or too small. A bad or improperly selected screwdriver can strip the screw and make it hard to remove.
Take pictures
If you cannot memories the correct location of each screw I would recommend taking pictures before taking your laptop apart. It helps a lot during the reassembly process. I’ve been fixing laptops for years but still take pictures when taking apart a new model.
Removing screws
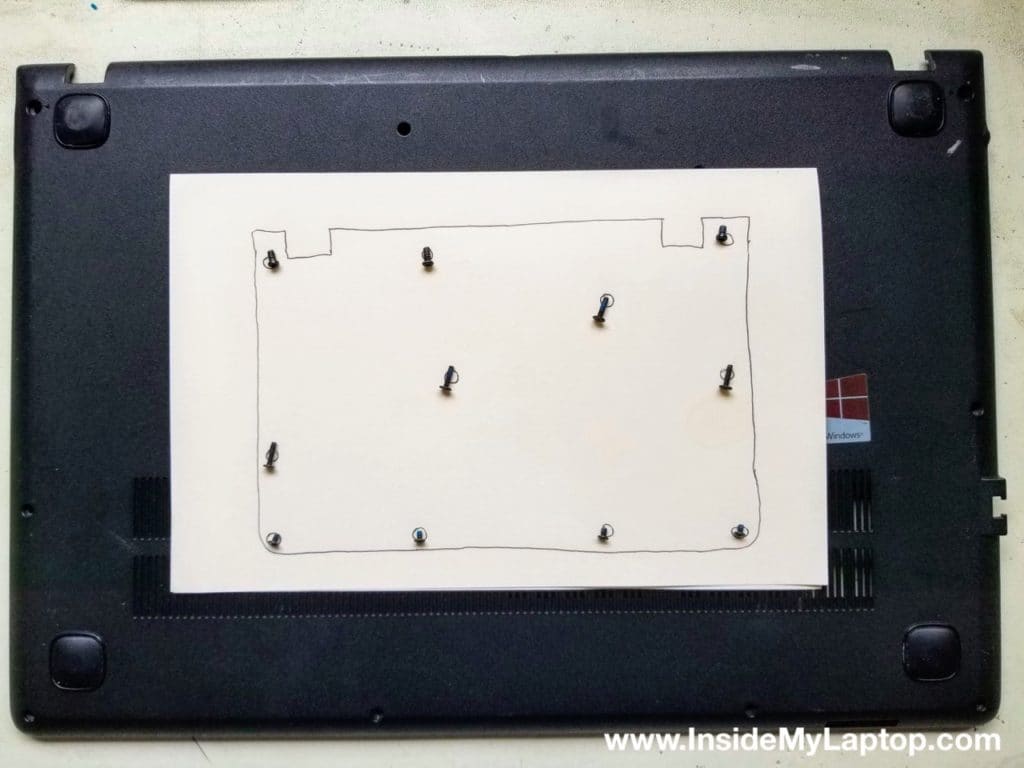
Be organized. There are many different types of screws used in one laptop. If you install a wrong screw during the re-assembly process, you can damage the laptop. I would suggest making notes or drawing a diagram for all screws you remove. The diagram will make the re-assembly process less stressful. A simple drawing on a piece of paper helps a lot.
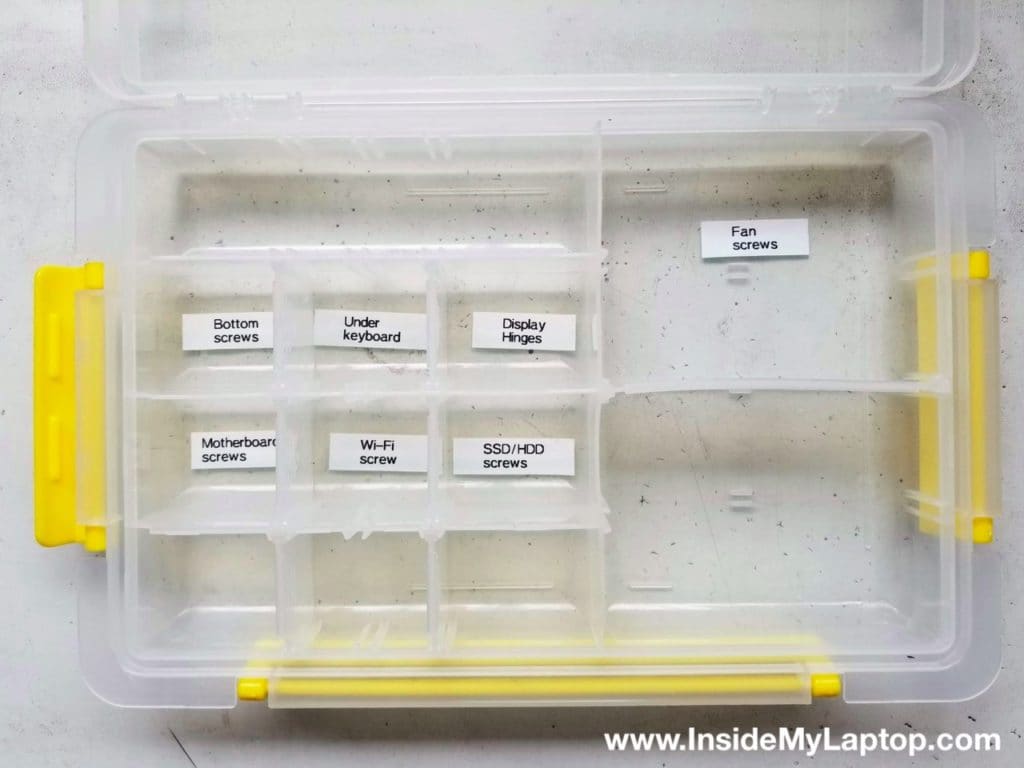
Very often one project will take a few days because you have to wait for spare parts to be delivered. It’s a good idea to keep all screws in one container with labeled sections.
Disconnecting laptop battery
Always disconnect the battery before working with the internal laptop component. With the battery connected there is some voltage flowing through the circuit. If you accidentally drop a screw on the motherboard or touch it with a screwdriver you can fry the motherboard and make it unrepairable.
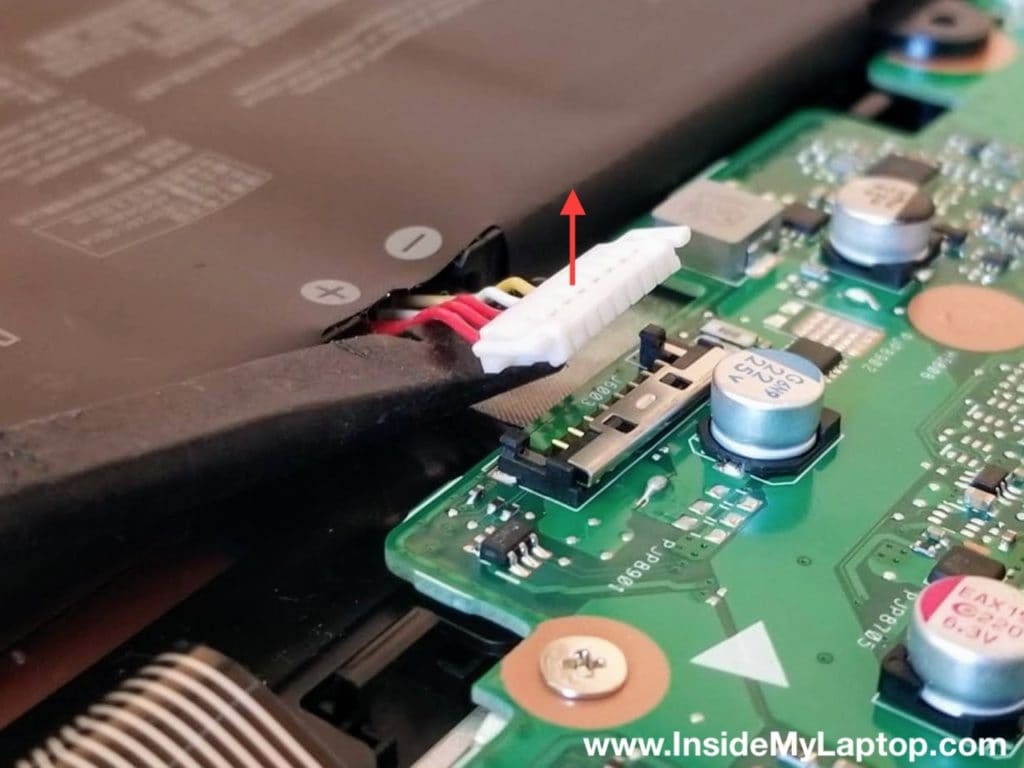
Never unplug the battery connector using a metal tool or screwdriver. You can short the pins inside the battery connector and damage the battery or the motherboard circuit. Use plastic tools instead.
Removing top case or bottom case
In most cases during the disassembly process you’ll be at the point where you have to separate the bottom cover from the top case. Make sure all screws attaching two parts together are removed.
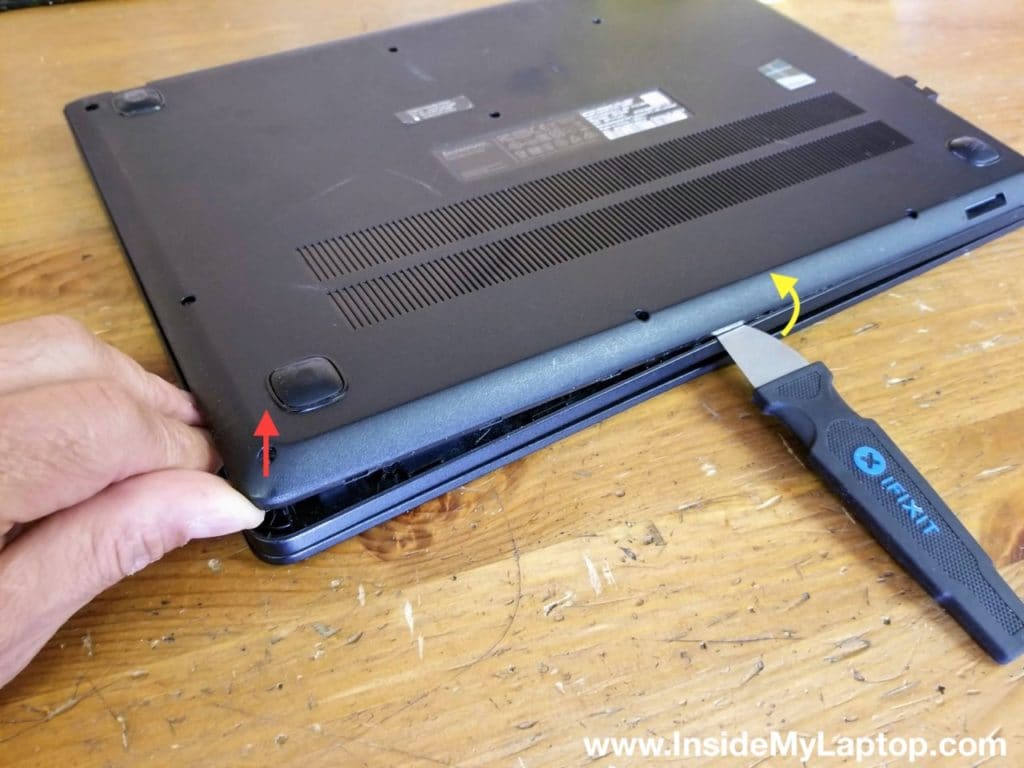
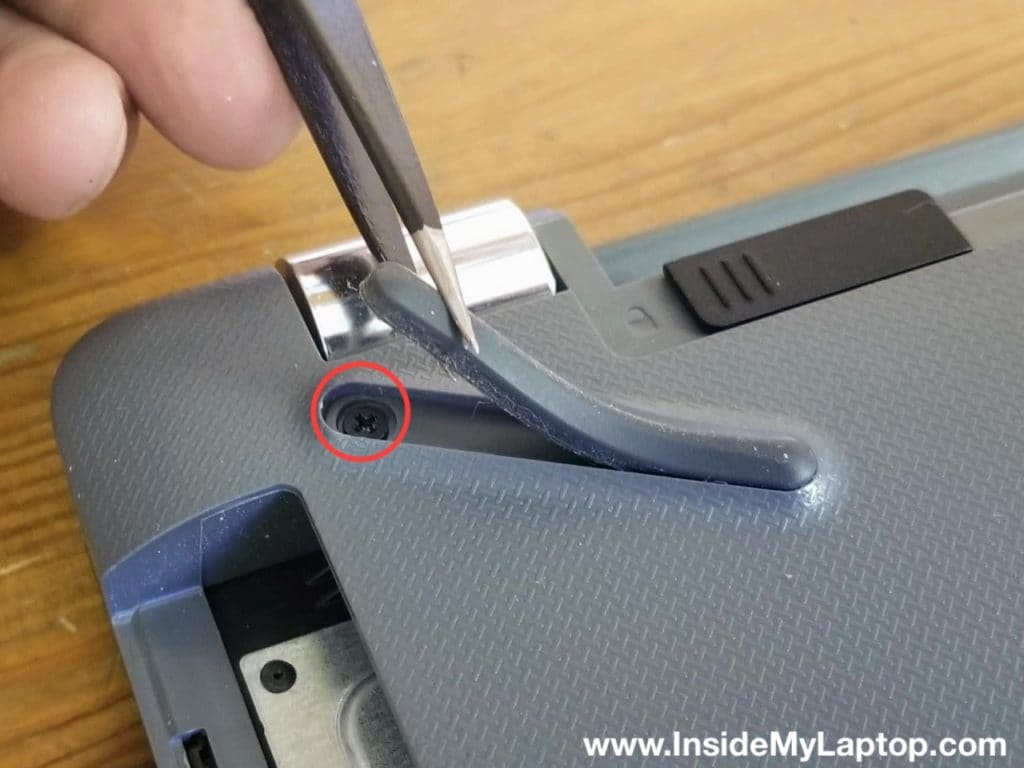
If the bottom cover doesn’t separate from the top case even after applying some reasonable force, start looking for hidden screws.
Very often you can find hidden screws in some unexpected locations. For example this laptop has a screw hidden under the rubber foot.
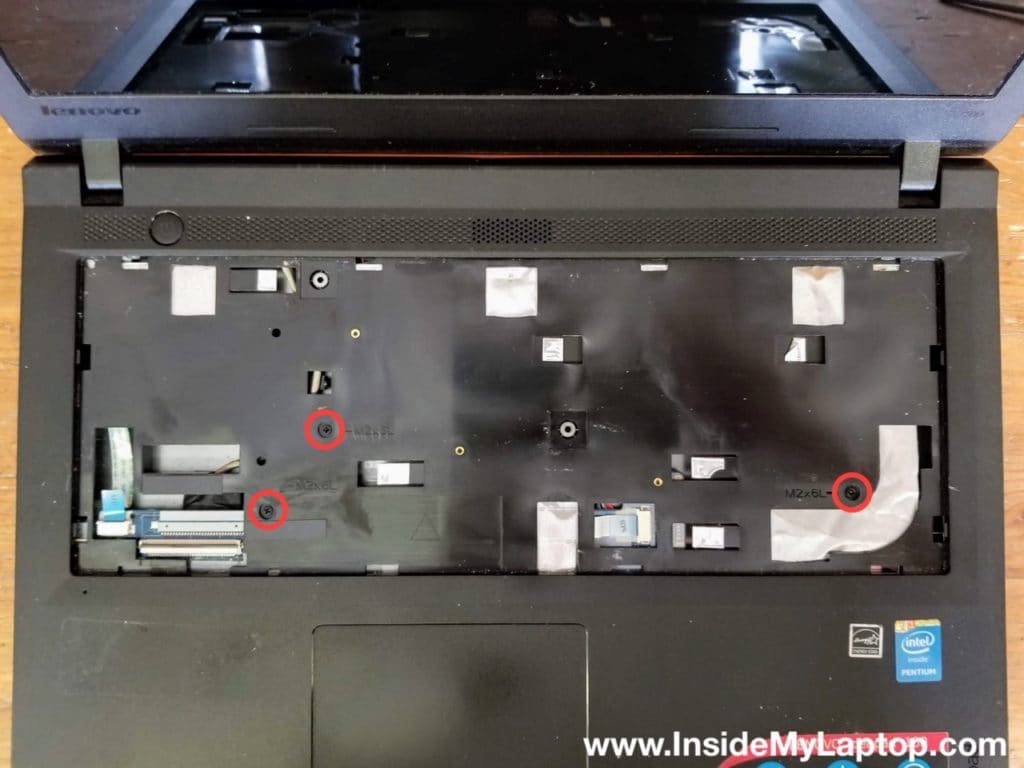
If the laptop has a removable keyboard most likely you will find some hidden screws under the keyboard.
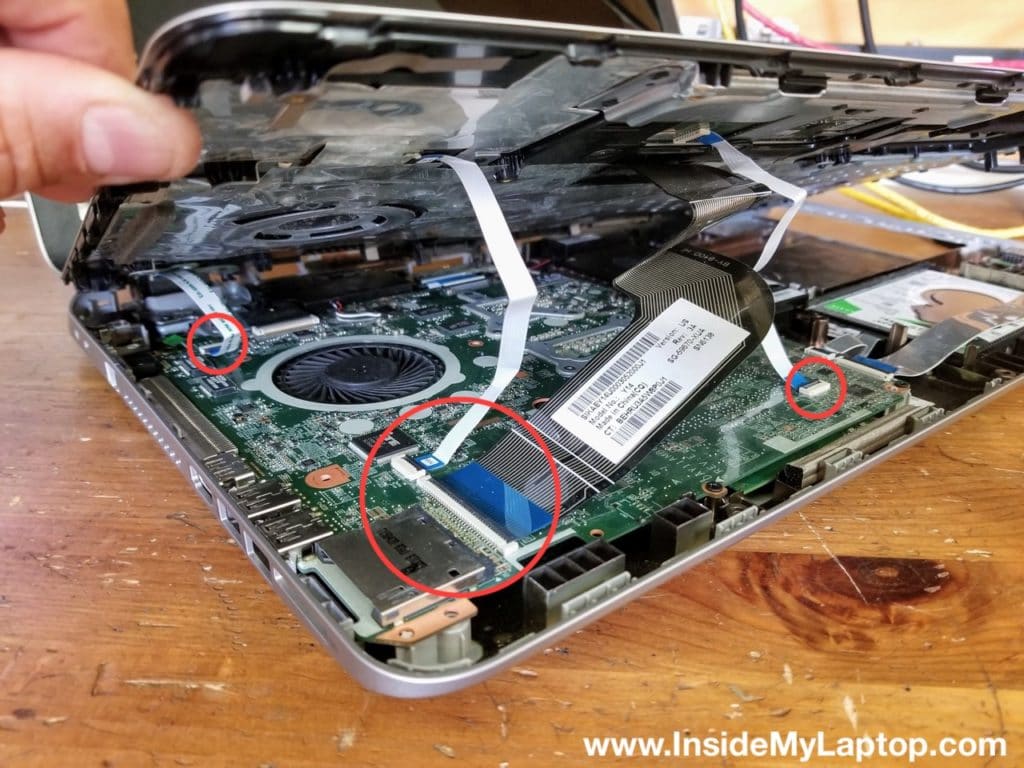
In some laptop models you have to remove the palmrest assembly, not the bottom cover. Pay attention to cable located underneath. You must disconnect all cables before removing the palmrest.
Routing internal cables
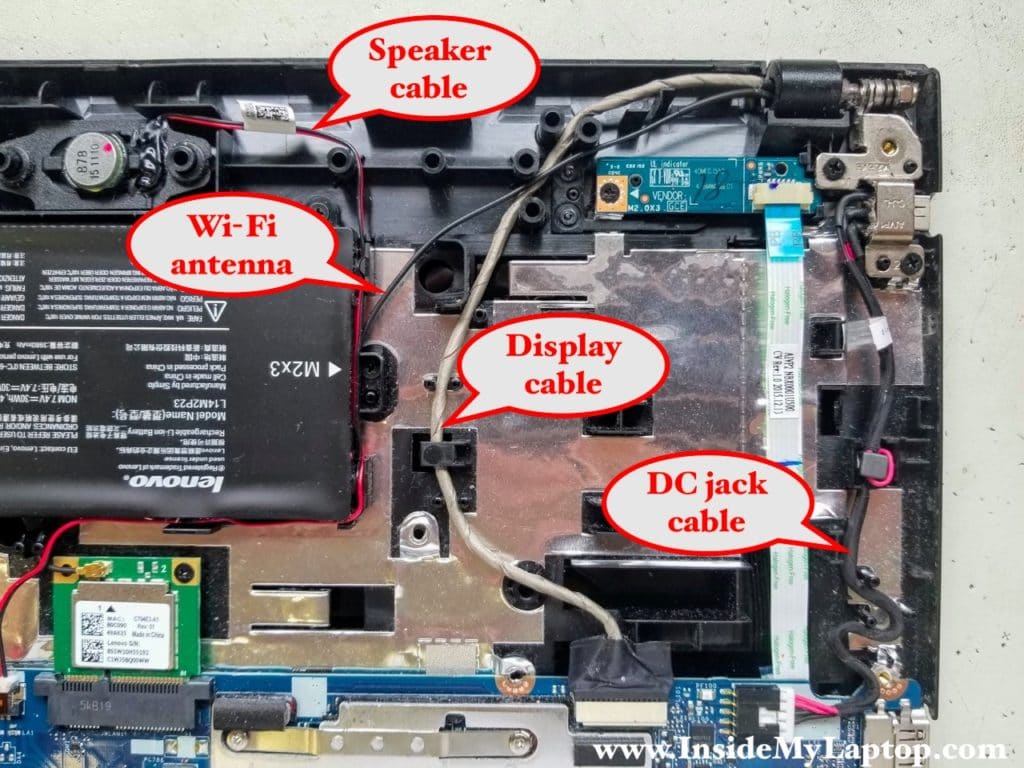
It’s very important to remember how internal cables are routed inside the laptop. On the following picture you can see a good example of multiple cables routed in one place. Each cable has a guided path. If one of the cables routed incorrectly, it can get pinched when you try to assemble everything back together.
A picture taken before disassembly will help you to route all cables correctly.
Disconnecting internal cables
The are many different types of connectors used in a regular laptop. In this part I’ll show most common connectors and explain how to unlock them.
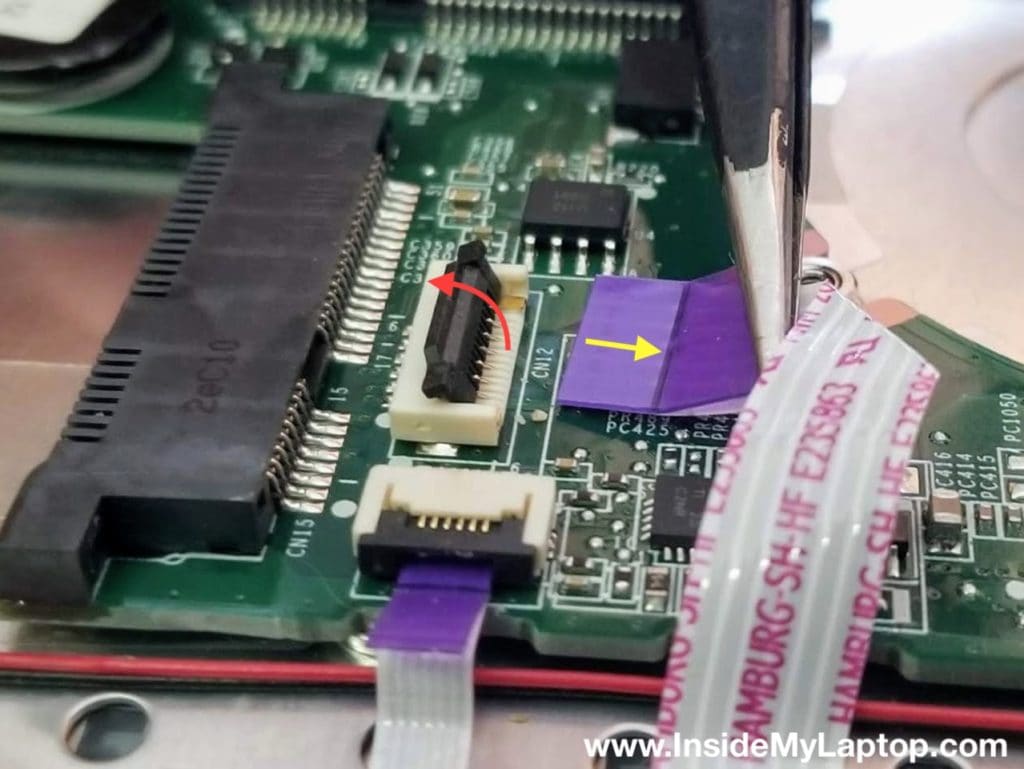
Here’s the most common type of connector you will find on any laptop motherboard. It’s used for wide and narrow cables connecting touchpads, keyboards, I/O boards and many other internal components.
In order to unlock this connector it’s necessary the lift up the locking tab first (red arrow). After the connector is unlocked you can pull the cable out.
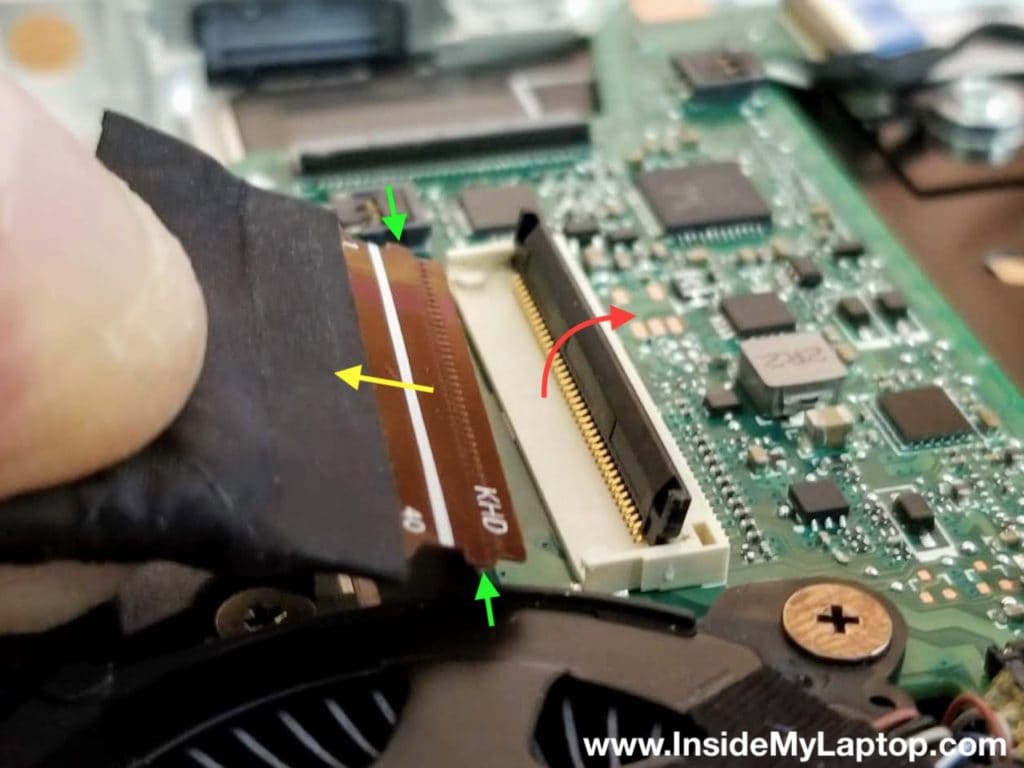
The connector shown on the following picture is similar to the previous one. If you take a closer look at the cable you will see two extensions on the sides (pointed with green arrows). After unlocking the connector (red arrow) you’ll have to lift up the cable a little bit to pull it out.
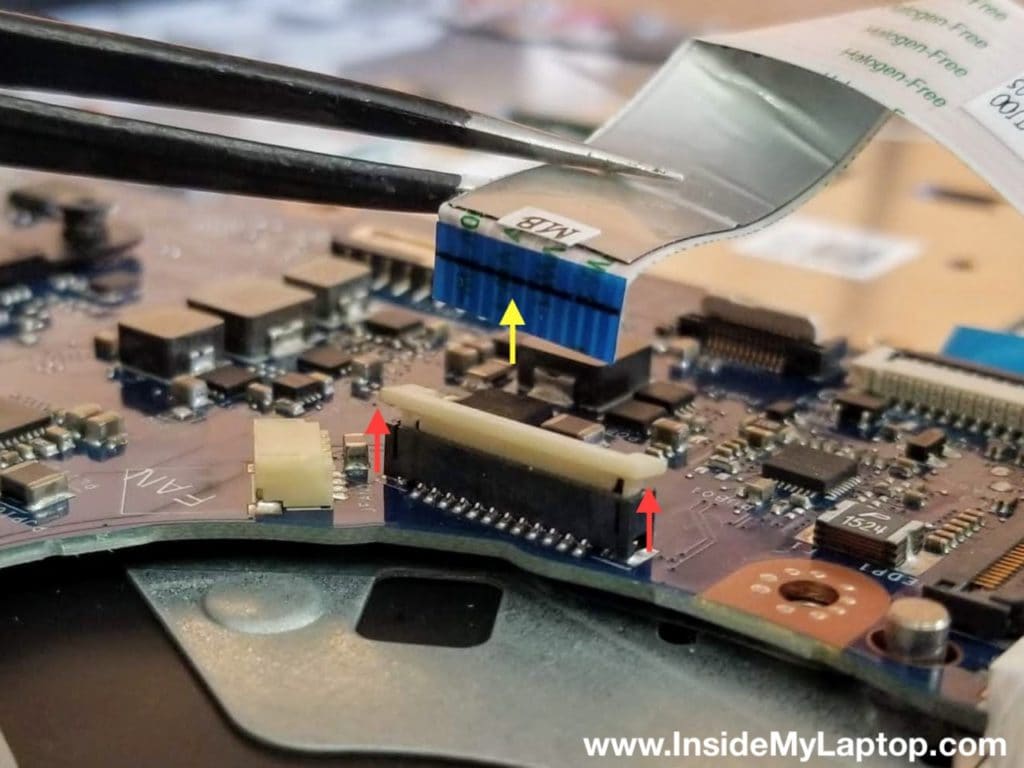
The following type is less common but still widely used. It’s a vertical connector for flat cables. You can unlock this connector by sliding the locking tab up (red arrows). Do not apply any force or the locking tab might separate from the connector. It must stay attached.
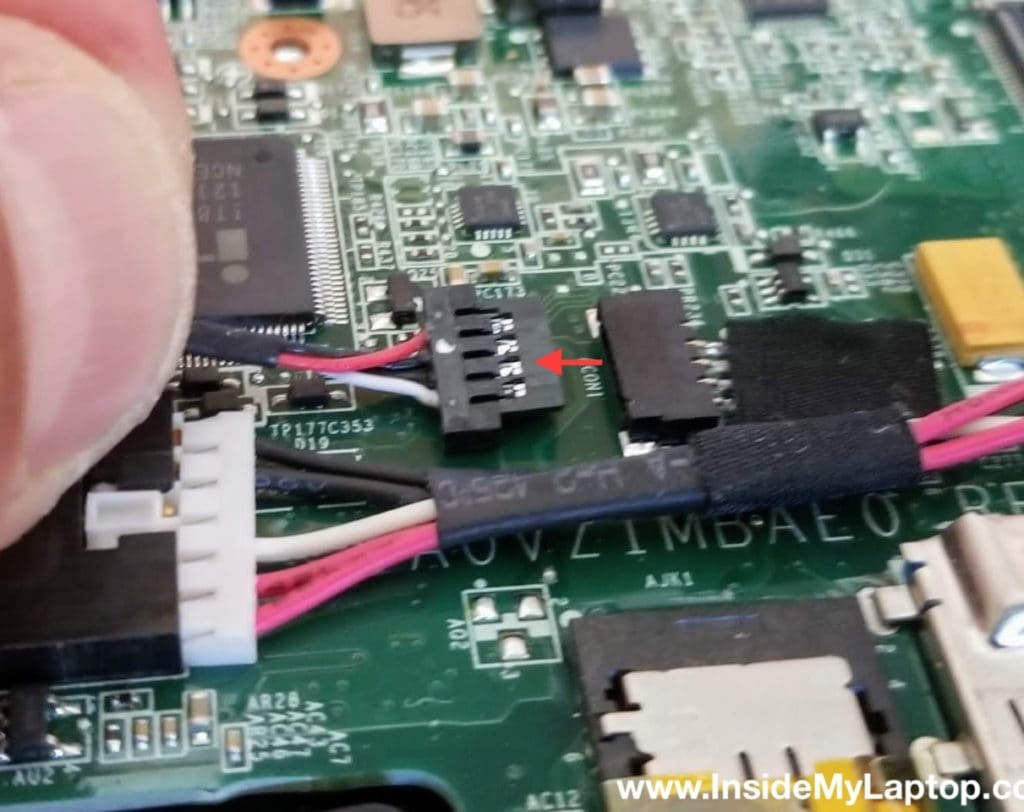
The following type of connector commonly used for cooling fans, speakers and DC power jacks. In order to disconnect the cable you have to unplug the male part attached to the cables from the female part on the motherboard.
Do not pull by the wires or you can accidentally separate them from the connector.
The following connector type used mostly for speakers and fans. Lift up the connector to disconnect it from the motherboard.
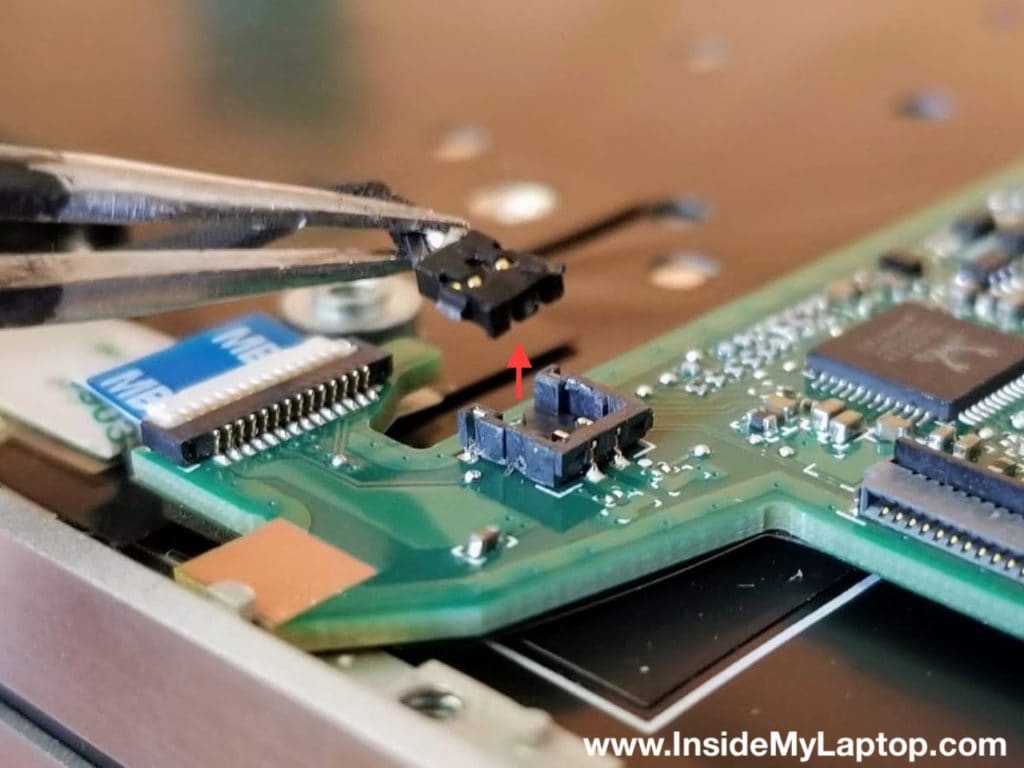
The following connector found mostly on display video cables. Lift up the connector to unplug it from the motherboard.
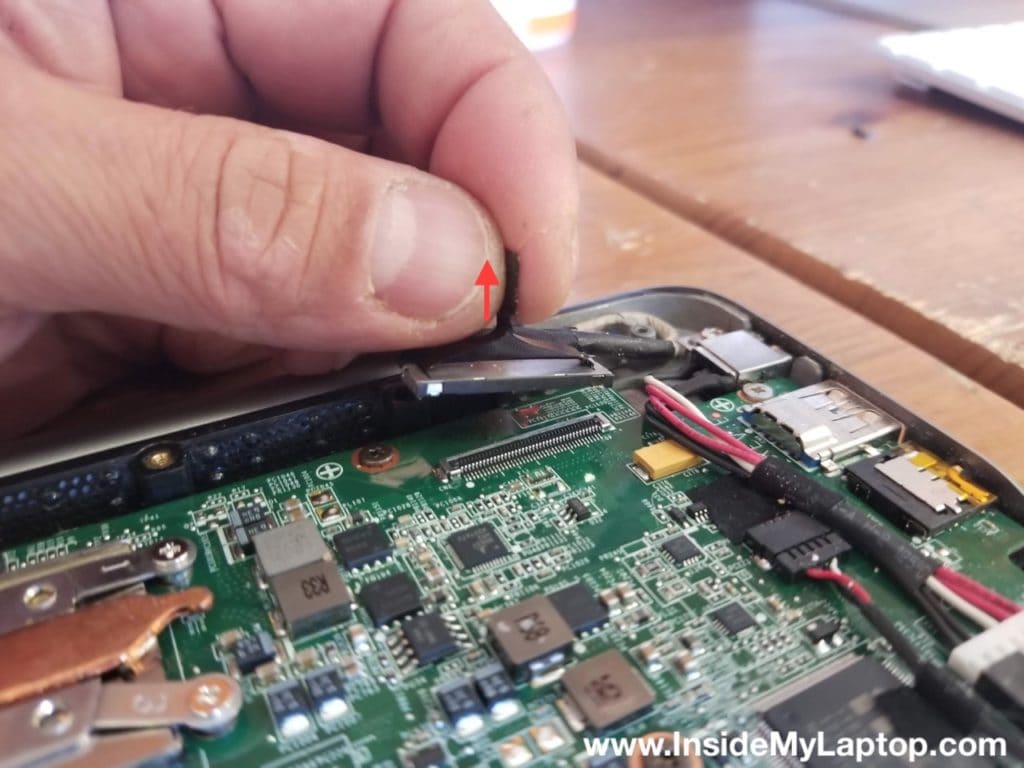
Finally, a connector without any locking mechanism. The cable is simply jammed inside and you disconnect it by pulling the cable out.
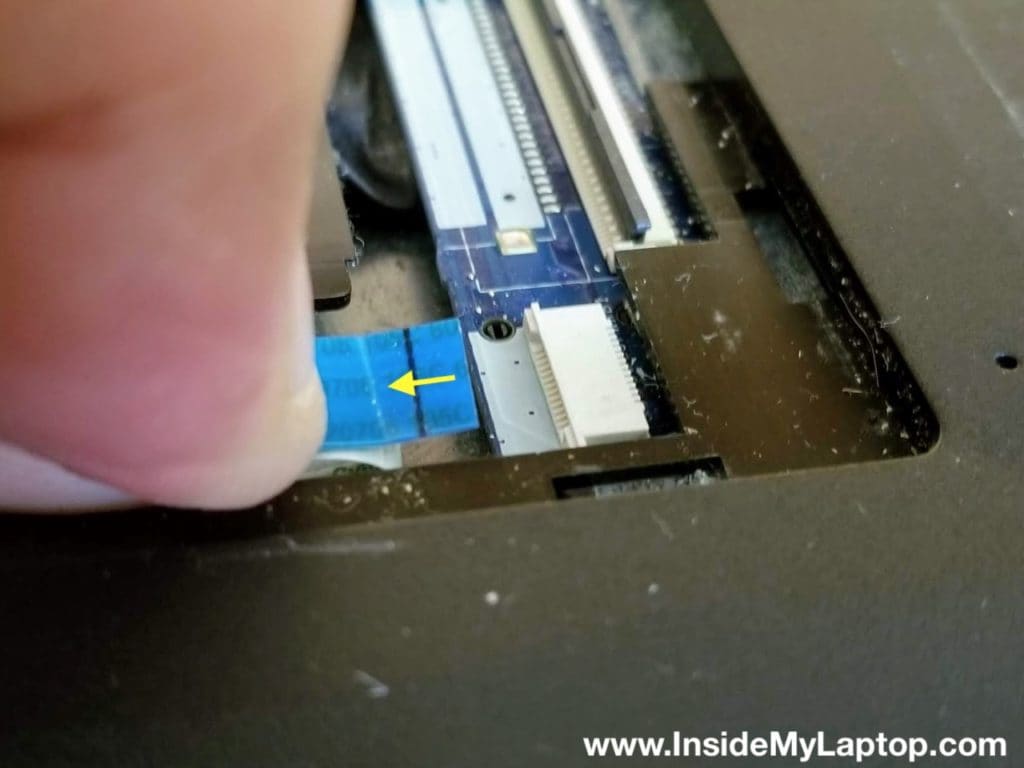
Disconnecting wireless card antennas
In most laptop you will find two antenna cables connected to the wireless card – the main antenna and the auxiliary antenna. In some models the main antenna is white cable in other models it’s black. Pay attention to which is which in your laptop. Normally the cables are labeled as 1 and 2 or main and aux.
Be very careful while disconnecting the antenna. If the cable get’s damaged your laptop will lose wireless connectivity. Replacing antenna cables is difficult because they are routed inside the display panel.
On the following picture you can see a typical laptop wireless card. The golden antenna connector snaps on the wireless card. In order to disconnect the antenna you have to lift the connector up and unsnap it from the card.
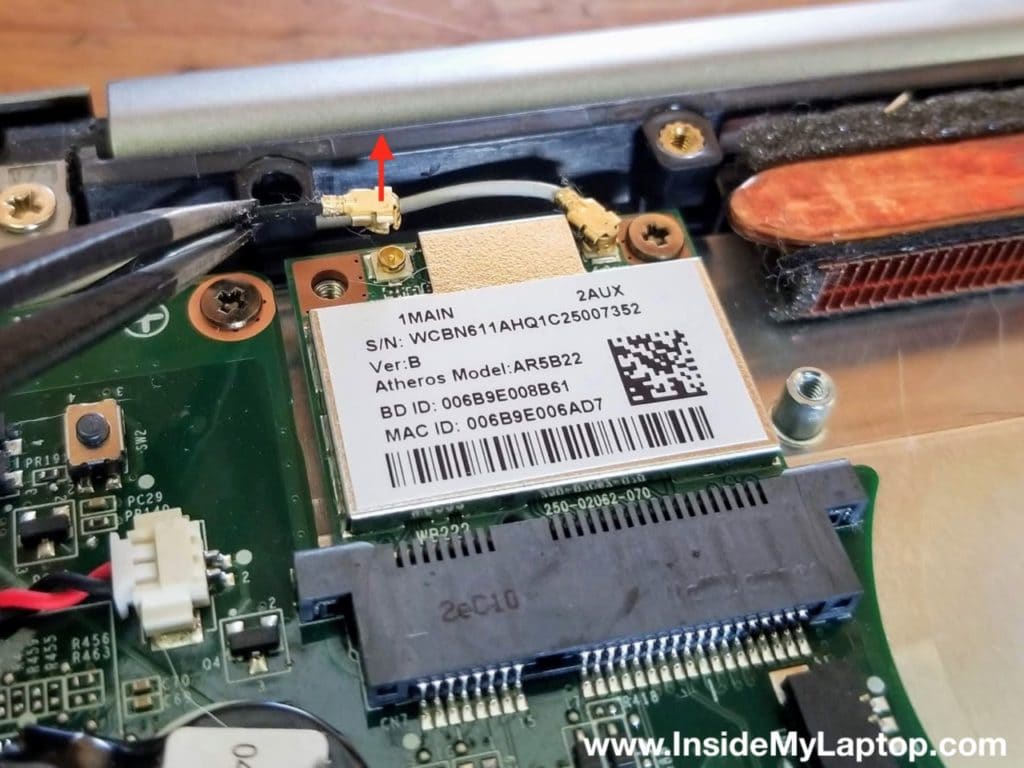
In order to reconnect the cable back to the card you’ll have to position the antenna connector right above the connector on the card and gently push on it until the connector snaps back on the wireless card.
Laptop not working properly after reassembly
If the laptop not working properly after the reassembly (no sound, no video, no wireless connection, etc…) check internal cables connections first. Most likely you forgot to connect some cables or didn’t connect them properly.