
Today I post my second take-apart guide for HP Pavilion dv6 laptops.
HP Pavilion dv6 models have different body styles and they have different disassembly procedures. The following guide will work for dv6-6000 series.
In this particular case I’m taking apart an HP Pavilion dv6-6013cl.
You will find links to other dv6 models at the end of this guide.
Before you start taking it apart make sure the computer is turned off.
STEP 1.
Unlock and remove the battery.

STEP 2.
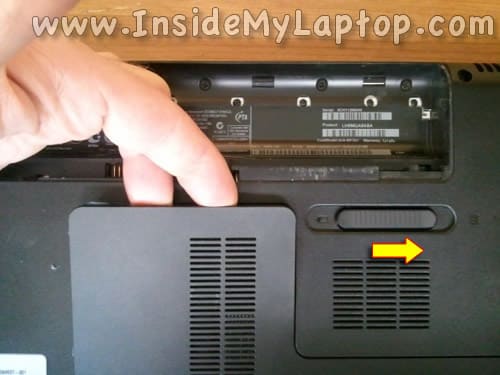
Slide the battery battery latch to the RIGHT and the service cover will lift up a little bit.
Continue removing the service cover with your fingers.
STEP 3.
Remove the service cover.

STEP 4.
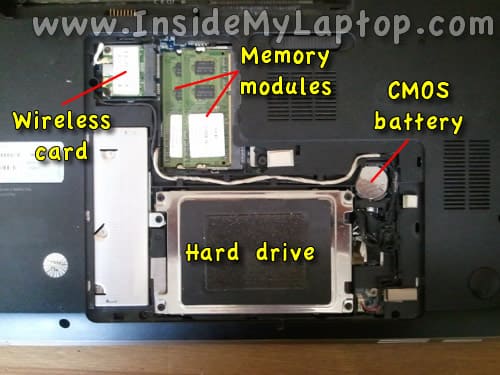
Under the service cover you’ll get access to the following major laptop components:
– Both memory modules.
– Wireless card.
– CMOS battery.
– Hard drive.
I will leave both memory modules and CMOS battery connected to the motherboard. It’s  not necessary to remove them for the purpose of my guide.
This laptop can handle 8GB (2x4GB) DDR3-12800 SODIMM memory modules.
STEP 5.
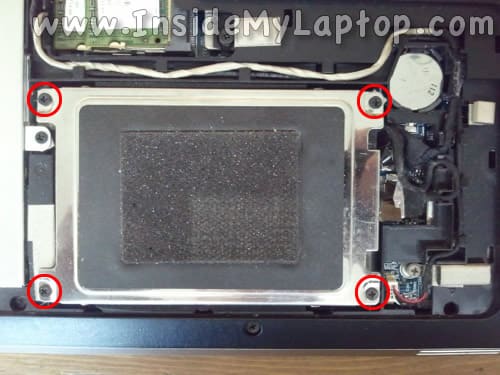
Remove four screws securing the hard drive assembly.
STEP 6.
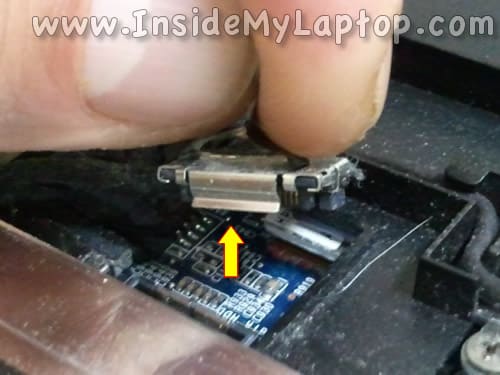
Unplug the hard drive cable from the motherboard.
STEP 7.
Lift up and remove the hard drive assembly.
Upgrading this regular 2.5″ SATA hard drive to a 2.5″ SATA solid state drive will improve laptop performance significantly.
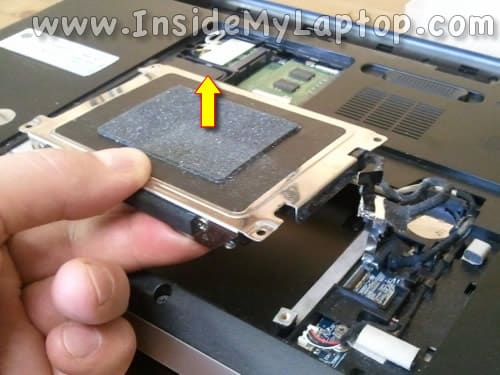
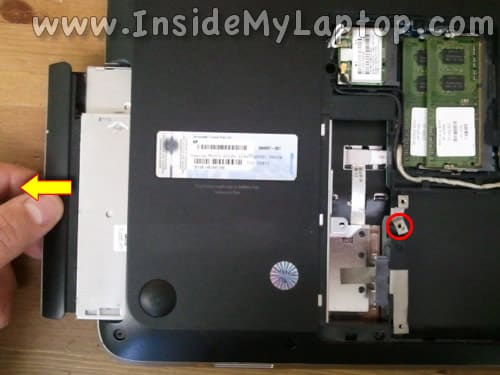
STEP 8.
Remove one screw securing the DVD drive.
Pull the DVD drive to the right and remove it.
STEP 9.
In order to remove the keyboard you’ll have to use the hole located on the left side from the wireless card.

STEP 10.
Insert a small screwdriver into the hole.
NOTE: you’ll be pushing on the bottom side of the keyboard so don’t use a sharp screwdriver. I’m using a T6 torx screwdriver for that because it has a flat end. A small slotted screwdriver should work too.
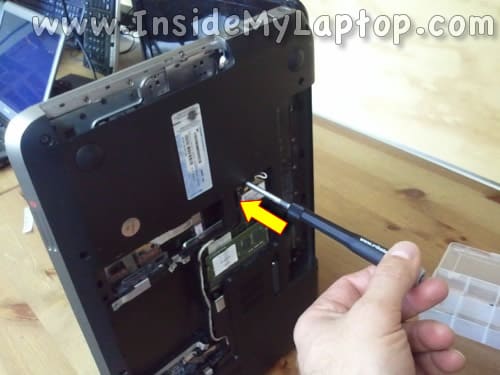
STEP 11.
Very genteelly push the screwdriver into the hole on the bottom of the laptop.
The top side of the keyboard will lift up a little bit and you should be able to insert your fingers under the keyboard.
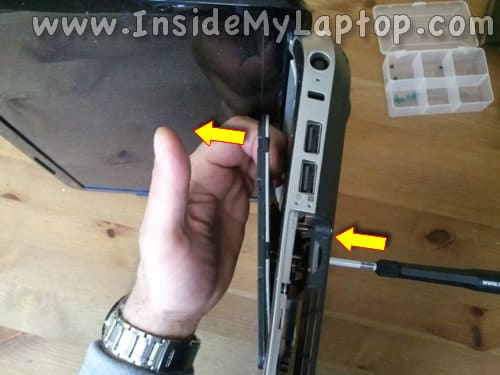
STEP 12.
Remove the screwdriver and continue removing the keyboard with your fingers.
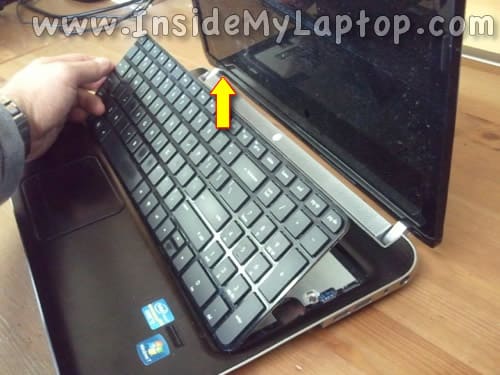
STEP 13.
Before you remove the keyboard you’ll have to disconnect the keyboard cable from the motherboard.
In the following two steps I explain how to unlock the connector.
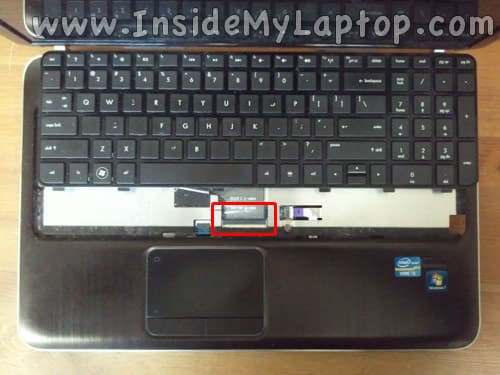
STEP 14.
On this picture the keyboard connector shown in the LOCKED state.
Carefully lift up the left side of the cable retainer (brown piece) with your fingernail.
The retainer will open up at a 90 degree angle.
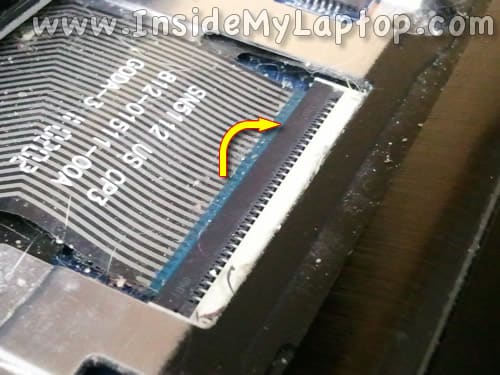
STEP 15.
Now you can pull the keyboard cable from the connector.
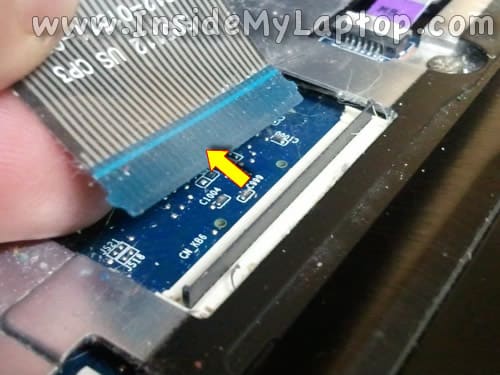
STEP 16.
Remove the keyboard.
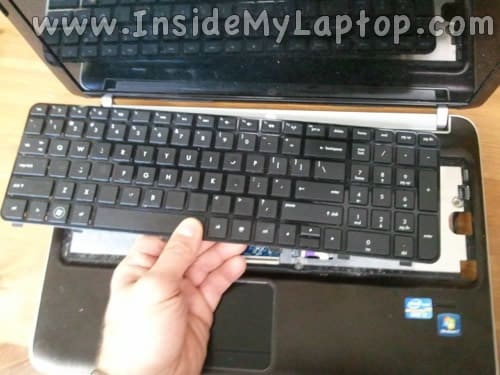
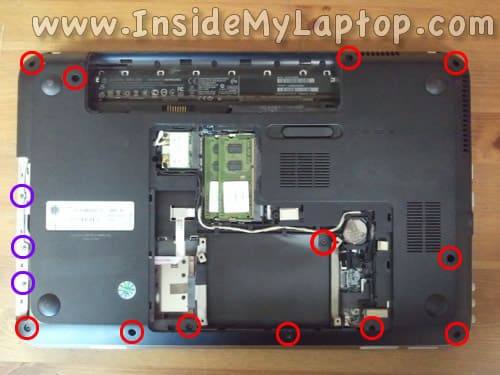
STEP 17.
Remove all screws from the bottom.
Don’t forget three screws in the DVD drive bay.
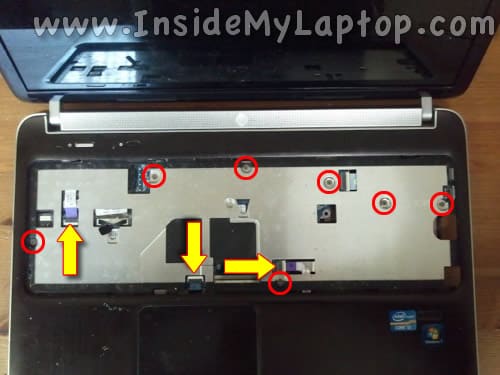
STEP 18.
Remove screws securing the top cover assembly.
Disconnect three cables from the motherboard.
Left to right:
– The power button board cable.
– The touchpad cable.
– The finger scanner device cable.
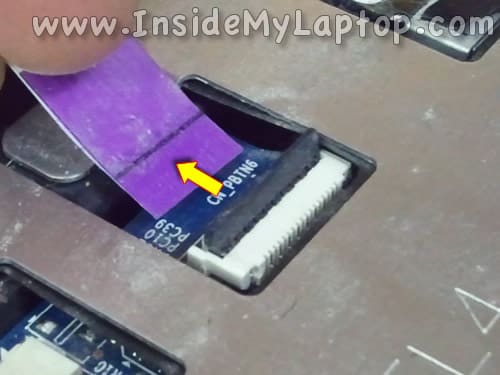
In order to disconnect these cables use same technique as for disconnecting the keyboard cable.
Lift up the cable retainer and pull cable from the connector.
STEP 19.
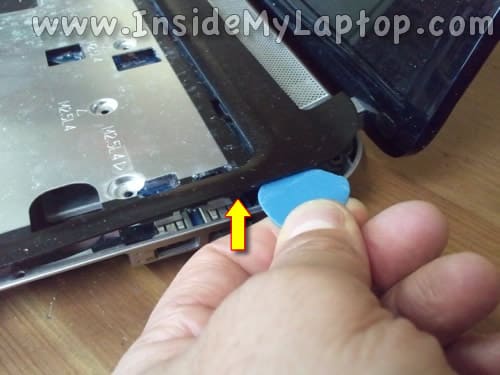
Now you can start separating the top cover assembly from the bottom cover.
Use a piece of plastic for that. Continue removing the top cover with your fingers.
STEP 20.
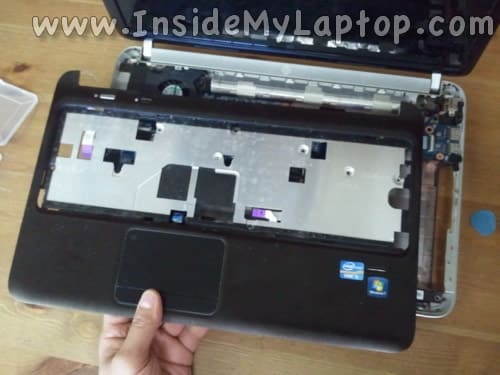
The top cover/palmrest assembly removed.
STEP 21.
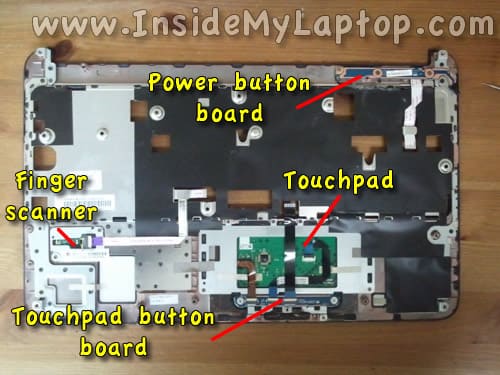
On the bottom side of the top cover you can access the following components:
– Finger scanner device.
– Power button board.
– Touchpad.
– Touchpad button board.
In the following steps I’ll be removing the laptop motherboard.
In order to remove the motherboard it’s necessary to disconnect the wireless card and unplug two more cables from the bottom.
STEP 22.
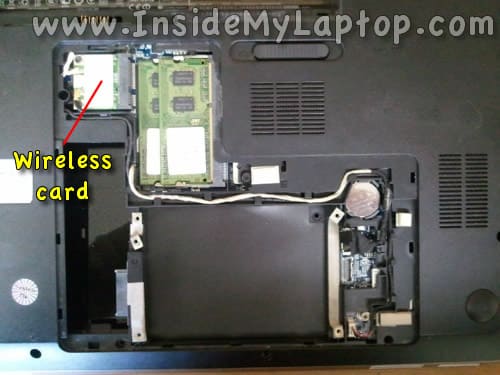
Disconnect two antenna cables from the wireless card.
Remove two screws securing the wireless card.
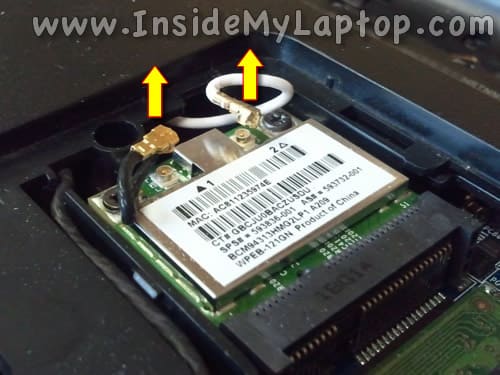
STEP 23.
Pull the wireless card from the slot on the motherboard.
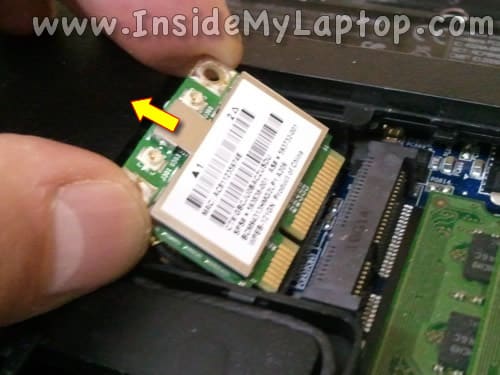
STEP 24.
Disconnect the DVD drive connector cable (left) and speaker cable (right) from the motherboard.
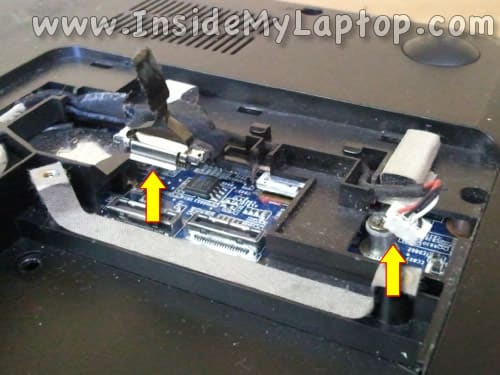
STEP 25.
Disconnect the USB board cable (top) and power connector cable (bottom) from the motherboard.
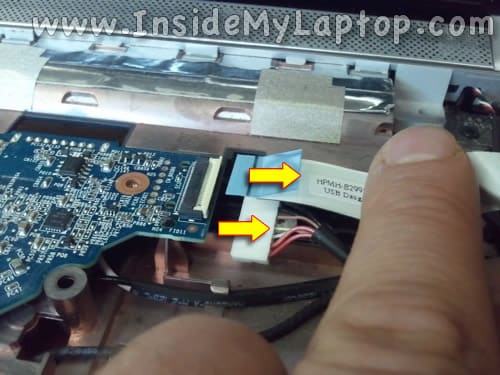
STEP 26.
Unplug the video cable (left) and webcam/microphone cable (right) from the motherboard.
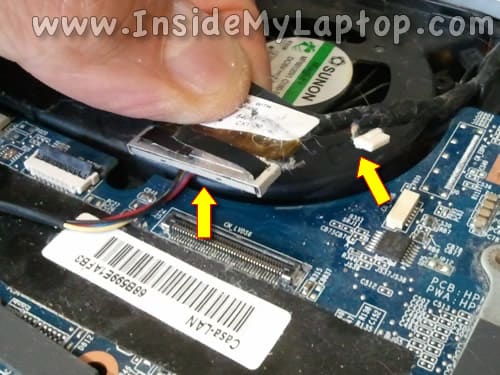
STEP 27.
Unplug the speaker cable from the motherboard.
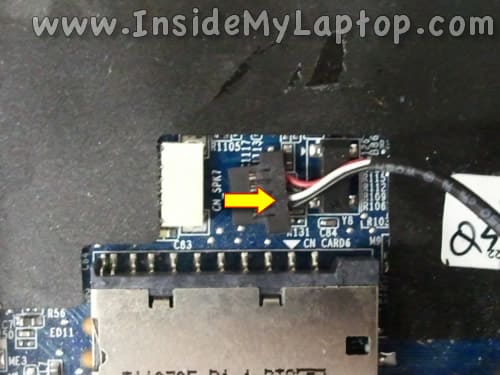
STEP 28.
Remove four screws securing the silver cover.
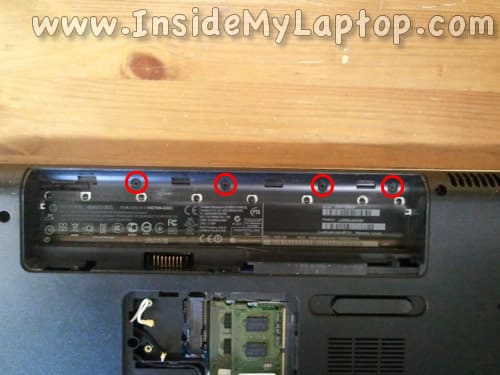
STEP 29.
Remove the silver cover.
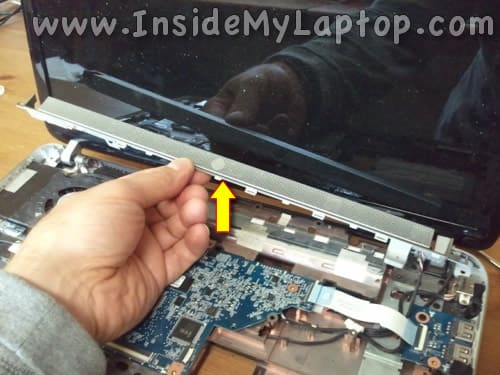
STEP 30.
Remove three screws securing the motherboard assembly to the bottom case.
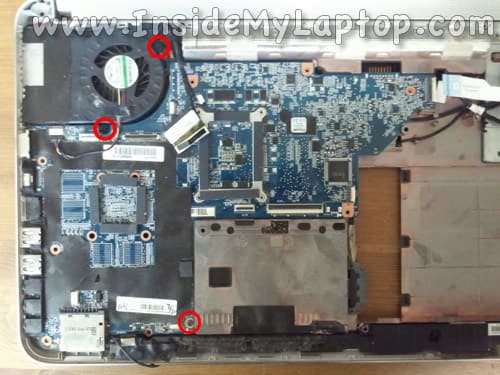
STEP 31.
Carefully remove the motherboard assembly from the base.
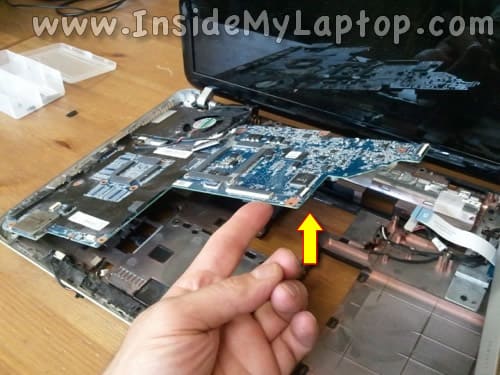
STEP 32.
The motherboard removed.
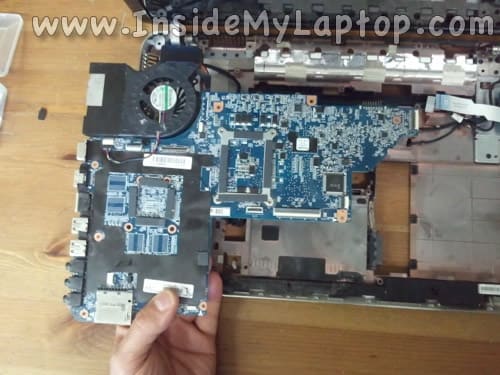
STEP 33.
The arrow shows where the fan cable connected to the motherboard.
If you wan to remove the fan assembly you’ll have to unplug this cable first.
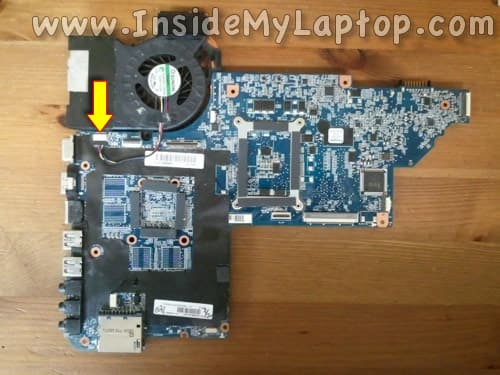
STEP 34.
On the other side of the motherboard you can access the remove the cooling fan assembly.
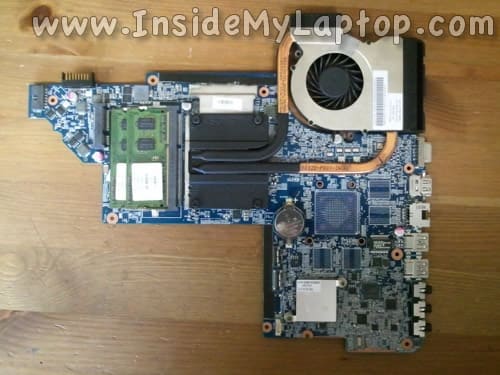
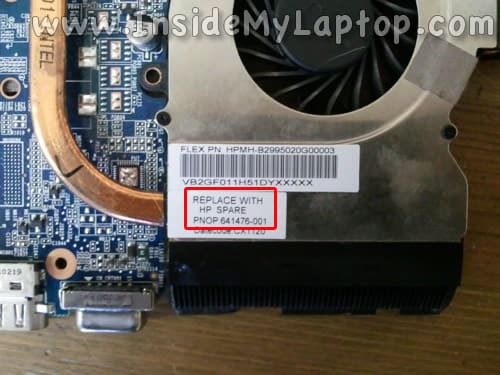
You can search for the replacement cooling fan assembly using HP spare part number.
In my laptop the cooling fan assembly had this part number: 641476-001.
If you have a different HP part number just search for it.
For LCD screen removal instructions please proceed to this guide.
UPDATE:Â If your laptop doesn’t look like one shown on the picture above, make sure to check out my other guides:
In my first disassembly guide I explained how to take apart HP Pavilion dv6-1000 and dv6-2000 series.
In my third disassembly guide I’m covering HP Pavilion dv6-3000 and dv6-4000.
ugwu kenneth
please where can get to replace my Hp pavilion dv6 top keypad top cover because when i was sleeping my laptop just fall down to ground then the cover broke and i need to change it because is not good to live it like that please how much does it cost in euro and where can i get it, Thanks
gregory
hey,
i can’t thank you enough!!
it was the first thime i ever opend a pc or laptop.
i opend it up, i took everething out, i replaced the fan an put everything back together.
it only cost me 20 usd in stead of 175 usd to let it get fixed! thank you!!!
jumaily
thank you thank you thank you for ur help
Jeongho.Bae
Really thank you…
At last I cleaned my dv6-6124tx fan…
And I found one thing that must be fixed in your post..
BEFORE REMOVE topcover/palmrest. There was one more screw at point under hdd place.
I am really appriciate your detail post.
Thank you. Bye
IML Tech
@ Jeongho.Bae,
Thank you for your comment. I found the missed screw in the HDD bay and fixed the picture.
Jim
Guide’s too long. All I want to do is get the fan out- not completely take it apart. I just need a small guide.
IML Tech
@ Jim,
In this laptop the cooling fan mounted under the motherboard and there is no other way to access it.
You’ll have to go though all disassembly steps as it shown in the guide if you want to remove the fan.
Laxchamp
Thank you very much!!!! This was the most helpful guide that I found!
Sangar
Thank you so much for these important notes and information .
Hope you all the success.
Werner Els
You legend! Thanks man!
Jon
STEP 11. isn’t working for me. The keyboard isn’t coming off.
Before inserting the screwdriver to push the keyboard out, I removed the screw, and then tried to push it out, but the keyboard won’t disconnect from the laptop. It’s really stuck to the laptop and is too resistant, like it’s going to break if I put any more pressure.
my laptop model is HP Pavilion dv6-6144ca. Please help.
Mike
I wanted to thank you for the amazing write up, it was amazingly helpful in cleaning my fan!
Mohamed Atef
Thanks alot…really helped me. God bless you 🙂
matt
Thanks a ton! Never deconstructed a laptop before, but using this I got my fan running again and the laptop runs like its right out of the box
Veeda
Thanks your guide is so detail, but I’ll have to print it out first to do this fan. It is the best guide out here. I don’t want to mess this up. my laptop is my life, lol. Thanks
Mike
Thank you SO MUCH!! Someone spilled wine on my dv6 and several keys stopped working.
I was able to remove the keyboard with your help and commence clean-up. Hopefully I won’t have to disassemble further, but at least now I know how.
-Fingers crossed
Wasim
Thank you so much for this! I just needed to open up my laptop to clean my fan and it worked great ! Very precise, better than the video tutorials i had lately.
mauri
Hi,
I accidently messed up the pins from the lock of the keyboard. Is there anyway to fixed the entry of thr lock?
Kevin
Hey great guide! Thorough and precise! I did everything, but when I put it all back together it will no longer turn on… I double checked everything to make sure every whole had a screw and every wire was pluged in. Any idea what went wrong?
mike
Great details in your procedures. While this wasn’t the same as my PC, it included that most important information for inserting a screw driver through the screw hole to push the keyboard up (steps 9-11). Your document was the only place I found that included this information. My fan is all clean and the PC is running well. All thanks to you.
Thanks for a great job!
mike
JJF
Thanks for the disassembly instructions that helped me replace my failed cooling fan. The entire tear-down taking it slow and taking breaks took about an hour. Note that it is possible to just replace the fan without replacing the entire cooling assembly. Once I got mine open I found this model number on the fan itself: “KSB0505HB” which is available for $7-$10. There are 4 very tiny screws that hold the fan to the cooling assembly. You’ll need a very fine tipped Phillips “jeweller’s” driver for them.
Francesca
Hello Danis, just wanted to say THANK YOU for your website, it did help my husband a lot. You’re doing such a great job, I’m amazed 🙂 Followed your instructions step-by-step!
Unfortunately putting it back, guess what, he had 2 screws left, oh-oh! but it seems that the laptop works anyway LOL.
Thank You, Francesca
Bobby
Very nice! Thanks for the simple, yet detailed and accurate instructions. Saved me lots of headache.
Dan Brune
Thank you VERY MUCH for this very detailed disassembly how-to for my HP pavilion. Awesome detail and great pictures step-by-step. One add – for step 10, I had to remove a small screw before I could push on the keyboard to remove it. Again, thank you, thank you, thank. Total cost for repair (install new heat sink) was less than $20 (heat sink, fan and thermal paste).
Ashi
Hi,
Is it possible to replace the Display unit of DV6-6168TX with DV6-2133ee?
Gokul
Thanks a lot for the post! Please let me know wheres the bluetooth hardware if i need to replace it?
Sonya Combs
Thank you soooooooo much!!!!!! I’ve built two desktops quite a few years ago, but honestly never saw myself taking a laptop apart….. I used a guide you posted for another older hp laptop to make sure I could do it going by your guide first….now the hard drive isn’t in that one so I had no idea if it worked, but I knew I could take it apart at least 🙂 !! Just bought me another laptop, but once I got it I decided to refurbish the old one for my Mom (my Mom thanks you too!!!!) replaced the fan and the keyboard and whalaaaaaaa it works great!!!!! Went so well I’m wondering about maybe doing it as a side business or for when I retire….so I was wondering how did you learn? Classes?? Are there manuals with complete breakdowns out there for all the different types? Anyways, you’re the best and I thank you from the bottom of my heart!!! Psssst one thing you forgot to mention…..removing the keyboard screw, but that was a no brainer so maybe you meant to!! One other thing I noticed is that instead of putting a screwdriver through that hole to push the keyboard up you can push on it in the area where you take out the cd drive….I didn’t get my cable in good so I had keys not working and so when I took it apart again I didn’t want to press on my new keyboard and then I saw that I could see it in the cd drive bay area so I pushed with my finger and since that’s near the edge anyway it worked great popped it loose there and then worked it loose the rest of the way from the top!! Hope you don’t think I’m dissing you, seriously you saved me a ton of money and improved my self-confidence a thousand fold!!!!
Thanks again,
Sonya
Mario
Thanks
My laptop wouldn’t power up (like if power buttons weren’t connected)
I have opened it to see it there was a fuse or something, just removed the service cover and the keyboard, played with a few connectors… reinserted the battery… and it powered up again.
Thanks, I had no clue on how to open it!
Lisa
Thank you so much for these instructions! Would not have been able to get to my dead fan without them. Matched my DV6 LM322AV laptop 99.9%. Only difference is that there is a screw in the hole you said to push into to release the keyboard. Had to remove the screw and then pop the keyboard off from the front. I see someone else posted the same information.
mohammad
hi thank you so much that was the best guide .the most complicated thing i have opened was a cell phone but i wanted to replace my bottom cover i could handle that with your help especially tip on removing the keyboard
J.Virta
Thank you very match. Now i can cleaning dusts my laptops.
Alex
Thanks for the write up, saved me a whole lot of time with trial and error.
One tip is that on re-installing the keyboard you have to make sure that you LH support slides under the retainer.
Have drink on me 🙂
Mary
Thank you. This was fun and a real learning experience
Sergei
Hey how’s it going? Thanks so much for the guide, it helped me heaps. However, after putting it back together i found that my screen won’t turn on at all for some reason, and i checked several times to make sure everything was connected properly… any advice?