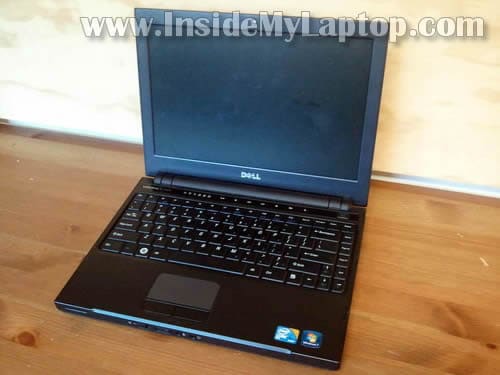
In this post I explain how to take apart a Dell Vostro 1220 laptop.
I’m taking it apart in order to remove and replace  the failed hard drive which is mounted deep inside the case.
I will also show how to access and remove other main Dell Vostro 1220 internal components such as memory modules, keyboard, DVD drive, wireless card and CMOS battery.
Before you start laptop disassembly, make sure it’s turned off and battery removed.
STEP 1.
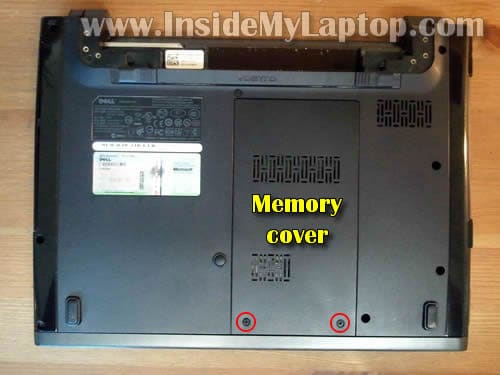
Remove two screws securing the memory cover. Remove the cover.
STEP 2.
Under the cover you’ll get access to both memory modules, wireless module and CMOS battery.

STEP 3.
Remove one screws securing the DVD drive.
Pull DVD drive to the left and remove it.

STEP 4.
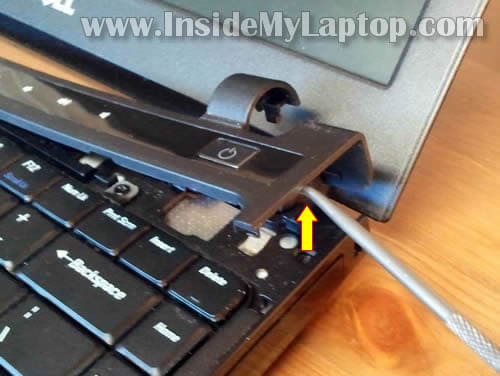
Using a sharp object lift up the right side of the center control cover.
STEP 5.
Continue removing the cover with your fingers.
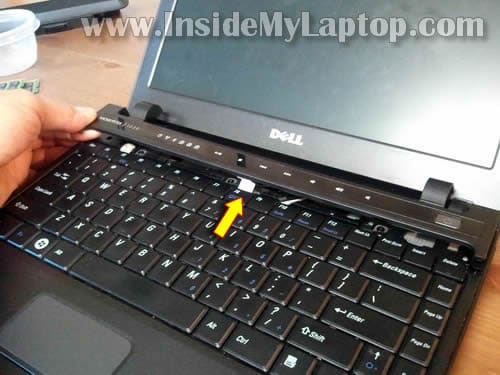
Be careful, the control button board cable still connected to the motherboard.
Don’t be scared if you accidentally pulled the cable from the connector. You can reconnect it later when the keyboard is removed.
STEP 6.
Move the center control cover toward the display so you can access keyboard screws.
Remove three screws securing the keyboard.

STEP 7.
Lift up the keyboard and turn it over on the palm rest.

STEP 8.
Now you can access the keyboard cable connector.
Before removing the keyboard, you’ll have to unlock the connector and release the cable.
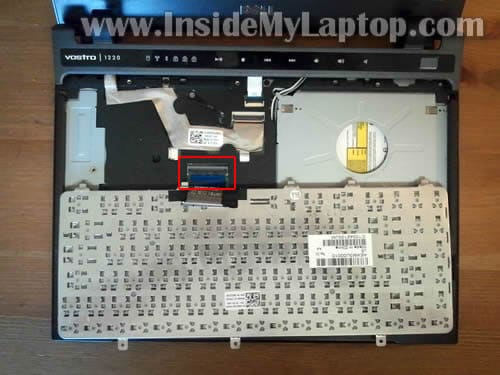
STEP 9.
On the following picture the keyboard connector shown in the locked position.
Carefully lift up the left side of the locking tab so it opens up at a 90 degree angle.
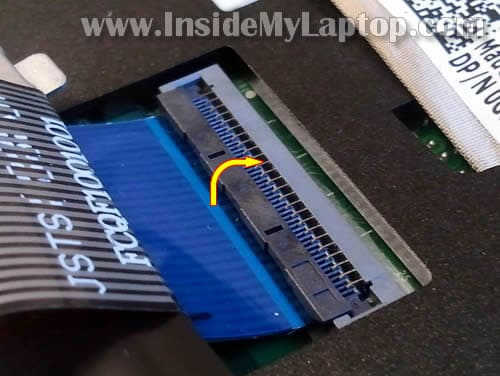
STEP 10.
On the following picture the connector is shown in the unlocked position.
Now you can pull the keyboard cable from the connector.
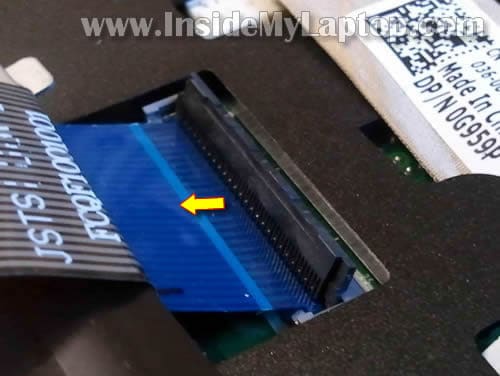
STEP 11.
Remove the keyboard.

STEP 12.
Disconnect the center control board cable.
Remove the center control cover.
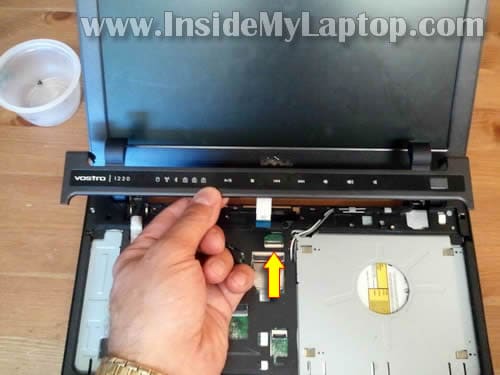
STEP 13.
Disconnect both antenna cables from the wireless card.

STEP 14.
Unroute wireless card antenna cables.
Remove all screws from the bottom.
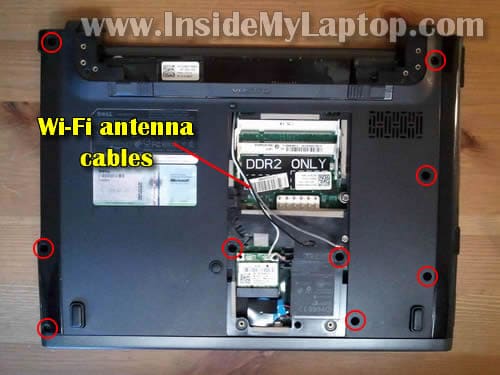
STEP 15.
Disconnect video cable from the motherboard. The video cable has ground cable which is secured by one screws.
Pull wireless card antenna cables though the opening in the top cover.

STEP 16.
Disconnect touch pad cable from the motherboard.
Remove three screws securing the top cover.
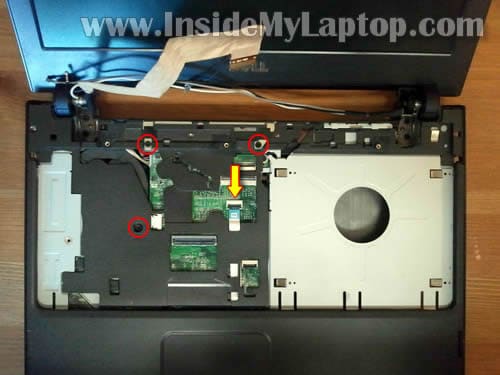
STEP 17.
Carefully separate the top cover assembly from the bottom case.

STEP 18.
Remove top cover assembly.

STEP 19.
The hard drive located in the lower right corner.

STEP 20.
Disconnect one side of the USB board cable and move the cable away from the hard drive.

STEP 21.
Remove four screws securing the hard drive.
Slide hard drive assembly to the right to disconnect it from the motherboard.

STEP 22.
Lift up and remove the HDD assembly.

STEP 23.
Remove two screws on each side of the hard drive.
Separate the mounting bracket and transfer it to the new drive drive.

In my Dell Vostro 1220 laptop I had a regular 2.5″ SATA HDD installed. You can replace it with another 2.5″ SATA HDD or upgrade to a 2.5″ Solid State Drive (SSD).
Solid State Drives are more expensive but significantly faster and quiet.
kevin
hello,wa kind laptap is good or better than others in ur experience?
Fluxed
I’m not the biggest fan of dell computers or laptops. However I must say, they do look quite simple to pull apart.
samcan
Thanx for a great guide of dismantling this laptop ! You are a star my friend !
Mith@Auto Transport
DEll is far better in mater of services but after warranty even an simple problem becomes so big.
Your post has given an full support and visuals to know my Dell laptop .
Thank u.
Sammy
now why in the world did they put the hard drive all the way under all that stuffs? on most laptops, actually on most dell laptops, you can just open a cover on the bottom of the laptop and the hard drive is right there. this has got to be one of the hardest hard drive replacement jobs i’ll ever have to do for a laptop.
but thank you for your illustration! i think i can give it a try!
Rob Wagner
The steps that you provided were excellent, thankyou. There is a grey cable in step 13 though, it’s with the antenna cables, which doesn’t seem to connect to anything, is that correct?
IML Tech
@ kevin,
I would say Lenovo ThinkPad is a good one. Better than any other laptop on the market.
IML Tech
@ Sammy,
I’ve been asking myself exactly the same question over and over. It’s very inconvenient for data backup.
IML Tech
@ Rob Wagner,
I believe some newer wireless cards require three antenna cables. Probably your wireless card needs just two antenna cables. Leave the gray one unconnected.
Ivan
many thanks your guide served me very well, what model laptop you recommend, greetings from Mexico
avan ivan
Super it really helps me to remove keyboard..
Thanks for uploading this guidelines.
Ray
In my Dell Vostro 1000 I want to upgrade the processor. Can you help me with what is the highest I can go as far as processor. If you can post some pictures of how to change the processor.
Alex
An excellent guide, thank you. Supplements the Dell documentation as this guide has more comments and shows that it is not necessary to remove the screen for some jobs in the innards. The Dell docs are worth a read too: http://support.dell.com/support/edocs/systems/vos1220/en/sm/parts.htm
I was trying to get to the fan to clean it. I followed your photos and comments. I got stuck trying to remove the palm rest though. I was able to lift and unclip the back and sides but the front didn’t want to come away. Rather than force and break it, I removed dust I could see in the fan and reassembled the laptop. More info on the clips or securing method at the front would be really useful.
Thanks for a great step through.
Ezequiel
Your guide helped me BIG time. Thanks for the effort
Russ
Many thanks. I spent several hours w/Dell and their instructions. They never mentioned the disconnect the wires and how can you get the palm rest off if you don’t. They are twits.
Thanks again.
Pieter
Great instructions, it helped me a lot changing the harddrive. Many tnx.
Yes the grey cable does not connect.
Regards, Pieter
bollos
thx for this 🙂
i’ve put this back together but the wireless isn’t working but the device is fine in device manager, but the gray lead at the wireless module end isn’t connected to anything and i can’t remember if it was before and also can’t work out where it’s connected in these photos! it gets out of the box via ethernet np, so i’m really suspicious it’s this loose gray lead.
bollos
aah sry, i see you’ve already answered the ‘loose gray lead’ thing, ah well, i’ll have to break the box open again and try and see what it is :/
umer
Hi every one i removed the wifi wire like 3 cabels from the back side but now i dont know where to connect them again please help me
umer
My wifi dont work after opening please help me what i do