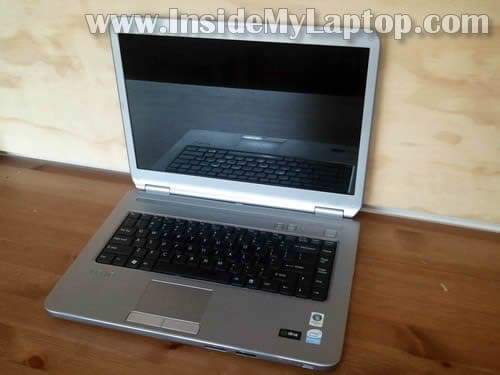
In this guide I explain how to disassemble a Sony Vaio VGN-NR series laptop.
I’ll be taking apart a Sony Vaio VGN-NR120E model but I believe you can use same instructions for all other models in VGN-NR line.
The main goal of my repair is removing and replacing the failed hard drive which is mounted inside the case.
While accessing the hard drive, I’ll explain how to remove some other main components.
Before you start, make sure the laptop is turned off and battery removed.
STEP 1.
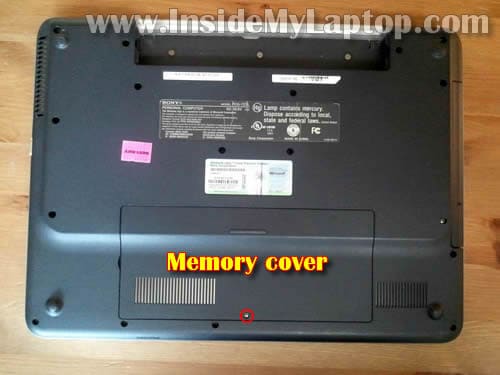
Both memory modules can be accessed on the bottom.
Remove one screw securing the service cover. Remove the cover.
STEP 2.
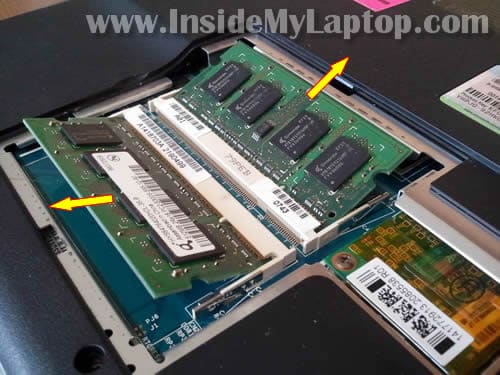
Release both memory modules and pull them from slots.
STEP 3.
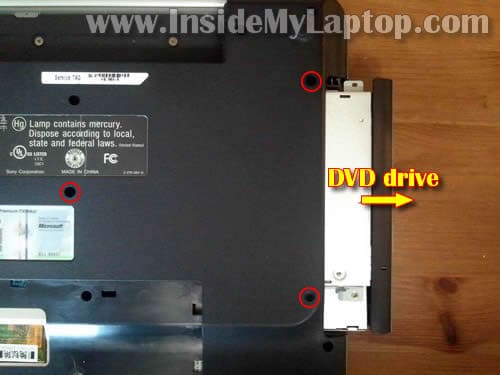
Remove three screws securing the DVD drive.
Pull DVD drive to the right and remove it.
STEP 4.
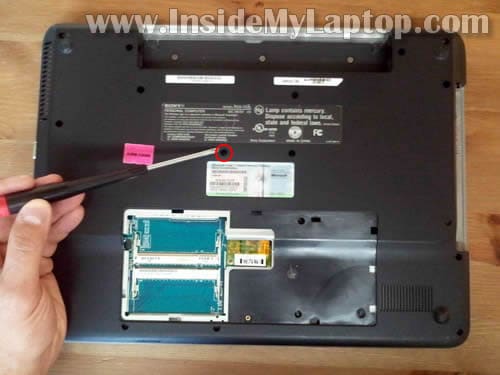
Remove one screw securing the keyboard.
STEP 5.
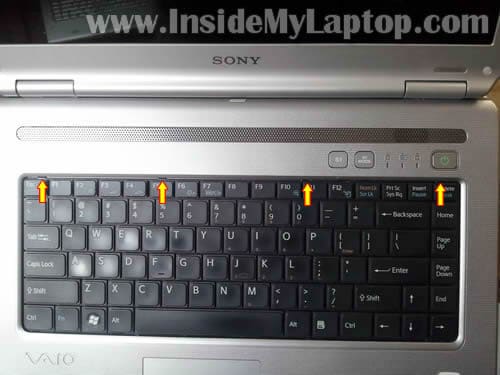
There are four spring loaded latches securing the keyboard to the top cover.
I pointed to latch locations with four arrows.
STEP 6.
In order to remove the keyboard you’ll have to release all four latches.
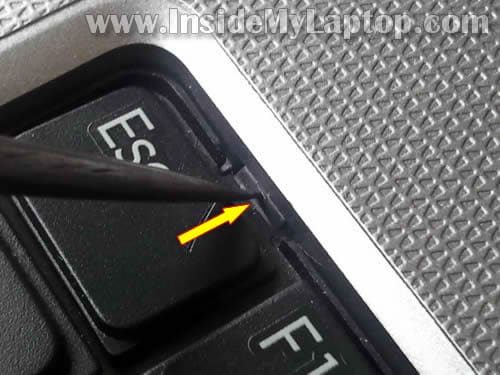
Push on the latch with a sharp object. The keyboard will lift up a little bit and will not allow the latch to lock again.
Release all four latches.
STEP 7.
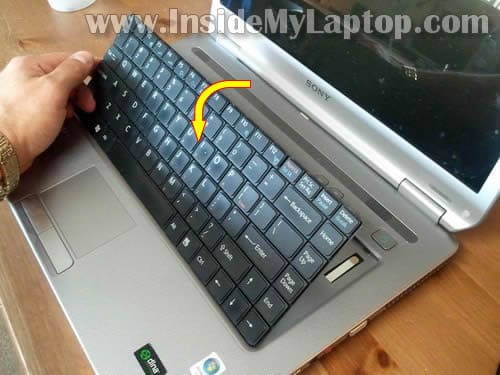
Now you should be able to lift up the keyboard and turn it over on the palm rest.
Be careful, the keyboard still attached to the motherboard.
STEP 8.
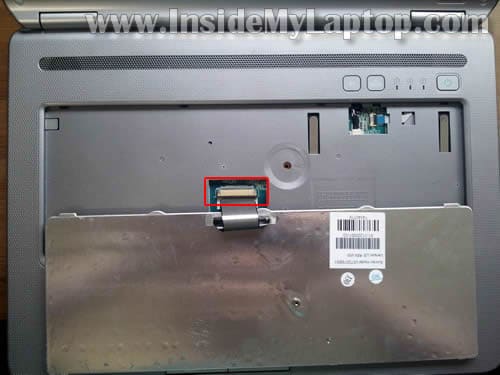
When the keyboard turned over, you can access the cable connector.
Before you remove the keyboard, the cable connector has to be unlocked and cable released.
STEP 9.
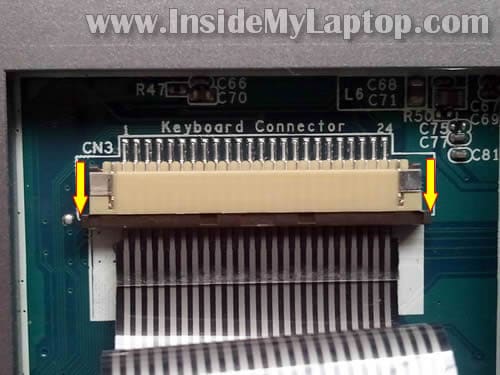
On the following picture the cable connector shown in the locked position.
In order to unlock the connector you’ll have to move the brown part about 2 millimeters to the direction shown by two arrows. The brown tab must stat attached to the white base. Do not move it too far. Do not separate it from the connector base.
STEP 10.
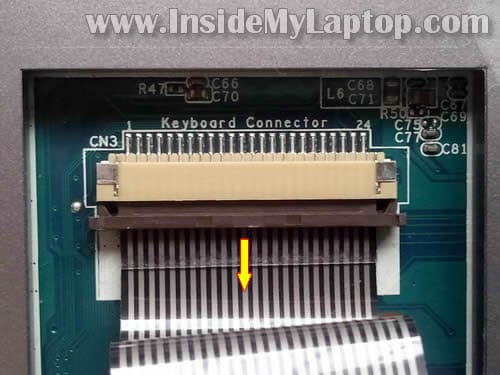
On the following picture the connector is shown in the unlocked position. As you see, the brown tab still attached to the base but the cable is released now.
Pull the cable from the connector.
STEP 11.
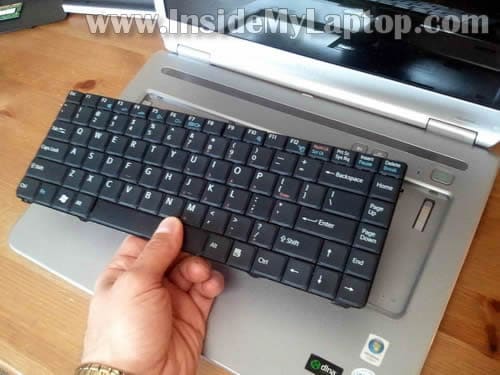
Now you can remove the keyboard.
STEP 12.
Remove all screws from the bottom. These screws securing the bottom cover to the top cover.
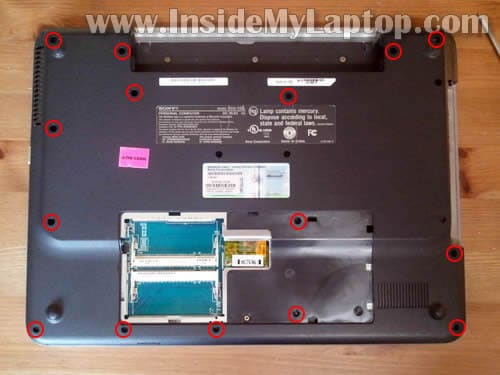
STEP 13.
Lift up and remove the bottom cover.
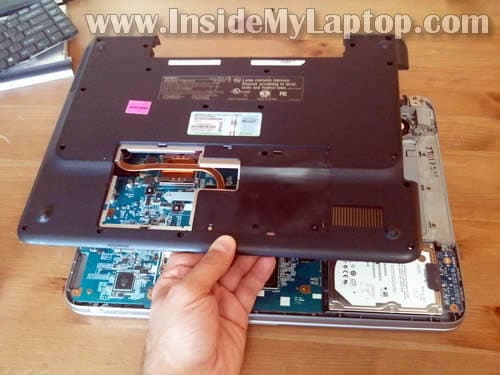
STEP 14.
When the bottom cover removed you can access the cooling fan, wireless card, processor and hard drive.
As I mentioned before, my goal is replacing the hard drive.
NOTE: In order to remove the cooling fan, you’ll have to remove the heat sink. Shouldn’t be very difficult.
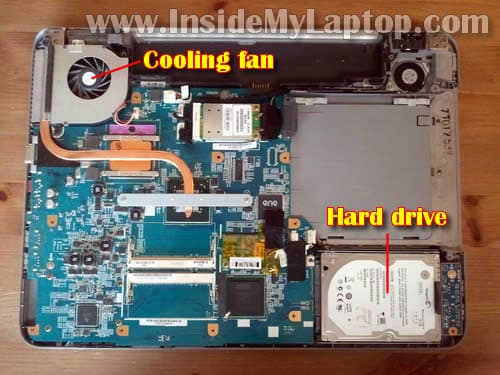
STEP 15.
Remove one screw securing the USB board. Lift up the USB board and put it aside.
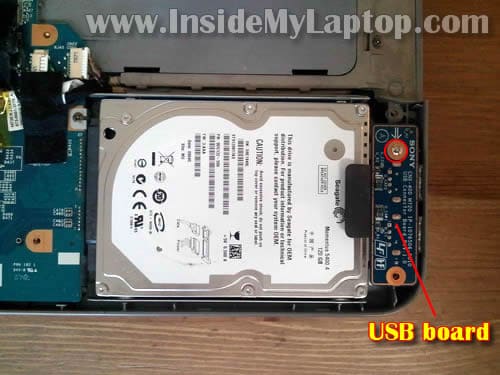
STEP 16.
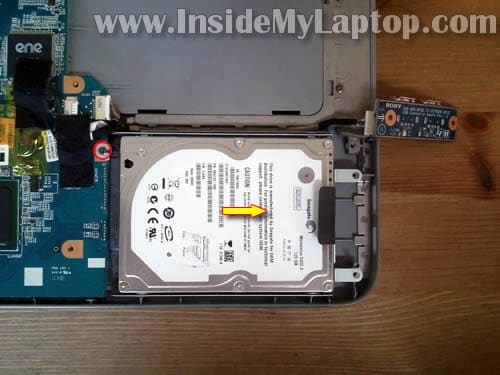
Remove one screw securing the hard drive assembly.
Slide the hard drive assembly to the right to disconnect it from the motherboard.
STEP 17.
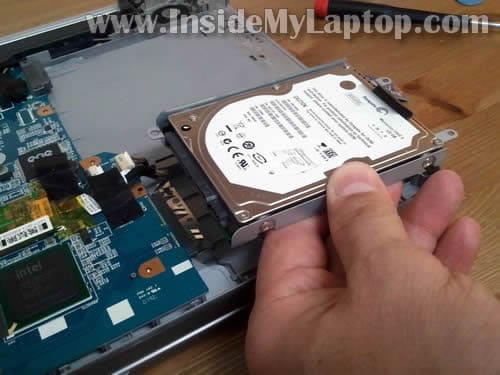
Lift up the hard drive assembly.
Now separate the failed hard drive from the mounting bracket and replace it with a new drive.
This is a regular 2.5″ SATA hard drive.
Any large 2.5″ SATA hard drive should work fine in this laptop.
I think my guide should fit the following Sony Vaio models: VGN-NR110, VGN-NR115, VGN-NR123, VGN-NR140, VGN-NR160, VGN-NR180, VGN-NR185, VGN-NR220, VGN-NR240, VGN-NR260, VGN-NR270, VGN-NR280, VGN-NR285, VGN-NR290, VGN-NR295, VGN-NR298, VGN-NR305, VGN-NR310, VGN-NR320, VGN-NR330, VGN-NR360, VGN-NR380, VGN-NR385, VGN-NR398, VGN-NR420, VGN-NR430, VGN-NR460, VGN-NR475, VGN-NR480, VGN-NR485, VGN-NR490, VGN-NR498.
John
Thanks! This guide was superb! and very clear!
Jacky
Hey can you tell how does the screw that hold the battery little cable with a ring
IML Tech
Jacky, I don’t think I understand your question.
Andy
Hi,
Great guide
Do you know were the backlight switch is for a vgn nr11s I have replaced the inverter plus the screen but this didn’t fix the backlight problem. I read somewhere that there is a magnetic switch on the board/lid which turns the screen backlight on and off? Can you help me in this fault
Thanks
John Downs
I can confirm that this procedure works 100% for a Sony Vaio VGN-NR21E.
Thanks again!
wlkr
Confirmed that VGN-NR485E is exactly the same as shown on pictures.
I’ve been searching that for a long time, thanks pal!
Chris Helgerson
Yes, this guide is good for my VGN-NR160E too, thanks…..
Luca
Tanks a lot! works great on vgn nr38e!
johnny
in step 14 somewhere around there was a little red switch. my cousin messed with that switch moving it back n forth when i wasnt payin attention….can you tell me which way its supposed to be and what that goes to, and do you have any ideas why my internet stopped working on it, could that switch be the reason?
Val
It looks just like mine. (VGN-NR430) I am researching to replace the power jack. Any tips before I brave opening it up?
Adan
¿¿Where can I find part numbers of a VGN-NR210FH ??
IML Tech
@ Adan,
What part number?
neil hahn
execellent guide for my NR 160, however I need to replace the power jack, do you have any additional information for this repair?
Jim Reid
Excellent guide, Do you know where the CMOS battery is sitting, in relation to your pictures?
IML Tech
@ Jim Reid,
I could be wrong, but one of the possible locations is between the hard drive and modem, under the yellow tape. Look at the step 14.
I’m not sure about that, but you can check without complete laptop disassemblu. Remove the memory cover and remove the model. If the battery located where I said, you should be able to see it.
If not, probably it’s somewhere on the other side of the motherboard.
Browne
@ Jim Reid…..The Cmos battery is located on the other side of the board, secured to the board by d/s tape and on my Model VGN-NR11S, its a double battery.
@ Neil Hahn…If your 160 is the same as the NR11s, the you should remove the heat sink and fan to get access to the power jack assembly. Mother board, power button board (under the Mobo), speaker, must all be removed before you can do this, however.
James Reid
Cheers guys The CMOS battery on my model VGN-NR38e was underneath motherboard, with double sided tape as mentioned. wasn’t too difficult, just removed a few cables, then 1 screw holding fan down and 2 screws holding motherboard down, then slipped it out to replace. Was going to take pictures but wasn’t sure what to do with them.
Jim Reid
Bish
Used this last night to strip down my partner’s VGN NR38E, clean it up and replace the hdd. Worked like a charm. Excellent guide – she’s delighted and I’m relieved, since I’d heard Vaios were tricky to disassemble. Cheers.
Maria
Finally found a useful guide to remove my aunts hard drive. I couldn’t believe how hard it was to find. It worked perfectly with the VGN-NS330J Sony Vaio laptop. Thanks a bunch
Ken
Nice detail on how to replace the hard drive. I need more information how to replace my power jack of VGN-NR285E, please help
Thanks,
Ken
Craig Hall
Hi I am also having problems accessing and repacing the power jack for this laptop. I removed the fan and speaker but it is encased in a plastic surround that does not budge or have any screws visible. Any info or diagrams that anyone knows about ould be great.
Thanks.
Craig
Jim
Excellent guide.IUsed it to open up my VGN-NR31J/S too reflow the GPU (GEFORCE 8400GT M) .
Unfortunately 2 wks down the line and GPU failed again. Obviously pushed the laptop to its limit by running Furmark benchmarks almost 3 times daily and reaching 85c max!
Steps followed:
1)Cleaned GPU with arctic clean 2)refluxed it with liquid flux 3) Used heatgun for 50 secs(at 300c) to melt the solder in conjuction with the liquid flux 4)Applied thermal paste and put heatsink and laptop back together.
On next fix(which is in a few days) will put a copper shim on top of GPU chip after applying thermal paste and thermal paste again on top of copper shim (see step 4) and drill a few holes at bottom of plactic cover where GPU is located (using a soldering iron) and using a custom made laptop cooler (which propels air into the holes)
Any ideas/suggestions are most welcome
Thanks
Pat
Great instructions!!! I used these directions to take my VGN-NR180 apart for a wireless switch on the front of the notebook that was not working. I was able to get the connection on the back of the on/off button reconnected back to the internal switch on the motherboard which allowed me to enable the wireless switch, the LED for the wireless card on the front of the notebook is now on solid green and the wireless connection is working again. Thanks for the assistance!!!
Alan C
The CMOS battery is (in my case) bright green in color and a little smaller than two dimes (though thicker). This is NOT on the side shown in step 14. It’s on the bottom instead, on the other side from the two memory slots. So after step 17, keep working as mentioned by others, if you want to reset the bios. My bios was freezing (F2 would enter, but couldn’t move from screen to screen (Main, Advanced, Security, Boot, Exit)). I pulled out the disk after 17, and connected it to my mac using an INFOSAFE SAT2510BU2B from Startech.com, and ran PhotoRec to retrieve files (partition was hosed). Got a ton of files to give back to my friend, the owner of the laptop.
To get to the CMOS battery, I had to remove the plastic battery casing (3 screws). I disconnected the tiny white connector from the usb board to the motherboard, and freed some cables here and there. By reassembly time, I found the usb board connector had slipped off the wires. Rather than guess at the wiring, I just left the 2-port USB board disconnected (but still in place) – small loss. I was able to unplug (and replug) the white connector from the CMOS battery without fully releasing the motherboard from the chassis. On reconnect, I also noticed the blue ribbon had become disconnected (see step 8 picture). I flipped up the connector and reinserted the ribbon cable, just before I inserted keyboard again.
I have a few more pictures, including one showing cmos battery. If author would like them, please contact me (you have my email from the post), and you can add them if you like.
Alan C
I should add on… After the battery trick to clear CMOS config data, I was able to boot into the bios and check all the screens etc. I was also able to do a Restore of the whole disk and get the system working again. There were two issues along the way…
1) As mentioned, I left two usb ports unusable but there are 2 more on the the right side that work fine.
2) The trackpad is not doing anything. I plugged in a cheap usb mouse rather than reopen the chassis again.
Thanks for these instructions!
Alan
Peter
Excellent article. I’ve just used this to get the keyboard off the laptop (which had broke) and managed to find the correct part and ordered.
Jaime Smith
Thanks. Fine, detailed explanation. This is much appreciated and it will apply to the VGN-NR120e too. Thanks for not bogging us down with extra details. Clear and concise.
Plastique Bertrand
what a palava, The only reason Sony made it this difficult to get at the hard drive is because they know the vast majority of users would not attempt something like this in the case of hard drive failure, and paying some company to do it would cost about £170 with labour and parts. It’s a complete con to get more people to buy more computers or to ship them back to a sony repair centre
Emely
When I replaced the hard drive, now the keyboard keys don’t line up. The ones specifically on the right. Any idea?
IML Tech
@ Emely,
There is no way I can tell what is wrong without looking at the laptop. Make sure it’s assembled correctly and all screws are installed correctly.
manuel
como puedo cambiarle el cable que conecta la pantalla con la trajeta madre y como se llama ese cable mi pantalla de repente falla
Ray J
I wanted to leave a note saying how informative ALL of your Laptop articles have been to me. I use your site when I need to find out how to take something apart and so far (no knocking on wood) you haven’t let me down. Having the pictures to refer to makes it oh so easy.
So keep up the good work – AND – Thanks Again
John Brel
I found this manual to be helpful, mainly because of the pictures. I’d recommend also using the official Sony disassembly manual, as this manual also describes the flow for other parts to be replaced. The official manuals can be found on “Tim’s laptop service manuals”, easy to find.
Hth,
John
T-Bone Burnett
Mint! Saved me loads of time trying to work out the order to do things correctly.
I managed to get the new hard disk in within 20 minutes; installing new OS as I type.
Many thanks.
jrow
Awesome writeup. Installed new hard drive and upgraded my processor from T5450 to T7500 all for $56. I got 6 years out of the original setup and hope to get another few years out of this upgrade. I love breaking the manufacturers forced 3-4 year engineered obsolescence cycle!!! Save green, both money and waste.
sharma
dear Leo,
I am facing the problem for the Vaio model No:VGN-Z56MG for dismantling the Hard drive can you please post the picture how to do, it will be appreciated
Peter Krueger
Hi,
very good guide to disassemble the Vaio NB. The one of my doughter want start up again. Accu is worn out and i thinh that the C-mos battery is also worn out. Have you any idea where the c-mos Battery is located that i can replace it?
Thanks for your answer
regards
Peter
IML Tech
@ Peter Krueger,
In Vaio VGN-NR the CMOS battery located on the side opposite from the RAM slots. You will have to remove the motherboard from the case in order to replace the battery.
mike
I have a sony vaio VGN-NR220E and it has no power no lights any ideas?
IML Tech
@ mike,
It’s either failed AC adapter, bad DC jack harness or motherboard problem.
1. Test your AC adapter with a voltmeter.
2. Try replacing the DC jack harness (only $5-7 on eBay).
mike
The power problem solved on sony vaio vgn-nr220e thanks for your tip.
however its stuck in mute any idea?
Lou
Close enough to my VGN-N320E. Thanks!
evg
Очень Ð¿Ð¾Ð»ÐµÐ·Ð½Ð°Ñ Ð¸Ð½Ñ„Ð¾Ñ€Ð¼Ð°Ñ†Ð¸Ñ. Мой ноутбук vgn-nr21mr дает информацию, что не видит аккумулÑтор, краÑный креÑÑ‚ на батарее. Ð’ чем проблема.
KISHORE
i could not find that all the information provided above is of no use when it is the matter of touchpad replacement. I found no info about the disassembly of touchpad and replacement of the touchpad of vgn nr310e or so .It would be muchmore useful to show something about touchpad functioning and replacement troubleshooting regarding. Thanks for the above info.
soufiane
I have a problem with my laptop a BIOS password is displayed when the computer starts. Sony VAIO VGN-NR 285E
perry
How do i remove dvd writer from a VAIO vgn NR11Z/s?
Thanks
Keegan
So I’m curious if I wanna change my hard drive should I remove my keyboard because that’s just so tricky and I don’t wanna break anything :-0
BS Barg
I have a sony vaio vgn nr260e
I need to replace the power button / switch and check The bios / cmos too.
The copper heat sink removal was not covered. I removed the 2 screws above and it. But the silver cross member seems to be bolted on or pressed in somewhere.
I also removed the screws to the fan, which did not help release the circuit board even with the removal of another arrow marked for removal additional screw.
Please help, I love my nr260e.
My son gave it to me, but the pwr button n cmos need to be replaced n or inspected.
Thx!
IML Tech
BS Barg, I don’t remember this model off the top of my head but I looked up the motherboard and heatsink on eBay.
There shouldn’t be anything securing the heatsink on the other side of the motherboard.
You should be able to remove the heatsink after you removed the following:
– 2 screws from the silver bar over the GPU chip
– 4 screws from the heatsink
– 1 screws from the fan
If the heatsink still doesn’t separate from the CPU/GPU, I think you can try applying some reasonable force to remove it. It’s possible the heatsink got stuck because of dried out thermal paste.
chanda horie
This guide was very clear! btw, can you please tell me where i can buy the cable for usb board? the name of that calbe and size,, @lease
IML Tech
Probably on eBay. Try searching for “Sony Vaio VGN-NR cable USB”