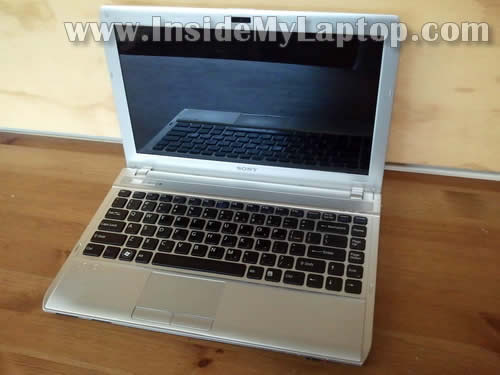
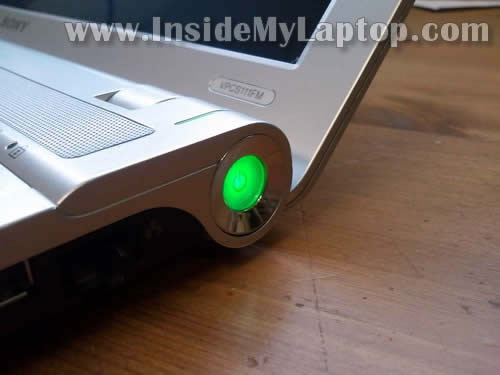
In this guide I will show how to disassemble a Sony Vaio VPCS111FM in order to fix broken power button.
Also, this laptop has another model number on the bottom: Model PCG-51211L.
Here’s what happened. The power button got pushed into the case and stopped working. It wasn’t possible to turn on the laptop at all.
In order to figure out what’s going on I had to disassemble the case and take a closer look at the power button.

By the way, here’s my previous post explaining how to replace LCD screen
STEP 1.
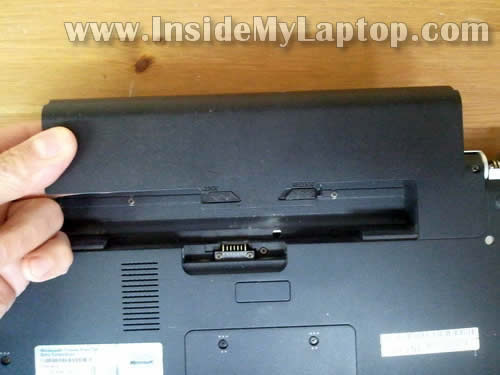
Make sure the computer is turned off. Remove the battery.
STEP 2.
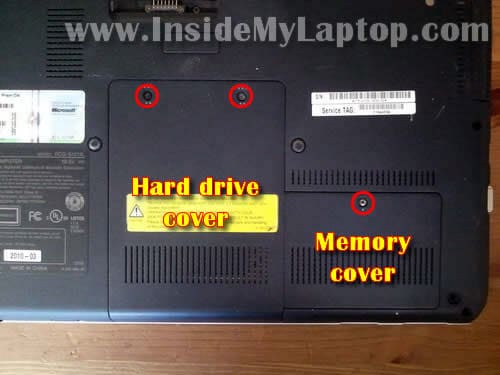
Remove four screws securing the hard drive and memory cover.
It’s not necessary to remove the memory cover for the purpose of this guide.
I’m doing it just to show where you can find both RAM (memory) modules
STEP 3.
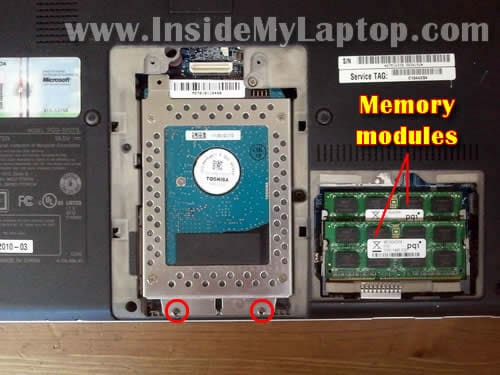
Remove two screws securing the hard drive assembly.
As you see, both memory modules can be accessed on the bottom door.
STEP 4.
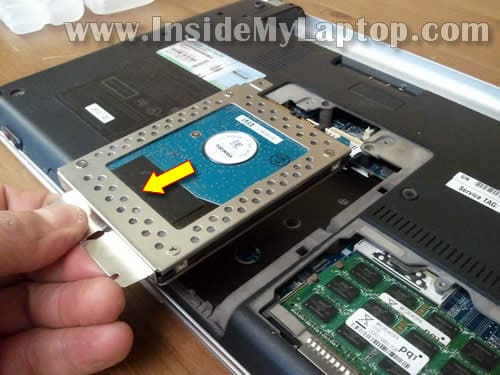
Slide the hard drive assembly to the shown direction to disconnect it from the motherboard.
Remove hard drive assembly.
STEP 5.
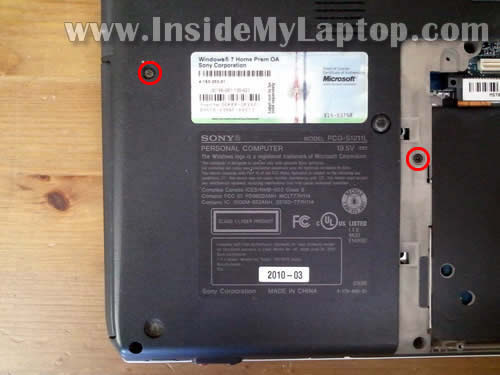
Remove two screws securing the DVD drive.
STEP 6.
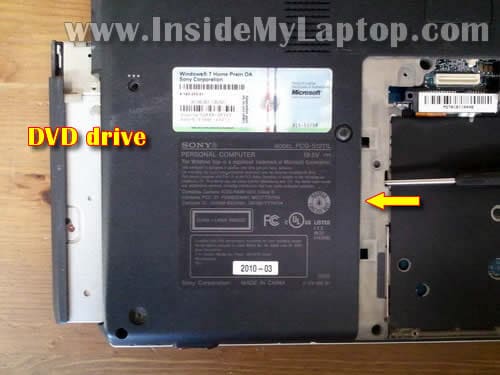
Push DVD drive with a screwdriver and remove it.
STEP 7.
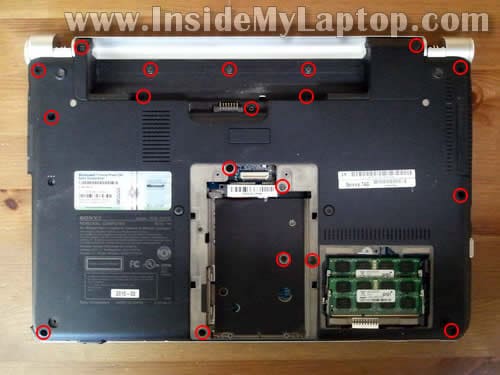
Remove all screws from the bottom.
NOTE: my Sony Vaio VPSS111FM had both hinge covers missing. I don’t think you’ll have a problem removing them.
STEP 8.
Remove the express card cover.
Don’t forget to remove one screw located under the cover.
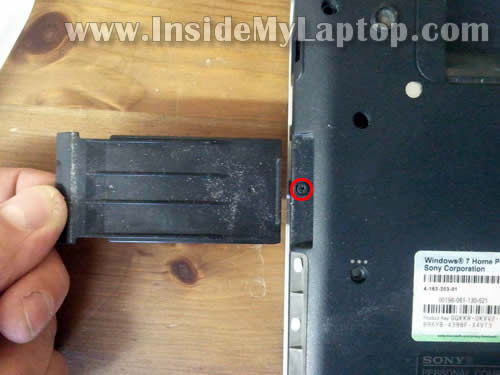
STEP 9.
Now you should be able to lift up the bottom cover and remove it from the rest of the laptop.
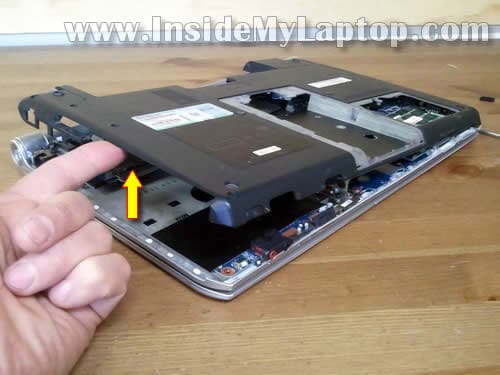
STEP 10.
The bottom cover removed.

STEP 11.
Under the top cover you’ll get access to the cooling fan assembly (fan and heatsink).
If the cooling fan looks dirty, blow the dust off the fan and heatsink.

STEP 12.
Remove screws securing the express card board.
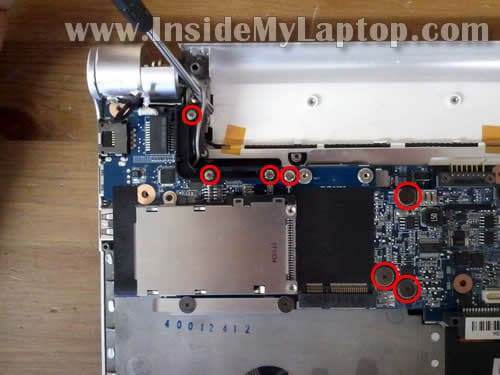
STEP 13.
Disconnect the power button board cable from the express card board.
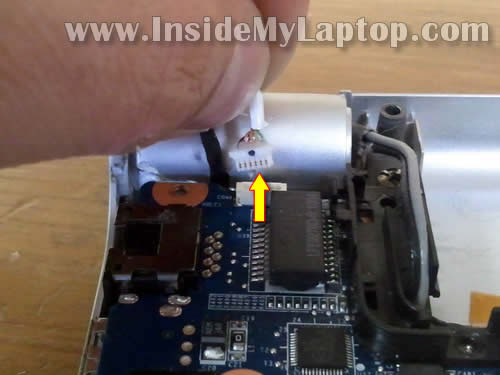
STEP 14.
Carefully lift up the right side of the express card board to disconnect it from the motherboard.
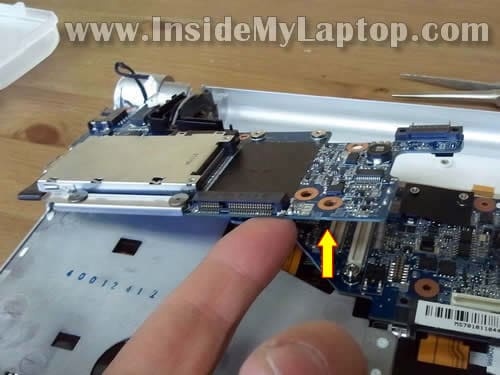
STEP 15.
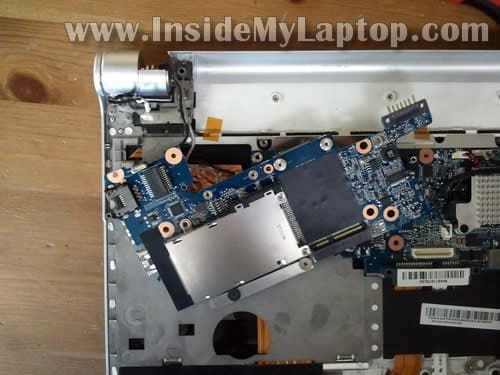
The express card board still connected to the display assembly by two wires (wireless card antenna cables).
It’s not necessary to disconnect them. Just put the board aside.
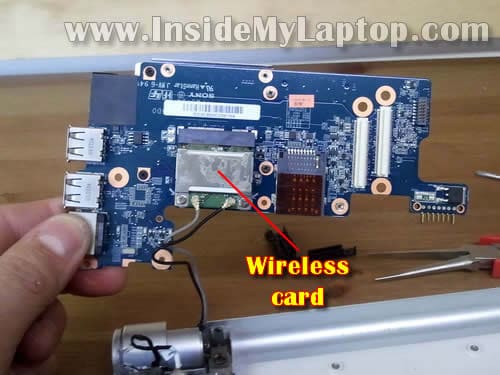
The wireless card attached to the bottom side of the express card board.
STEP 16.
Remove one screw securing the power button cover.
Lift up and remove the cover.
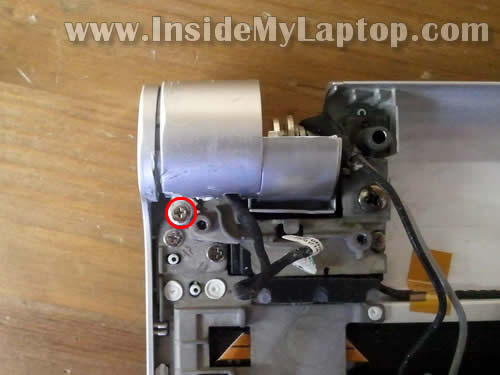
Now you can see why the power button got pushed in.
The power button board mounted on the metal frame which is part of the top cover assembly.
A part of the metal frame where the power button board attached broke off.
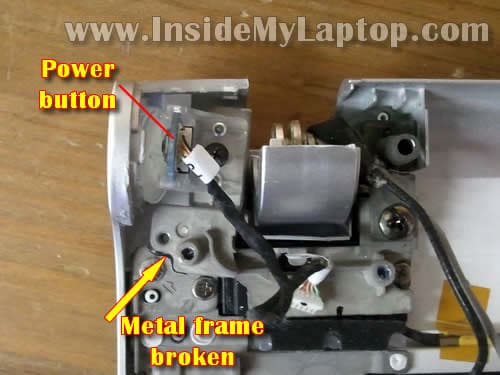
STEP 17.
Remove the broken metal frame with the power button.
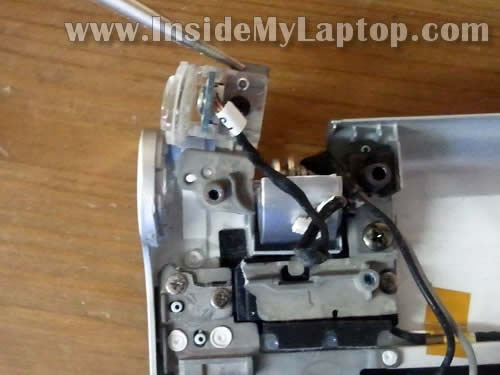
STEP 18.
Remove one screw securing the power button board to the frame and remove the board.
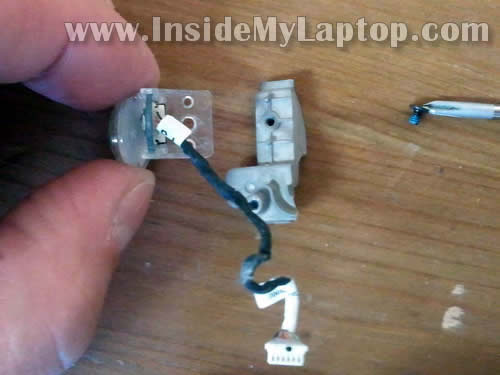
Now I’m going to glue the broken metal piece back to the main chassis.
I’ll be using JB weld Cold Weld compound to attach two metal parts.
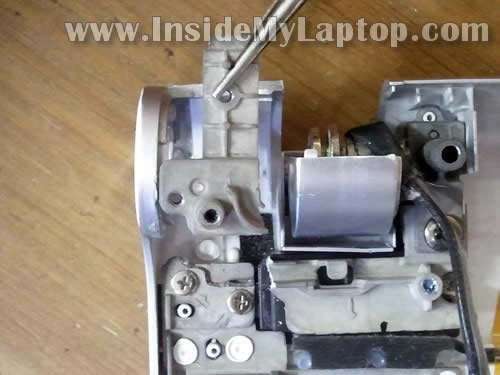
I glued broken parts and let it cure overnight.
The next day I assemble the laptop and voila! The Sony Vaio VPCS111FM power button fixed!
Johari
Dear Admin, can you teach me how to disaassemble an ASUS A53S? Cause i’m having problems with my display, its flickering like this http://www.youtube.com/watch?v=juu7_Z0awDk i would love to hear back from you 🙂 thank you. btw thanks for guiding me how to disassemble my acer 4745g
John
Hi admin, do you know if removing the cmos battery of an asus n53s will reset the bios password?
Thanks in advance.
Steven
How do I get Windows XP to recognize the hard drive as drive letter “C” instead of the card reader
THANKS!!!
Menachem Sharon
Hello,
May be you know what is the P/N of the plastic outer parts of the Power Button
and where I can order it ?
Many thanks,
Menachem Sharon
Jagger
Dear Admin,
I need to buy a new 17″ laptop. One of the most important criteria for my selection (brand and model) is that the cooling fan(s) must be easy to access for cleaning and/or replacement. I’d like to find a laptop that doesn’t need to be completely disassembled to access the fan.
Since it looks like you’ve disassembled 100’s or 1,000’s of laptops, I was wondering if you could recommend a brand and model (recent 2011 or 2012 make) would fit my need.
Dell Inspiron, Latitute, Vostro, XPS, or their Alienware? HP Envy or dv7? Acer? Asus? Sony? Toshiba?
Thanks for your help.
Fixide
Hi.
Thank you for yo guide.
I need to change my vaioS keyboard. Can you confirm that is the rear to be removed and not the front like the vaio Z guide to remove the keyboard?
Could you also tell me what screws can unlock the keyboard?
Thanks.
Damien
Shiba
Actually I’m having problem putting back a hinge cover on an almost identical model (s11e7e). It fell off yesterday and I’m not sure how to proceed. I think I will try to remove the screen bezel to see what’s below.
Kamran
Dear Admin:
I’m using Sony Vaio VPCS111FM. The “one button recovery” on top left corner of Keyboard does not work, Kindly guide if possible…….Thnx
2ndly, I presently have intalled Window 7 Home Premium & want to upgrade it to Windows 8…………….Do U know some solution??
Regards
Richard
Just one little wrinkle in there. If there is a Sim card then remove this or you can’t get the back off. It’s in the battery compartment.
Thanks very much for this – much appreciated.
tayo
hello I am having problem putting this model back together could you send me a detailed/ bigger version of the pictures you have on the site for the model sony vaio VPC-s111fm. I accidently took the screen apart from the from the motherboard now i just have pieces, if you could send me some pics im sure I could figure out what goes where
thank you,
tayo
Moi Jank
Thanks a lot for the very helpful guide!
Agustin
Dear Admin,
Absolutely helpful! I could fix my work laptop with your help, saving time and money. THANK YOU!!!!
Best wishes,
Agustin from Argentina
Subbu
Can you pl. send a picture of where the RTC CMOS Battery is located in mother board
Thanks in advance
Charko
Heyho,
‘ve got a VAIO pcg -81112m (Looks exactly like the above) that has gotten a bit cranky.
Whenever I move it it will shut down. I have checked the power button but it seems in one piece. Pretty certain it’s a fault though.
So I was just wondering if any of you might know if it’s something common or not.
IML Tech
@ Charko,
I don’t think it’s a common problem.
There is a chance your motherboard is failing. Maybe it has a micro crack somewhere.
Apparently, when you move the laptop, you short the motherboard.
Have you tried reseating RAM just in case?
Norm
Hey, I am disassembling my sony vpcs113fg, i am having trouble removing the screw under the hard drive assembly (refer step 7 photo), can you tell me what type of screwdriver I will need? I suspect it is a torx screw?
Steerpike
Thanks for taking the time to document the steps. I followed them but ran into a few variations on the same model. Hopefully this helps others
Step 3 – hard drive. There was a 3rd, long screw to remove close to the barcode sticker in the picture (left of the sticker). Pretty obvious to spot.
Step 7 – to the other poster who mentioned difficulty removing the screw below the hard drive – I got it out with the same Philips head screwdriver that I used for everything else. Note that these screws are several different sizes and you need to remember which ones go back where … I take a sheet of paper and place the screws in the exact ‘location’ they came from.
Step 12 and 14 – this is where I really had difficulty. After removing all the noted screws (which again are different sizes, keep track of them!), I could NOT release the board. After maybe 30 minutes of nerve-wracking effort, I noticed there was some strong adhesive Copper tape somehow holding the wireless card down against the back of the keyboard. It was super-sticky, and the act of removing it required a lot of brute force which is not reassuring when dealing with such delicate components. .
When it came time to reassemble this part, there are THREE separate ‘plugs’ that mate to three corresponding ‘sockets’ on the board below. The two white ones are robust, but the third is just a bunch of raw copper pins sticking up. During the above struggle with the tape, I think I bent several of them. I spent another hour or so painstakingly straightening the bent pins before being able to re-assemble. Great care is needed with this board, overall!
subbu
Yeah the copper tape is super sticky felt I’m going break the board if I wasn’t careful, thank for your info