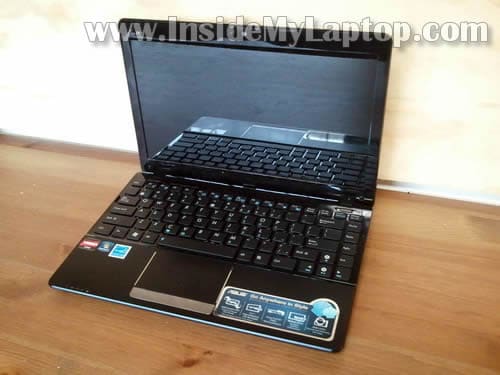
In this guide I explain how to disassemble an Asus Eee PC 1215B laptop.
It’s likely my guide will work for other models in Eee PC 1215 line.
I’m taking it apart in order to access and upgrade the hard drive which is mounted deep inside the case.
Before you start, make sure the computer is turned off and battery removed.
STEP 1.
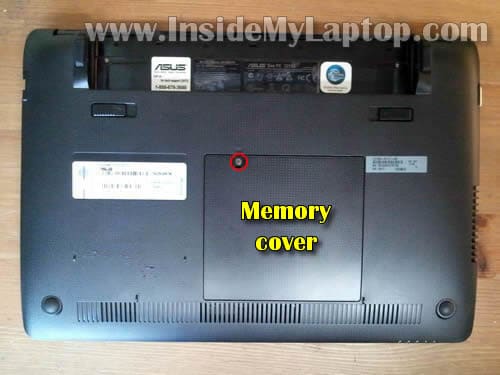
Remove one screw securing the memory cover.
Lift up and remove the cover.
STEP 2.
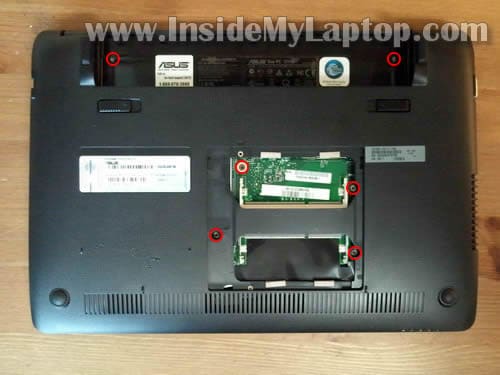
Both memory slots are located under the cover.
In order to remove the memory module you’ll have to spread latches on both sides of the memory slot. The memory module will pop up at a 30 degree angle. After that you can pull the memory module from the slot.
Asus Eee 1215B PC laptop uses DDR3 type memory.
NOTE: My customer has two 4GB RAM modules installed. The laptop running Windows 7 Professional 64-bit OS. In system properties it says 8GB RAM installed but only 7.6GB usable.

STEP 3.
Remove six screws securing the keyboard and palm rest assembly.
STEP 4.
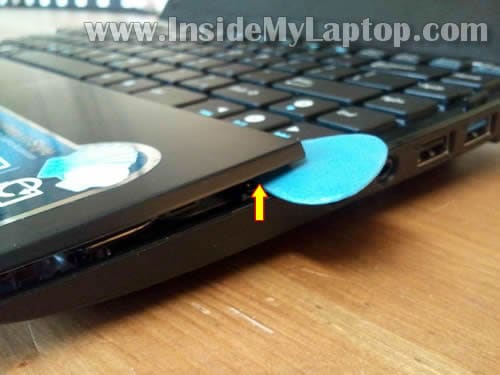
Carefully separate the palm rest assembly from the base with a piece of soft plastic (I’m using a guitar pick).
Continue separating it with your fingers.
There are a few hidden hooks securing the palm rest assembly. You’ll have to wiggle the assembly a little bit in order to disengage the hooks.
Lift up the palm rest assembly a little bit and slide it towards the display to disengage the hidden hooks. You’ll find detailed explanation in the comment 9.
STEP 5.
Do not lift up the palm rest assembly too far from the base because the touch pad cable still attached to the motherboard.
You have to unlock the connector and release the touch pad cable before removing the palm rest assembly.
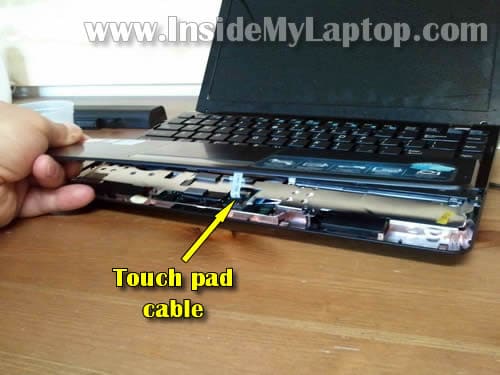
STEP 6.
Move the palm rest assembly away from the keyboard so you can access the connector.
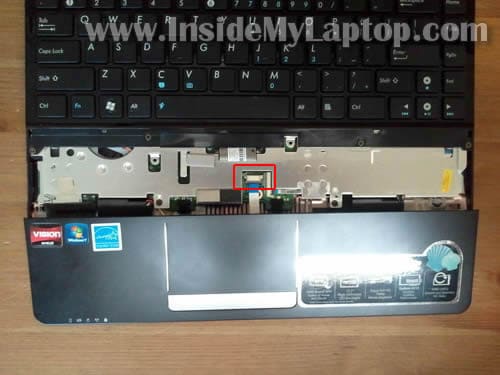
STEP 7.
In order to unlock the connector you’ll have to move the brown tab about 2 millimeters to the shown direction.
DO NOT move the tab too far from the connector base. The brown tab must stay attached to the connector base.
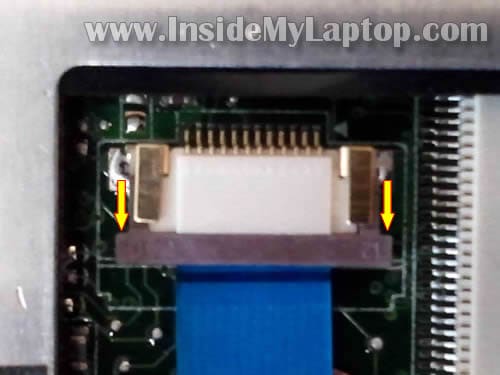
STEP 8.
On the following picture the connector is shown in the unlocked position. As you see, the brown tab still attached to the base.
Now the touch pad cable is released and you can pull it from the connector.
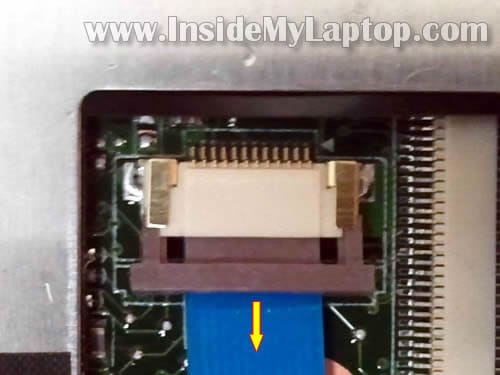
STEP 9.
Remove the palm rest assembly.

STEP 10.
Remove four screws securing the keyboard.
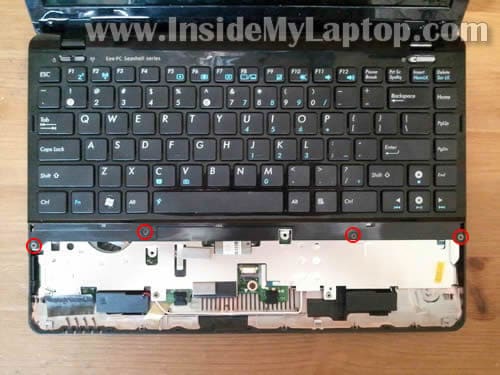
STEP 11.
Start separating the keyboard from the laptop base. I’m using same guitar pick for that.
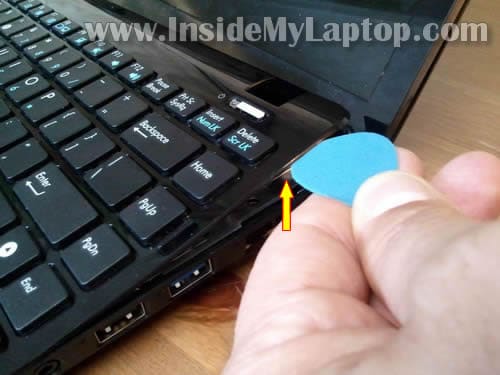
STEP 12.
Carefully lift up the keyboard and move it towards the LCD screen so you can access the keyboard cable connector underneath.
The connector has to be unlocked and cable released before you remove the keyboard.
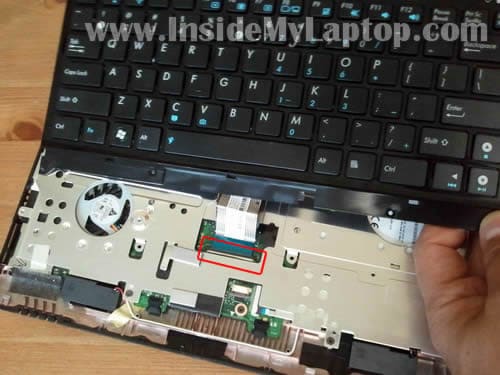
STEP 13.
For unlocking the keyboard connector use same technique we used in the step 6.
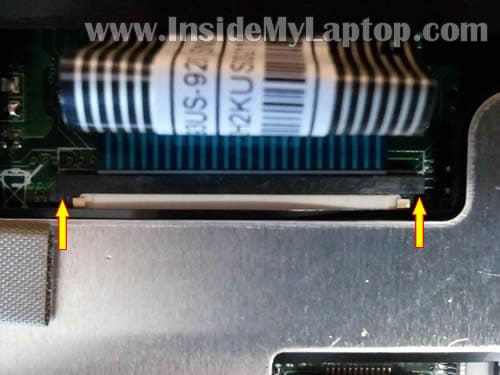
STEP 14.
On the following picture the connector is shown in the unlocked position.
Now the cable is released and you can pull it from the connector.
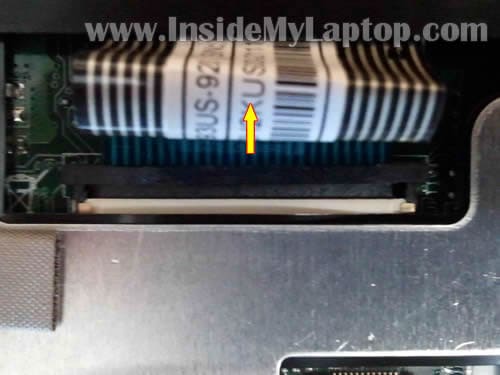
STEP 15.
Remove the keyboard.
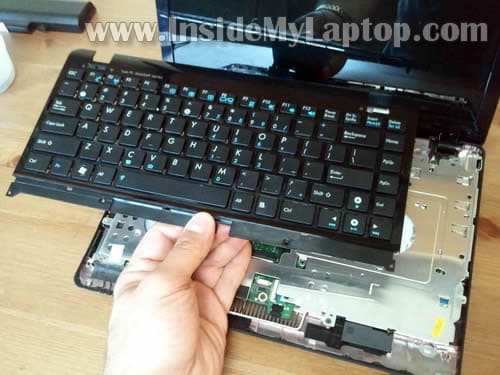
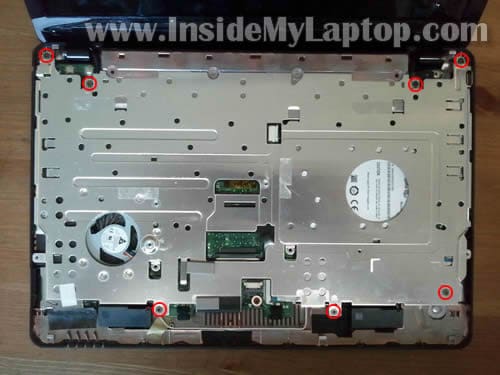
STEP 16.
Remove seven screws securing the metal shield.
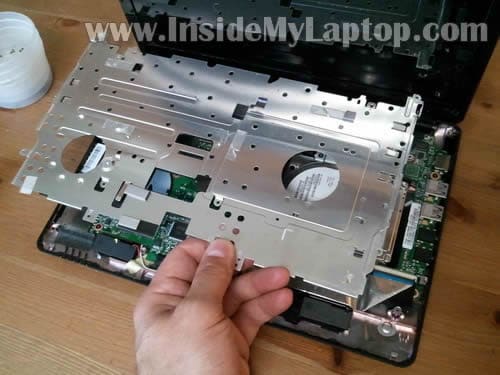
STEP 17.
Lift up and remove the shield.
STEP 18.
Now you can access the hard drive.
Remove four screws securing the hard drive assembly and slide it to the right to disconnect from the motherboard.

STEP 19.
Lift up and remove the hard drive.
Asus Eee PC1215B uses a regular 2.5″ SATA HDD. You can upgrade it to any other larger 2.5″ SATA HDD.
I’m going to replace it with a SSD (my customer requested that).

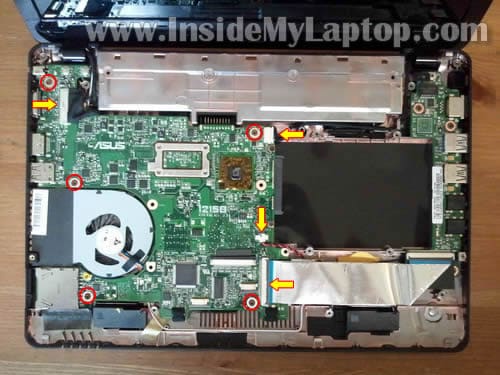
I’m not going to disassemble the laptop any further but it’s not difficult to remove the motherboard.
Remove five screws securing the motherboard. Disconnect four cables.
After that you should be able to lift up and remove the motherboard.
It’s necessary to remove the motherboard in order to access and replace the cooling fan.
Cloud
Hi, can you add the steps about how to replace the 1215p LCD screen? I have a 1015PW and its LCD was broken, then I am finding the way how to replace it.
Many thanks to your help, and this guide was very helpful.
Mattias
Hello! Very nice DIY.
Just wana ask about the memories, are you sure about that 8gb will work on every asus 1215B? As you probably know in the asus specifications it says max 4gb (2x2gb) memory. I just bought the Asus Eee PC 1215B few days ago, the 4gb version, and thinking of upgrading to 8gb in the near future if thats possible. And the corsair memories you installed, what´s the product code/number of the memories. And the hard drive is it standard 2,5″ SATA for netbooks? Thinking of installing a Momentus XT hybrid disk, what do you think? will the difference be noticeable. And one last and “stupid” question, how do i get the Windows 7 from the old hard drive to the new? if i make the hard drive change.
Thanks in advance!
IML Tech
@ Mattias,
No, I’m not sure. Specs said it can take up to 4GB total, but my customer’s laptop had 8GB installed and it worked. Will it work in your laptop? I don’t know. I guess you’ll have to try.
Cannot tell. I don’t have this laptop anymore.
Yes, the laptop had a regular 2.5″ SATA hard drive for notebooks. Nothing special.
I replaced original hard drive with a 64GB SSD hard drive (made by Crucial) and it worked. I think your hard drive should work too. In my case the difference was noticeable. Better boot time.
1. Reinstall OS from recovery discs. I don’t know if you have them. I guess you can order them from Asus or maybe you have an option to create them on your laptop.
2. Reinstall OS from scratch using OEM installation CD and your license code from the bottom. You’ll have to find the OEM disc.
3. Clone your original hard drive to the new drive.
If you want to use 8GB you have to run a 64-bit OS.
David Baldock
I received a 1215b today, and have a 750 GB WD Scorpio 7200 RPM drive to put in it. I was thinking about ordering a 1 TB drive, but they seem to be 12.5mm – 15mm thick, and I didn’t know if there was enough clearance, since I’m sure the stock 320 GB drive is probably 9.5mm or less.
From reading about other people’s experiences of opening the 1215b case to swap the hard drive, it seems like they had troubles getting the plastic clips to release without breaking a few. Did any break during your drive swap? If not, did you have to flex the whole case back and forth to get the clips to release? I guess I need to head over to Guitar Center and buy some “tools”. ::grin:: Is your guitar pick a standard thickness and strength?
Thanks,
David Baldock
David Baldock
An update on my 1215b: Installed 2 sticks of 4GB DDR3-1333 RAM today, and the machine boots and reports all 8 GB (well, 7.61 G since some is used for the Graphics Processing Unit). Still need to go buy some guitar picks for case dis-assembly.
NOTE: I did find that Samsung now has the Spinpoint M8 HN-M101MBB 1TB Notebook Hard Drive that is the standard 9.5mm high. It has a 3 year warranty, rather than 5 years like the WD Scorpio.
David Baldock
OK – the 320 GB Seagate Hard Drive has been replaced by a 1 TB Samsung unit. I followed directions on another Blog, and made a 8 GB Flash Drive Bootable and copied the Win7 Ultimate 64-Bit Installation DVD to it, along with the ASUS 1215B Drivers and Application files. After installing Win7, and the Netbook specific Drivers, nearly everything is working the way it was with the original hard drive and Win7 Home Premium.
There are a couple of things that are not working the same, and I was wondering if you had these issues, and what you did to fix them:
1) If the downloaded Asus ExpressGate Cloud OS is installed, it always starts first, even if the Right-Hand (Win7) Power Button is pressed. Were you able to retain the original operation where Express Gate booted if you pressed the Left-Hand button, and Win7 booted if you pressed the Right-Hand button?
2) The Right side of the Left-Hand button used to cycle the power for the WiFi and Bluetooth radios. Did that function still work for you after the Hard Drive swap?
Thanks,
David Baldock
Jay
David,
I just recently installed Win7 Ultimate 64-bit and upgraded from 2GB to 8GB on my 1215B.
From reading online, ExpressGate seems to be resident in the very last partition of the stock hard drive.
Partition 1: C:\ System
Partition 2: Recovery
Partition 3: D:\
Partition 4: ExpressGate
I didn’t have to reinstall ExpressGate when I reinstalled Windows as I did not upgrade my HDD.
I just left Partition 4 alone during Windows setup and merged Partitions 1/2/3 into one big primary partition. ExpressGate still functions. You may need to make some manual edits to the boot loader? I’m not really sure.
With regards to the buttons/cycling – you need to download the Keyboard Filter driver from the Asus website. Run the Hotkey installer that is located in the same download as the keyboard filter.
David Baldock
Jay, Thanks for the reply!
A couple of days ago I found out as you’ve mentioned, that even though the “KBFilter-V1_0_0_3_Win7” won’t install on the 64-Bit version of Windows 7, the “HotkeyService_1.23” application that’s in a sub-folder will install. So, I got the SoftKey Switching of the Radios working.
I’ve placed the unmodified original 320 GB hard drive in an external enclosure. It’s not here at work with me this evening, so I’ll have to wait and see if I can identify / copy the ExpressGate partition to the new hard drive this weekend. When it was connected to the Netbook the other day, I don’t remember seeing 4 partitions, but I wasn’t using any partitioning tools – just Windows Explorer.
Randy Lee
The instructions are good with one glaring exception. The key step is removing the palm rest. The rest is attached by “hooks” in the front (front being the side closest to you when you have the netbook positioned as it normally is when you use it). If you pry straight up you *will* break the hooks. The trick is to pry up starting in the back corners as shown in the picture. But then pry up the back side next, (the back side is the side that is nearest the keyboard. Pry the back side up all the way across from corner to corner. Then you can lift it up in the back and move it to the back (towards the screen) to release the hooks without breaking them. I have to confess that I have only taken mine apart once, and I broke all the hooks doing so, (It’s not the end of the world – mine still works just fine – it just doesn’t look quite so “of a piece” as it did.) but it sure looks like the method I describe would work if you did it just right. The even trickier part of this is that there are also hooks on both sides. I think that if you bowed the palm rest up in the middle while lifting it up in the back and moving it back towards the screen you might just could release the side hooks at the same time you are releasing the front hooks, and just possibly not break any of them. Whew! What a intricate little bugger.
IML Tech
@ Randy Lee,
Thank you for your explanation. I mentioned your comment in the post. I hope it will help other people.
Randy Lee
Thanks IML Tech. I couldn’t have got as far as I did without your generous publication in the first place.
One Change: I think that if I ever do this again, I will try to start separating the palm rest in the center of the back, in other words start just opposite the center of the space bar. (Well, actually a bit to the right of that as the space bar is not quite in the center of the keyboard.) That way the palm rest will lift up there first. Then I’d insert the corner of a credit card in the gap while working the guitar pick out to both corners from the middle. Maybe I’d add more credit cards as I went to facilitate the “bowing” I mentioned in my first post. Hopfully with this method the palm rest could be separated without breaking nary a hook. Will report if I ever try this.
Thanks again for putting up the guide. My boss really likes his new eeePc now that it has an SSD!
tbb977
hey,
would anyone be able to image the recovery partition… unfortunatly i had to delet it and the software dvd cost 50 dollars…
I know its 16GB+ but as i looked around a lot of people are looking for the recovery software/ images…
would be glad if anyone could help
thx
Mith@Auto Transport
Hey thank u for this post
I have asus laptop and i have to adjust my keyboard it was not fitted properly.I was scared to open the laptop as i have never opened it before and its new.
By viewing your post i had successfully opened and rearranged my keyboard.
Nick
Hello, could you please provide me with the partnumber of the keyboard? I’m trying to order an “azerty†keyboard to replace my qwerty one 🙂 Many
thanks
Jean-Michel Pouré
Many thanks!
Some eeePC-1215b have a touchpad problem. I have two eee-pc 1215b, one has no problem, the other has a touchpad problem.
Thanks to you explanations, I could disassemble my laptop and fix the problem. I followed the explanations of http://www.youtube.com/watch?v=8ak20j48w1A
Also, I went to Control Panel => Mouse and removed double or triple finger options. I read the patent disclairmer, I simply disabled all complex options: two fingers zoom, three fingers zoom, scrolling. You may also remove the touchpad driver and get back to Windows7 default options.
This is a clear example of a vendor releasing a non-working and complicated touchpad driver, IMHO just for the “beauty” of registering patents. Thise two-three fingers touchpad does not work.
The eee-pc-1215b works like a charm under GNU/Linux.
airone41
salve,
complimenti per la delucidazione! Io vorrei sapere come devo fare per riparare il gancetto destro di plastica del mio 1215B quello che ricopre la vite dell’alza schermo per capirci la parte di plastica sopra il tasto dell’accensione e che cè anche nel lato sx.
Un giorno improvvisamente si è tolto metà pezzetto di plastica destro e non riesco piu ad incastrarlo e se lo incollo credo non resisti perchè è nella parte in cui si alza e abbassa lo schermo.
Qualche soluzione?
Grazie infinite!
IML Tech
@ airone41,
Normally you don’t fix plastic parts, you replace them. If you want to glue it, try epoxy.
Rémy C.
Hello !
Thank very much to all of you for your help.
I managed to put an SSD Hard Drive without any hurt.
The #9 comment is very well explained, although my english was pretty “rusty”.
Cheers from France !
Rémy
Boris
Hello
tnx for this, can you please tell me how to reset bios pass on this notebook? can I only remove battery conector and wait 15 minutes or ? is there any clmos jumper ?
tnx in advance
Salvu Werwer
Hi,
I bought this laptop from Germany and it obviously has a German ZWERTY keyboard. I would like to replace the keyboard and from ebay I found that you have to separate something else before you replace it. What else needs separating?
In your pictures you just lifted it complete with the power button etc. Can you please say how to separate the actual keyboard from the rest?
Thank you for the informative tutorial
IML Tech
@ Salvu Werwer,
I don’t have this laptop anymore and cannot provide a guide, but I think you should do the following:
– remove the keyboard assembly as it shown in the step 15.
– take a look on the back side of the assembly and search for screws.
Most likely you’ll be able to separate the keyboard after all screw removed.
j0
a salesperson mentioned the 1215B with AMD E450 and Windows 7 Home Premium cannot accept a RAM upgrade above 2G. Is this true? I’m doubting this but need expert advice. What is the maximum RAM upgrade if its possible?
Of course i can upgrade to Windows 7 Professional if pressed.
IML Tech
@ j0,
Here are Crucial® Memory Advisor results for the ASUS Eee PC 1215B Netbook:
j0
thanks for reply. If the Crucial results says maximum 4G ram. How was your client’s laptop able utilize 8G ram.
IML Tech
@ j0,
Apparently 4GB is factory specs (and that’s what Crucial shows) but in real life it takes 8GB RAM.
Pat
Is the wlan module onboard or connected with a mini pci-e slot? I can’t see anyone on the pictures…
IML Tech
@ Pat,
I cannot see it either. Could be built in. Not sure.
JM S.
Hi!
How can I change the APU of this laptop? Mine’s a C50, which is a lot slower than the E450.
Thanks!
IML Tech
@ JM S,
I don’t think you can. I believe it’s integrated into the motherboard.
Kevin Park
Hi,
Your guides are fantastic. Helped me fix my 1215n numerous times.
However, I need to replace my hinge on it now. Any chance you can do a how-to on that?
Best.
IML Tech
@ Kevin Park,
I don’t have a guide for that but it shouldn’t be very difficult to figure out.
I think you’ll have to go though steps 1-17 and remove the metal shield.
After that you take apart the display panel (similar to many other laptops. I have many guides here).
Finally, replace the broken hinge.
Nacho
Thanks! I just succesfully open an Asus eee pc 1215P so i could fix the battery connector. I am sending you a couple of beers via PayPal!
lisior
Any chance of having similar instructions for Asus 1225b? Would like to replace an existing HDD with a SSD, however the design of 1225b seems to be somewhat different. Thanks!
Basti
Hey really cool guide 😀
do you know how big the hard drive is? (dimensions)
I would like to replace mine, but i am afraid of my new one not fitting into it 😉
thank you
basti
Przemo
@ Pat and IML Tech
The PCI Card is not built in and is situated bottom the silver tape connected to mPCI express card (half size). I’ve recently replace my only WLAN card to WLAN + Bluetooth card and works fine.
Solo
@ lisior:
I’ve recently purchased an ASUS 1225B and as soon as I got it home, replaced the HDD with an OCZ Agility III 240GB SSD. I basically followed these instructions, adjusting the procedure to compensate for the new ASUS Flare design. You remove the screws on the back, then using a guitar pick, separate the entire top half of the laptop base. Careful when you lift, as the keyboard and trackpad connectors look quite fragile. Disconnect those, lift off the keyboard/trackpad and you’ve got full access to replace the HDD. The included 320GB HDD was thinner than my SSD, but mounted on some sponge, so it squishes down and fits fine. Good luck!
As I live in Thailand, my keys have English + Thai characters on them. Does anyone know of a way to remove the additionally printed Thai letters without making it look a horrid mess? Keeping it simple, I’ve tested a couple permanent markers, but they rub off quite quickly, and scratching them off doesn’t seem to work well. Replacement keys or keyboard even?
Johee
Hello!
This helped me alot when I was fixing one of these computers.
I think you did a very good job on showing where the screws were, you did it simple and easy! Just the way it should be!
Thank you so much for helping me out!
Greetings,
Johee
Frank
Thanks for sharing! I must admit, I too broke some of the hooks of the palmrest while takingit off.
The trick is to FIRST release the little hooks that are on the side and the top of the palmrest with a thin piece of plastic. By “the top” I mean the part of the palmrest that is just beneath and along side the keyboard. It is possible to also get a thin piece of plastic in there. But don’t push to hard because these little hooks can also break. Next thing you will want to do is gently lift the TOP of the palmrest first. If any hooks prevent lifting, gently use the thin plastic on that spot. Never try to lift the bottom of the palmrest because those hooks do not allow pulling straight up and will definately break when you try that. When the whole top of the palmrest is lifted up a bit and all hooks on the side are released, THEN you can wiggle the thing a bit so that the bottom hooks will also come off. Remember: Take your time. Never force it. The palmrest should come off quite easy, ONLY when you keep to the above described order. And in case you should break any hooks: Just glue them back on with good glue. At fist I used instant glue, but that didn’t work. Later I used a two-component plastic glue. That did the trick.
Man says:
Hello, very useful guide. Keep on your work. I would like to ask U, is it possible to add touch screen to this model?
TQ very much
roland
Hi
Great help if you want to replace something under the keyboard. I am just sitting what kind of tricks to loosen the screen frame. It is just only 2 simplte screw and probably thousands of hinges and hooks.. Are you the man to guide me…
Jimmy
Hey . Followed your guide just to clean the pc from the inside. Reassembled it and now the screening wont work.. Whats wrong? All cables are ok
/jimmy from sweden
IML Tech
@ Jimmy,
Make sure memory modules are seated correctly. Try reseating them.
Jordi
Thanks a lot for this tutorial. With the help of this tutorial I’ve been able to understand the mechanics and I applied the same to an ASUS 1225B.
The main difference is that 1225 B shell (that includes mousepad, keyboard) is a whole one piece that must be removed very carefully and is really hard tightened.
1225B have no memory modules but the screws are located in the same place as 1215.
Everything is the same…although in the 1225B once you remove the keyboard there’s no metallic cover shield , once you remove keyboard you will see the wester digital Scorpio Blue ready to be removed. I installed a Crucial M4 128 Gb , and I can tell you is night and day. So don’t hesitate to do it, don’t be afraid, cause is not that hard….
The tricky part is to understand how to tighten again keyboard and mouse pad cables (Step 8 and Step 14) ….the rest is piece of cake….you only need patientce and order (to remember screw location again) I also recommend to download youtube videos of 1215 tutorials (at the moment still didnt found any 1225b tuto) and record them into your mobile phone so you will have a nice tool to remember the procedure.
Well thanks again for this great tutorial !
James
Great page/site. Very helpful. Thanks!
Joe
Hi.
Thanks for all comments and tutorials.
I have an ASUS 1225b with 500Gb WD HD. I will change this drive with a SSD 128 Gb (now the PC is verry slowly PC… Hope it will became quicker with a SSD Drive…).
My question is: What I need to do to transfer the original ASUS partition on the new SSD drive ?
It’s a best way to sart with only one partition and install a new Win 7 64 bits on the SSD Drive ??
Thanks for your help.
Regards.
Joe
IML Tech
@ Joe,
1. You can probably buy a set of recovery discs for your laptop directly from Asus.
2. You can search torrents for an image of OEM Windows 7 and burn it on a DVD. Install OS from that image. Activate OS using the license key attached to the bottom of your laptop.
Wicked
Honestly, amazing crystal clear instructions (including comment #9).
The whole SSD replacement worked like a charm.
You rock!
Ken
THANKS. Extremely detailed with clear pictures. Saved me a lot of time, frustration, and hassle. Sincerely grateful.
Maurice Strauss
I am in doubt about changing my keyboard as the keys are not responsive and in ebay, there is an add for selling new keyboards that say they are replacements for my model, but after looking at this tutorial I can see the keyboard is different as the keyboard is a larger piece.
Maurice from Brazil
IML Tech
@ Maurice Strauss,
Most likely, when you remove the keyboard assembly as it shown in the step 15, you will be able to remove the keyboard from the keyboard bezel.
I don’t remember how to do it off the top of my head but most likely all you have to do is remove some screws and separate the keyboard from the bezel.
martin
works for 1225 B with little differences.
– memory chips are on board, so no need to pull them out
– in step 3 there are 8 screws to remove – 6 under the battery and two in memory hole
– keyboard and mousepad pieces are one piece, I started to pick it (also with guitar pick) from back to front on both sides, then the front side and then I was able to open it up.
– to unlock keyboard and mouse cable you have to pull white (for mouse) and black (for keyboard) parts up, in contrast to pulling forward for 1215 B
– no need for step 16 and 17, metal shield is mounted on the bottom of keyboard, not on the MB/HDD hole
Benjamin
Hello!
Thinking to upgrade my ASUS 1215 b 🙂
I will change ram from 2.00 GB to 2×4 GB ram (good/bad??)
Also think about getting a ssd hard drive.
Here you can find the stuff
ssd har drive
ram
TIPS?
IML Tech
@ Benjamin,
The Crucial site says:
Memory Type: DDR3 PC3-10600, DDR3 PC3-8500, DDR3 (non-ECC)
Maximum Memory: 4GB
But my customer’s laptop had 8GB and it worked. You have to have a 64-bit OS installed. Otherwise it will not see all memory installed.
You RAM and HDD should work.
Benjamin
@IML Tech
Okey, i have a 63 bit win7 home premium 🙂 So it shuid work!
but wath about the ssd upgrade, do i need to bay a new windows??
Caliban
I want to change two strips of 2X2 Gigas RAM against two strips 2X4 Gigas RAM on a laptop Asus 1215B, what is the gain?
Fail
The removing of the motherboard was not easy at all – we removed 7 screws (instead of 5, as you wrote), disconnectes 4 cables – that wasnt easy at all – and still couldnt lift the motherboard.
We´d be grateful for a tutorial for that.
keis
Hi my asus is shutdown automatic and never start again and if I press the button to start the blue indicate is blink but the laptop not going on
can help me what to do plz
periklis
Hello, I would like to inform me if you know what is the name of the mouse connector you show from step 7 to 8. I have the same connector and its broken, i wan to to order it but i dont know what type is and how to search it. Thank you very much.
linuxuser
where’s 1215B’s cmos battery.
offlate it does not start and i will have to charge battery even if its green for a few minutes!
but since date and time are intact even without internet i dont know if i have to replace battery or cmos battery!
is there still no all in one battery where we can adjust power requirement and use it on any laptop!
my expenditure on battery has become more than netbook!
SF
Is it possible to upgrade the CPU of this laptop?
IML Tech
@ SF,
I don’t think so. I believe the CPU soldered to the motherboard.
Fredrik
Thanks for this guide
My fan on the 1215b hade something jammed in or (at least i think so) so i got overheated
It didnt help so use compressed air in it so i had to disamble, but at first i tried to get from the underside, but thanks to your help i worked it out and could push the fan a little bit, and now its working like a clock.
THX!!!
Ðльберт
где CMOS-батареи 1215B ,чтобы обнулить биоÑ
IML Tech
@ Ðльберт,
Take a look at the picture in step 19. On the bottom of the picture you’ll see a white connector with black and red wires. This is CMOS battery connector.
You can see the CMOS battery partially on the last picture. It’s yellow and hidden under the wide ribbon cable.
Обрати внимание на фотку в шаге 19. Ðа нижней чаÑти фотки еÑÑ‚ÑŒ разъем Ñ Ñ‡ÐµÑ€Ð½Ñ‹Ð¼ и краÑным проводом. Ðто батарейка про которую Ñ‚Ñ‹ Ñпрашиваешь.
Arno Baarslag
I just wanted to increase performance of my E-350 1215B. THere is 5 GB of internal memory.
I also have a ASUS K55A with a Samsung 840 pro 128 GB and this is pure fun.
So I bought a Kingston SSDNow V300 120GB 2.5″ SATA600, not that expensive but enough for the 1215B to make it a lot faster. I tried to get to the place where the Hd is located but no result untill I found your article about this subject, which is a great help, thank you.
Thanks again,
Arno Baarslag
The Netherlands
ich
thanks for your guide.. i need it so bad because my fan stuck by dust
🙂
Retrospector
Thanks for that guide, was really helpful! Great use for a guitar pick, it’s now part of my tool drawer 🙂
Little Donation sent 😉
Rizki Billionman
hi dude, i followed your steps to disassemble this nb and it works man! thanks for the guide, keep it up man!
RYKEL LIM
Hi, I changed my Asus EeePC 1215B hard disk to an Intel SSD 240GB.
My BIOS is the factory default.
I burnt a Windows 8.1 Pro ISO to a USB thumbdrive using Rufus. I set Rufus to format the thumbdrive to “GPT mode for UEFI” and FAT32 filesystem.
Upon trying to install Windows, I deleted all partitions so that the SSD is 100% unallocated space.
I am able to get to the partitioning of the SSD, but when the installer is trying to copy files over, I get an error saying that the PC encountered a problem and then a restart.
Is this a badly created USB thumbdrive or do I need to change some settings in the netbook BIOS?
Please advise.
IML Tech
@ RYKEL LIM,
Could be a problem with the USB flash drive. Can you try installing Windows 8.1 from a DVD?
Is it a good Windows image?
Also, check firmware updates for your SSD. Maybe it has to be updated.
Jacquelin
THANK YOU!
One day my laptop would just not turn on although I could hear the fans running and the case lights were lit. I took it to a repair shop and they told me it seemed like a Mother board issue and I was better off replacing it. I had the laptop for little over a year and I refused to believe the motherboard would just give up like that. I searched online for answers and couldn’t find any.
This went on for almost a year until one day I came across this page and decided to try reseating it myself. It now works! I saved myself hundreds of dollars in the cost of new laptop by following this tutorial! 😀
RYKEL LIM
@IML TECH… I found out the problem. I was trying to boot up the thumbdrive in UEFI mode. In the end, I simply booted it up WITHOUT UEFI and was able to install Windows 8.1 Pro successfully! Now, to try taking it apart again, and replacing the Wireless card in it… : )
aup
hello….
may U help me to solve my problem……?
I have trouble with my asus 1215B, my netbook can not display anything (black screen) but the blue indicator light is ON, but sometimes it’s can start normally
what’s wrong with my netbook…….?
please help me to solve my problem….
thank’s in advance
psalmy
I love that… You know…it’s nt easy… Thanks a lot!
Rainer
Hi,
Great guide, thanks!
My fan is ratling so I want to replace it. Checking eBay I can see they sell both the fan separately and together with the heatsink.
Is it easier replacing both the heatsink+fan together or just the fan on its own?
Much appreciated if somebody could shed some light on this 🙂
Re: Rainer
Just replaced the fan. No need to touch the heatsink, everything came apart easily. There’s only some tape holding the two together.
Mike
Thanks for these really great instructions! I’ve just disassembled my wife’s eeePC 1215B, given it a good clean, reassembled it, and it works just fine. Thanks also to the author of Comment #9 re how to remove the touch pad without breaking those hooks.
With regard to removing the mother board in Step 19 (which I had to do because I wanted to clean out the fan, and the dust under it), after removing the seven (7) screws and four (4) connectors shown in the second picture, you’ll also need to remove three (3) more screws in order to remove the motherboard. There is one (1) screw under the cable going to the connector shown in the top-left corner of the picture – this also holds a lug terminating a wire, so when re-installing the motherboard make sure this lug is placed under the screw. Under the flat silver-coloured cable running to the connector shown at the bottom of the picture (just to the right of centre), there are two (2) screws holding the radio modem in place – remove these screws and unplug the modem from the motherboard. Lift the motherboard up at the right-hand edge, pulling to the right, in order to disengage all those peripheral connectors from the left-hand side of the case (as shown in the picture).
Thanks again for this great set of instructions.
Grant Gustafson
Older Intel 310 80GB sataII mini pcie is half-size 30×30 instead of 30×51. Lenovo used it. It might plug into the 1215N WLAN slot. USB WiFi N could replace the WLAN. Anyone tried it? Could add a 2nd OS, e.g., Linux Mint, for about $35 in eBay parts.
Fred
Yeah! Only broke 1 of these hooks, underneath the palm rest! ^^
Thanks a million times for taking the time to share the guidance and advice, much appreciated! 🙂
Cheers
Nabil4247
Thank you very much 🙂