
In this guide I explain how to disassemble Acer Aspire 5740/5340 series laptop.
I will show how to remove the motherboard.
Main disassembly steps:
STEP 2-5: Removing the hard drive, memory and DVD drive.
STEP 6-11: Removing the keyboard.
STEP 12-17: Removing the display assembly.
STEP 18-22: Removing top cover assembly.
STEP 23-30: Removing the motherboard. Accessing cooling fan and DC jack.
STEP 1.
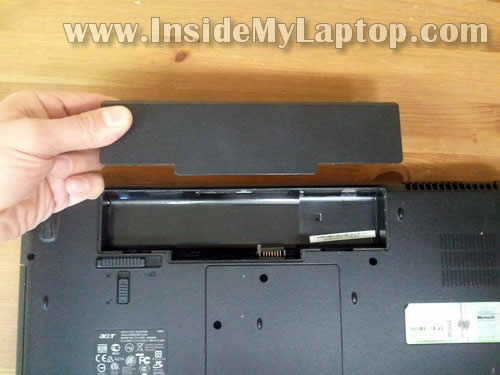
First of all, make sure the computer is turned off and battery removed.
STEP 2.
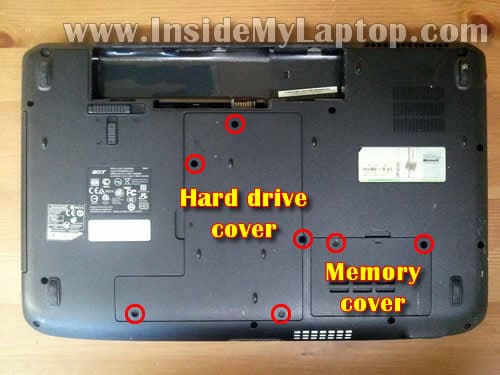
Remove screws securing the hard drive and memory covers on the bottom.
Lift up and remove both covers.
STEP 3.
Both memory slots are located on the bottom.
Acer Aspire 5740 can take up to 8GB RAM total (up to 4GB module in each slot).
Memory specs: PC3-8500 DDR3-1066 204pin SDRAM SODIMM.
This laptop supports Dual-Channel SDRAM support. In order to run it in Dual-Channel mode you must have two identical memory modules in both slots.
I’ll leave both memory modules connected to the motherboard.
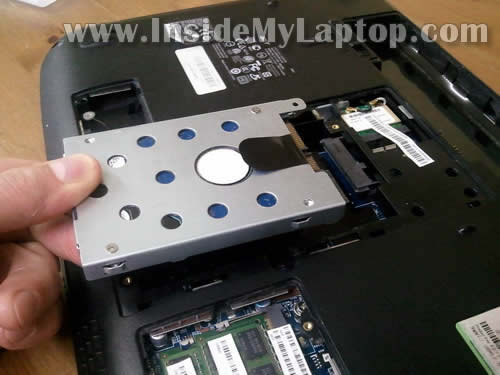
Remove one screw securing the hard drive. Slide the hard drive to the shown direction to disconnect it from the motherboard.

STEP 4.
Lift up and remove the hard drive.
Acer Aspire 5740/5340 has a regular 2.5″ SATA hard drive installed. You can replace it with any large capacity 2.5″ SATA hard drive or SSD.
STEP 5.
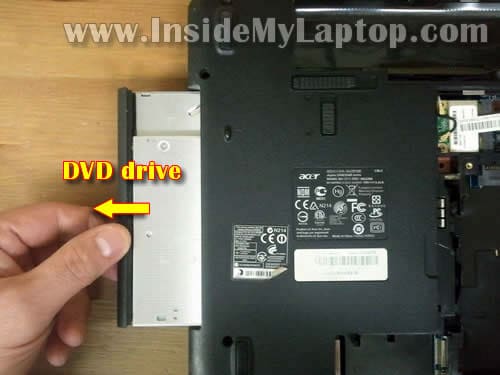
Pull the DVD drive and remove it.
The DVD drive was secured by one of the screws we removed in the step  2.
STEP 6.
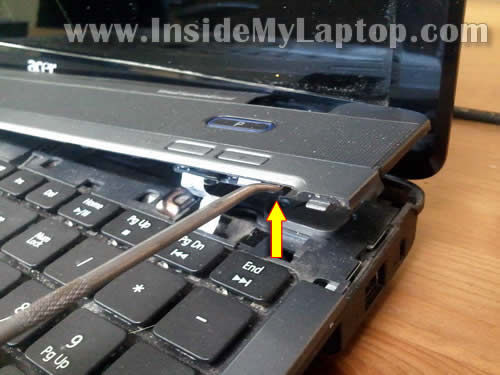
Carefully lift up the keyboard bezel with a small screwdriver.
Do not move the cover to far because the media button board (attached to the cover) still connected to the motherboard.
Turn the keyboard cover upside down.
STEP 7.
Here you can see the media button board which is attached to the keyboard cover.
Before you can remove the cover it’s necessary to unlock the connector and release the cable.
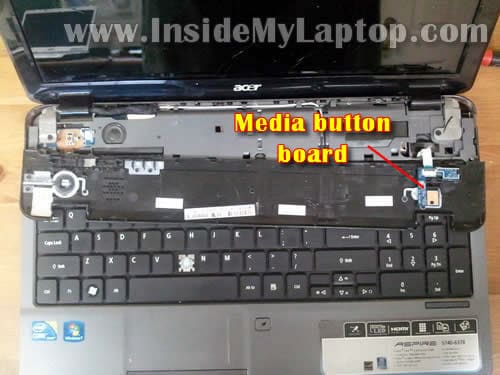
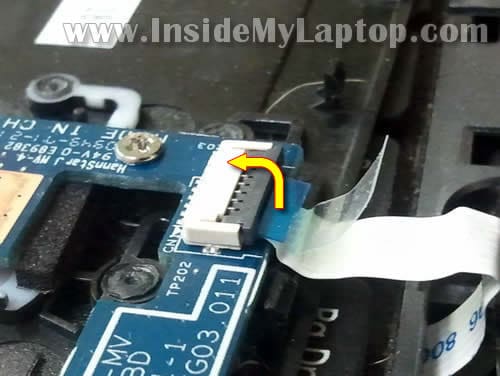
On the following picture the connector shown in the locked position.
Lift up the brown locking tab with your fingernail. It will open up at a 90 degree angle.
NOTE: the locking tab must stay attached to the connector base.
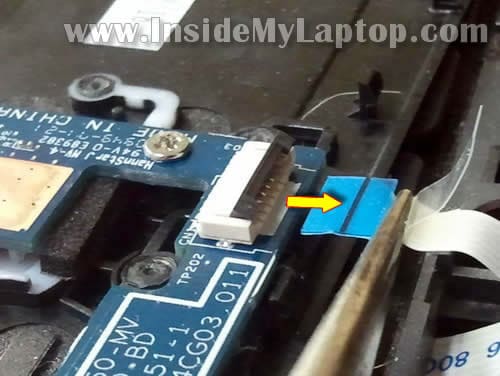
On the following picture the same connector shown in the unlocked position.
Now you can pull cable from the connector.
After you release the cable you can remove the keyboard cover completely.
STEP 8.
The keyboard secured by three locking latches on the top.
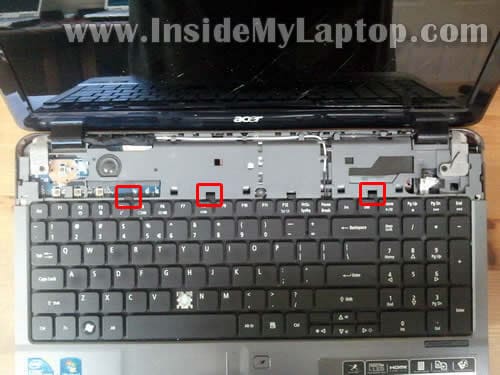
Push each latch with a small screwdriver and lift up the keyboard.
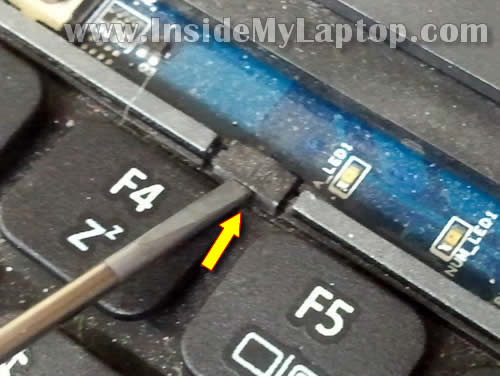
STEP 9.
After all three latches are unlocked you can lift up the keyboard and place it upside down on the palmrest.
Be careful, the keyboard still attached to the motherboard.
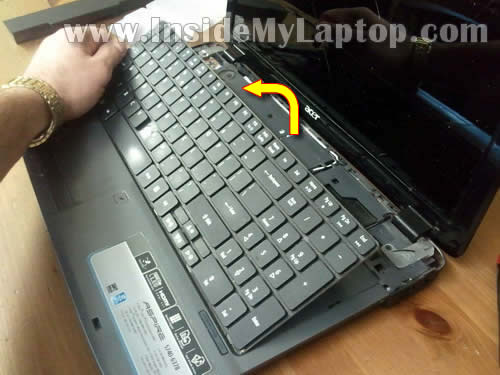
STEP 10.
Disconnect the keyboard cable using the same technique as in the step 7.
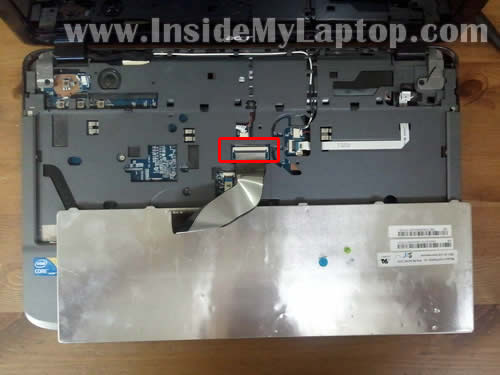
STEP 11.
After you disconnected the keyboard cable from the motherboard you can remove the keyboard.
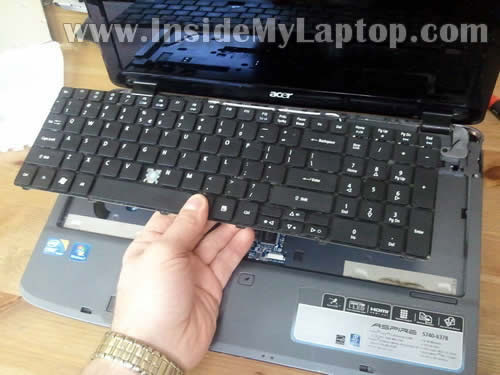
STEP 12.
In the following six steps I’ll show how to remove the display assembly.
In order to do that we’ll have to disconnect the wireless card antenna cables first.
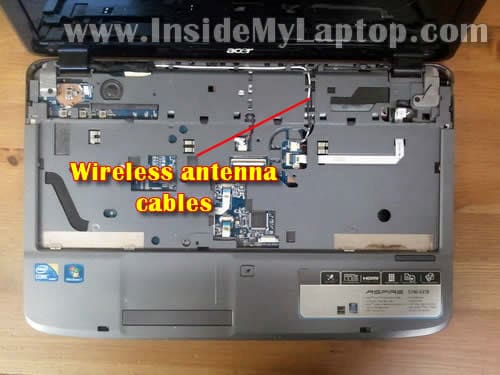
STEP 13.
Turn the laptop upside down and disconnect two antenna cables from the wireless card.
You can leave the wireless card connected to the motherboard.
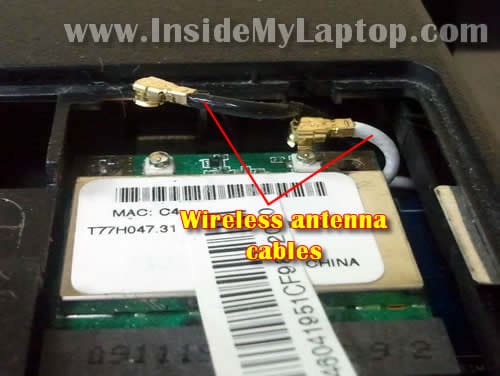
STEP 14.
Pull both antenna cables though the opening in the top cover.
Un-route both cables.
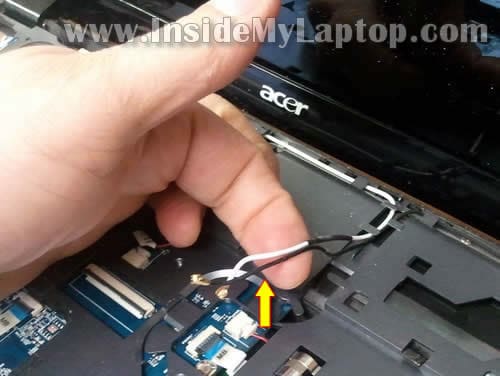
STEP 15.
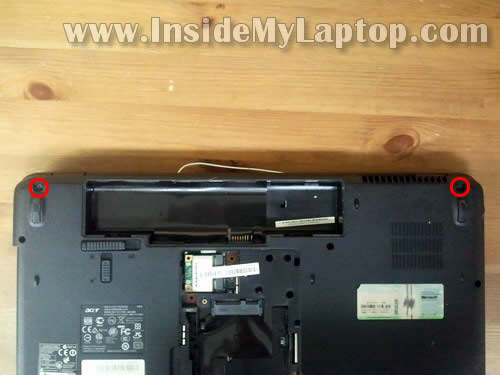
Remove two screws securing display hinges on the bottom.
STEP 16.
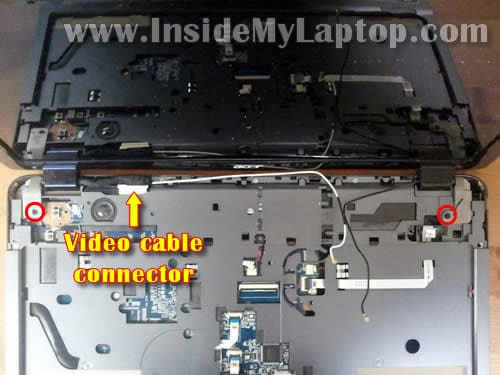
Disconnect video cable from the motherboard.
Remove two screws securing display hinges.
STEP 17.
Lift up and remove the display assembly.

STEP 18.
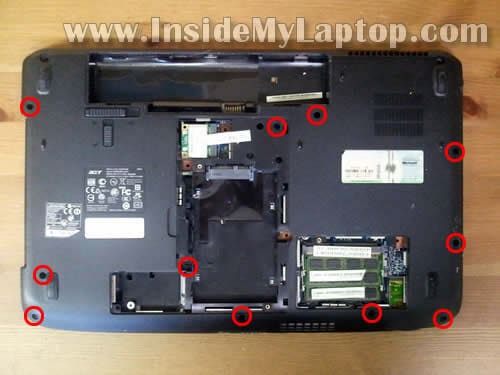
Remove all screw from the bottom (I could have missed one or two on this picture, so check all screws carefully).
STEP 19.
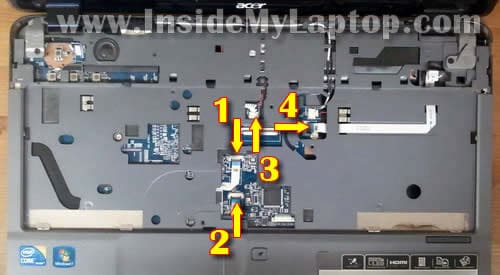
Disconnect the following cables from the motherboard:
1. Touchpad cable.
2. Touchpad button board cable.
3. Left speaker cable.
4. Media button board cable.
Disconnect cables 1, 2 and 4 same way you disconnected cable in the step 7.
Update: there are three screws securing the top cover on the top. I forgot to show them. Don’t forget to remove this screws.
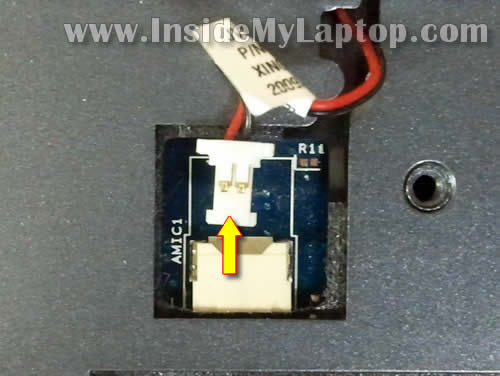
STEP 20.
Disconnect the left speaker cable from the motherboard.
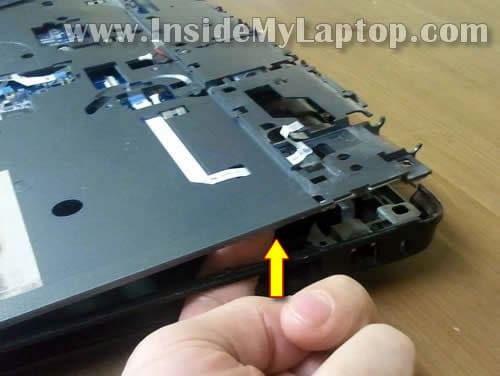
STEP 21.
Start separating the top cover assembly from the base.
STEP 22.
Remove the top cover assembly.
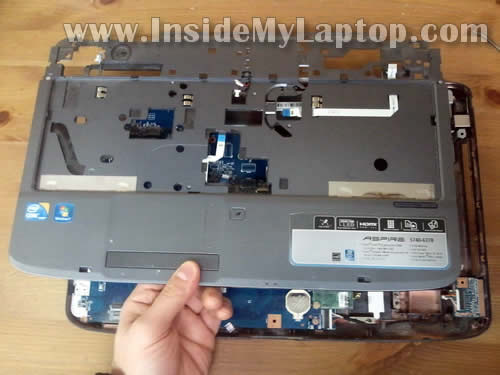
On the other side of the top cover assembly you can access the left speaker, touchpad and touchpad button board.

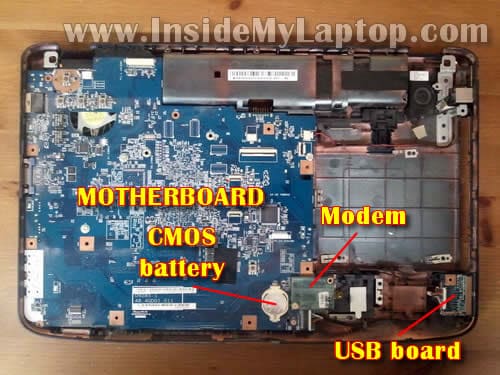
STEP 23.
After the top cover assembly removed you can access the motherboard, CMOS battery (replaceable), modem card and USB board.
STEP 24.
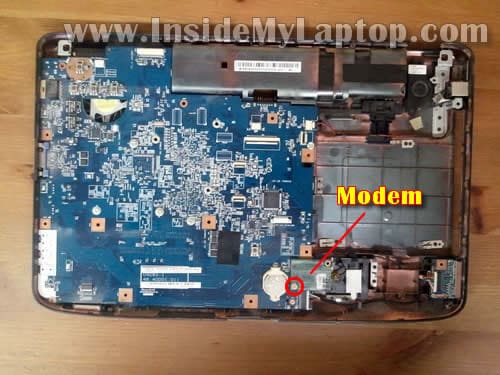
Remove one screw securing the modem card.
Lift up the modem card and disconnect it from the motherboard.
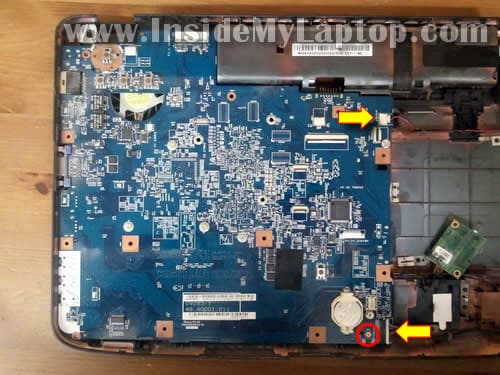
STEP 25.
Disconnect the right speaker cable from the motherboard (upper arrow).
Disconnect the USB board cable from the motherboard (lower arrow).
Remove one screw securing the motherboard.
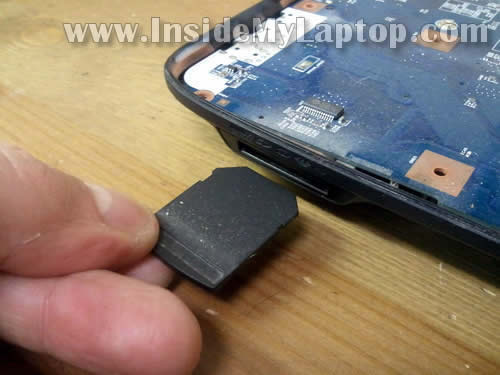
STEP 26.
Make sure the SD dummy card (or SD card) removed from the card reader.
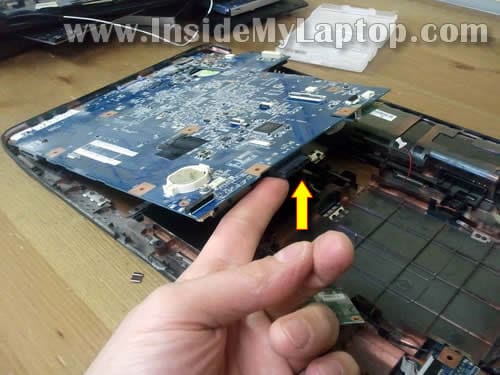
STEP 27.
Start removing the motherboard from the base as it shown on the following picture.
STEP 28.
The motherboard removed.
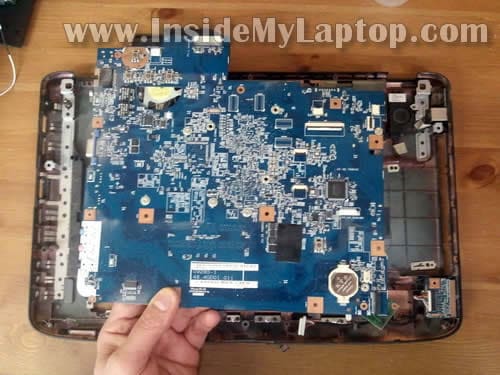
STEP 29.
The cooling fan assembly attached to the bottom side of the motherboard.
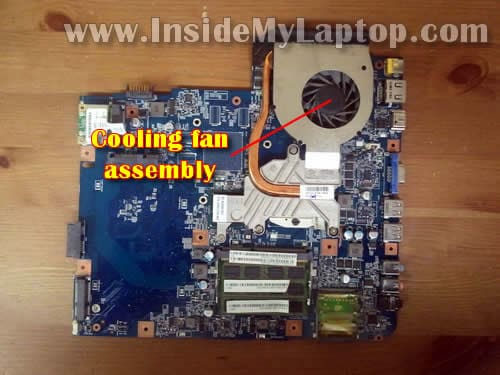
STEP 30.
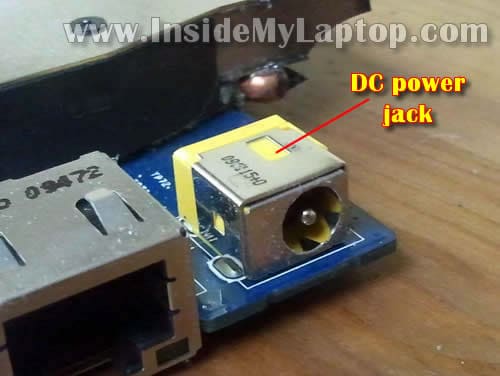
Acer Aspire 5740/5340 series laptop has DC power jack soldered to the motherboard.
If the jack fails, you’ll have to de-solder it from the motherboard and replace with a new one.
This disassembly guide might fit some other models in the Acer Aspire line. If it works for you, please mention the model number in the following comments.
Saikat
Absolutely generous guide! One of the best.
Pat
This is an amazing guide… Thanks heaps saved me alot of time
austine
Hi I have a hp dv7 pavilion laptop is coming up but not displaying , I have change the memory but still not coming up…..
Paclevkov
Hi dude.. Your Graphics/Chipset chip is overheated. You need to airflow it with some air gun , you can buy it from anywhere. Type in youtube “dv7 repair” and watch the demos. IT will show you how to repair your laptop.
Victor
Hi, Thank you very much, Excelent Guide. Can You tell me, the correct position of cables (white & Black), In J1, J2, thank you i will wait your answer.
Thanks Good Day
laly
how to remove and replace the usb port?
Linda
Thank so so very much for your wonderful detailed guide. I was sitting here thinking about how much i was going to get ripped off by the repair shop to replace my keyboard when I found your guide. 20 bucks for the keyboard from amazon and free labor (my own) and now my laptop’s even better than before! Thanks again!
Keith
Great! Took apart my 5740G, cleaned the dust out of case and fan and now it runs 20c cooler!
Thanks
Rafa
Perfect guide!!! Thanks!!!
Valerio
hi i’m Valerio from Rome, Italy , i have an Acer Aspire 5740G-334g50mn with a motherboard problem… there is no power when plug in the power jack.. all leds do not give signs of life.. all off.. and the notebook will not turn on when i press the power on button!
Do you think i need a motherboard or a dc power jack?
Patison
Hi
I have Acer 5740 and the same problem like Valerio, probably motherboard. Notebook not turn on after cleaning cooling fan. Maybe someone can help us?
thomas wood
i need more then 1 bit of information from you
1> can you add the bluetooth modual
2> what can you do about sticky keyboad button other then buy a new one
3> laptop keeps over heating
Steph
I have an Acer Aspire 5740 and I have one plug that is not mentioned. It’s on the underside of the USB port in the motherboard and I couldn’t manage to get it loose so I just had to be mindful that it was still there. My unit overheats while playing games, the headphone jack is non-responsive and the DVD drive only works occasionally, so I’ve been curious to see what I can do. Only managed to blow off some dust and pull the broken pieces of headphone jack out haha.
Thank you.
pamela
I had a security chip installed and now my Acer aspire runs very slow now I would hate to take it back and have it removed they are going to charge me again please tell me how to remove it
bigboy22116
Many many thanks for a great detailed guide
Michael Wetherholt
Hello:
I took my Aspire 5740 part and saw that the power jack was soldiered on the motherboard. I looked on the back side and saw about 4 or 5 places where it looked like the jack was pinned to the MB. How do I unsolder the jack? Do I just use a soldering iron to heat the soldier joints next to the jack or do I heat the back side of the MB where the jack is pinned to the board? Didn’t know this laptop was such a mess to work on…sigh. BTW do you sell the power jack?
Thanks,
Michael
Sachin VErma
thanks a lot man!!!
but i got a situation here , my laptop is not turning on (bios not loading) until i take its HDD out of it.
and please tell me if i can connect my internal HDD to any other computer via cable for formatting it.
or what can be wrong.
please reply.
IML Tech
@ Sachin VErma,
It’s likely that your hard drive failed and it’s preventing the entire system from booting properly.
You can remove the laptop hard drive and connect it to any other woking computer via external USB enclosure.
It’s explained in this post.
If the hard drive not mounting on another PC most likely there is a problem with the drive.
mehmet
i found an extra piece you didnt mension under the cover assembly.
the pic of the piece is on the link.
http://i45.tinypic.com/1iiiwz.jpg
there is no screws connected to it so im a bit confused how to gather all this thing back.
can you give me a hint pls
Mahendra Kothari
My ACER ASPIRE 5740 was heating problem and after sometime it turned off.
I gave it to local service center and he returned me after 2 months with power cable burn hence it I replaced the power cable and check the voltage it was showing 19.5V then I switched on but the power led is glowing and blue charging light is on but it culd not switched on.?
Please suggest
IML Tech
@ Mahendra Kothari,
I would check memory modules. Maybe memory not seated correctly. Try reseating it.
aakashkumar
Hi , Is there any way to setup external Graphics Card For Acer Aspire 5740 Laptop
Gary Ward
Hi Great guide but need some more help with the power button board.. I cannot turn on Laptop as I think the small piece of plastic on the board which is moved by the slider has broken. I have looked at other pictures of the board which has this plastic on and my board seems to be missing it which is why I cannot switch on. Also under the board there is a small spring – but I cannot see how this attaches (it fell off when I removed the power button board). Any help on the above issue would be greatly appreciated as well as does anybody know where I can get a replacement power button board. Travelmate 5740. Thanks
Lorenzo
it works for Acer Aspire 5740DG!!
ikhwan afiq
i love your website bro,its really helps me a lot.
by the way can you show us how to disassemble acer 4741G ?
thanks
Dave Harrell
Thank you for these instructions. With the help of a $10.65 new keyboard from eBay, my wife thinks she has a new computer. It’s amazing how important an “R” key is.
naitik patel
Thanx for the post
But I need little more help
My dc power jack show continuity on plus and minus point on port
Is there my port is damaged
Laptop turn on in battery but not starting charging help me…
IML Tech
@ naitik patel,
It’s hard to tell if the jack or bad or there is a problem with the motherboard.
Try replacing the jack.
Andres
On steps 19 sub 3 an step 20 what you are refering as left speaker it’s actually the mic
Alan Walker
I have the Aspire 5542G and this guide is exactly what I needed. I had to replace the keyboard as some keys stopped working. I also had to replace the CMOS battery as it had died. Next is to buy a replacement main battery as it is dead too, and I almost have a new laptop, thanks to your guide, it was so easy.
artur
jesteÅ› najlepszy gratuluje