
Connecting two Macs in order to migrate data (user files, applications and settings) from one to another is pretty much straightforward and uncomplicated process.
As long as you can find the right cable that links two Macs together, you can start moving files in a few clicks.
Before you start, make sure the storage space in the target computer is large enough to hold the data from the old computer otherwise the migration process will fail.
How to start data transfer to your new Mac
STEP 1.
Find the right cable that fits both, your old computer (source) and new computer (target). I will discuss different cables and adapters in greater details later in this post.
STEP 2.
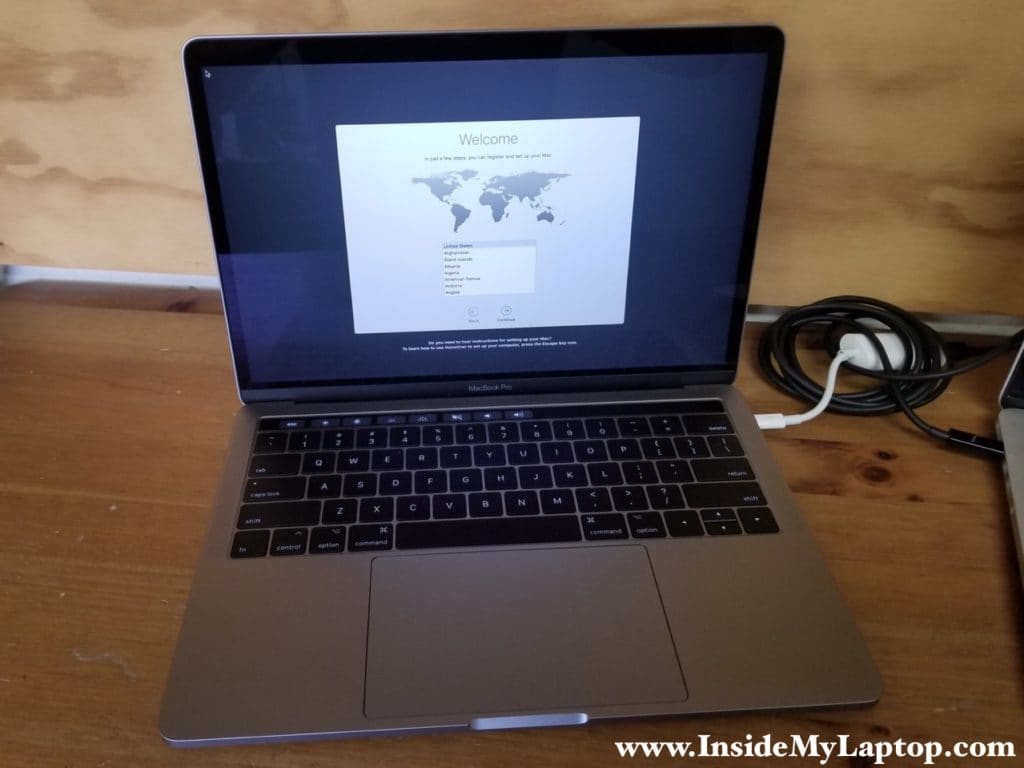
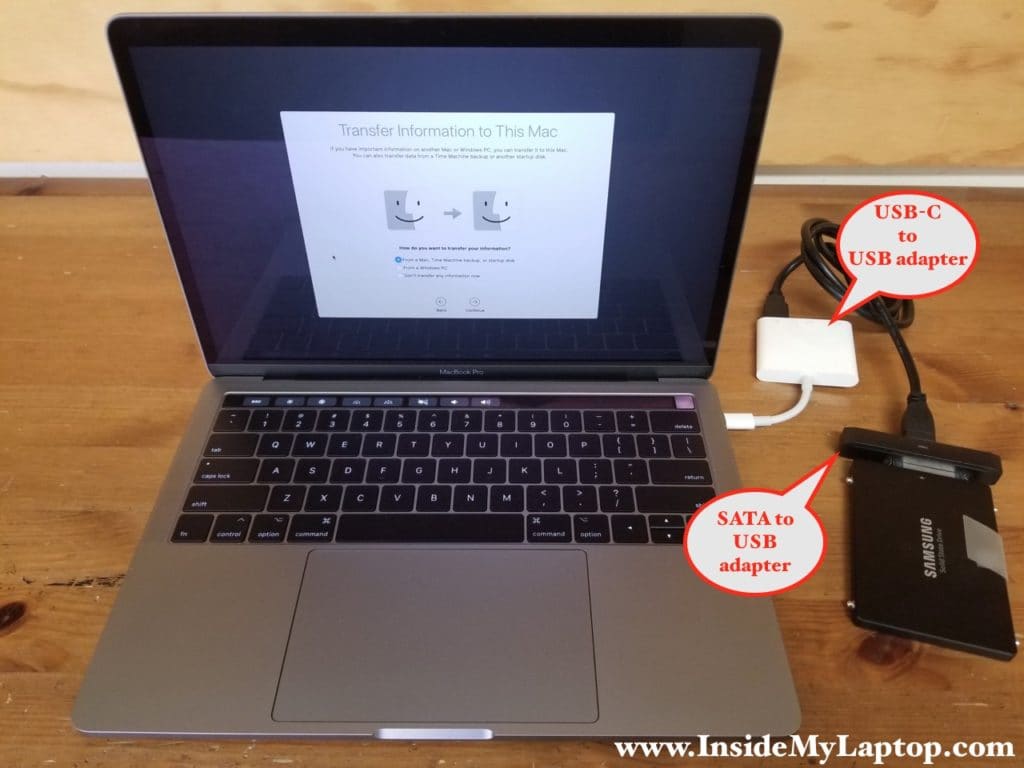
Power up your new computer. I assume your computer has a freshly installed OS and it boots to the OS X Setup Assistant as shown on the following picture.
If the user account on your new Mac has been configured already, you can force it to re-run the OS X Setup Assistant and start fresh.
Alternatively, you can make a bootable USB install drive and reinstall Mac OS from scratch.
STEP 3.
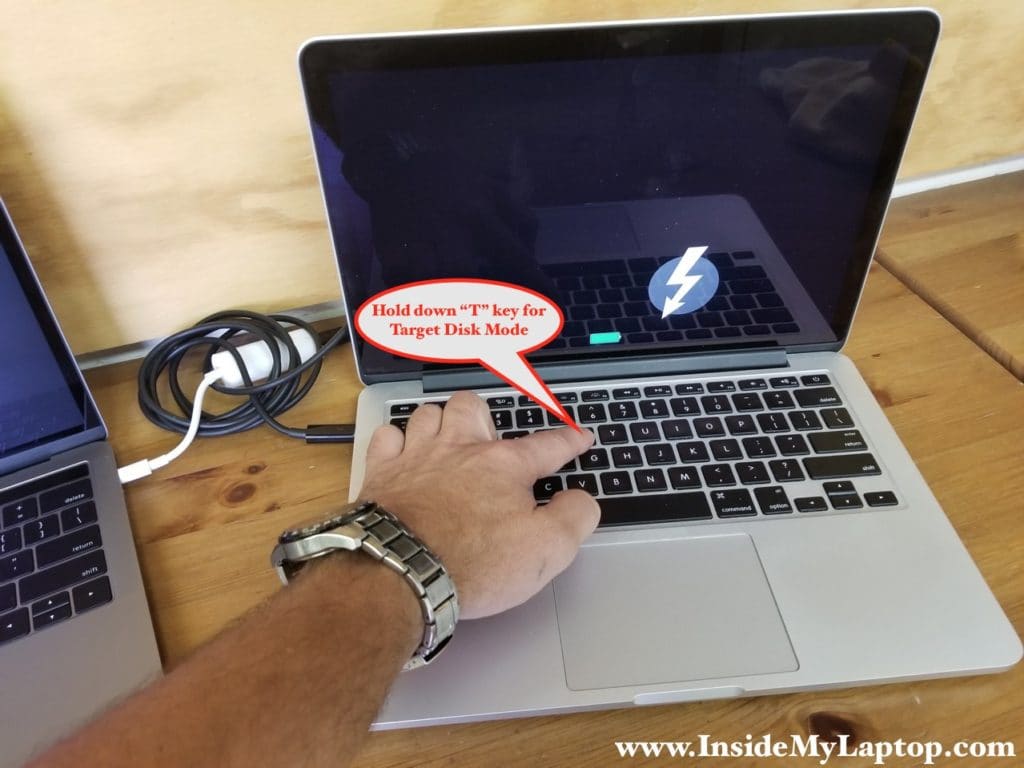
Power up your old computer in Target Disk Mode.
Hold down the “T” key and push on the power button. Keep holing the “T” key down until the Target Disk Mode symbol appears on the screen.
It can be a Thunderbolt or FireWire symbol depending on the type of cable in use.
STEP 4.
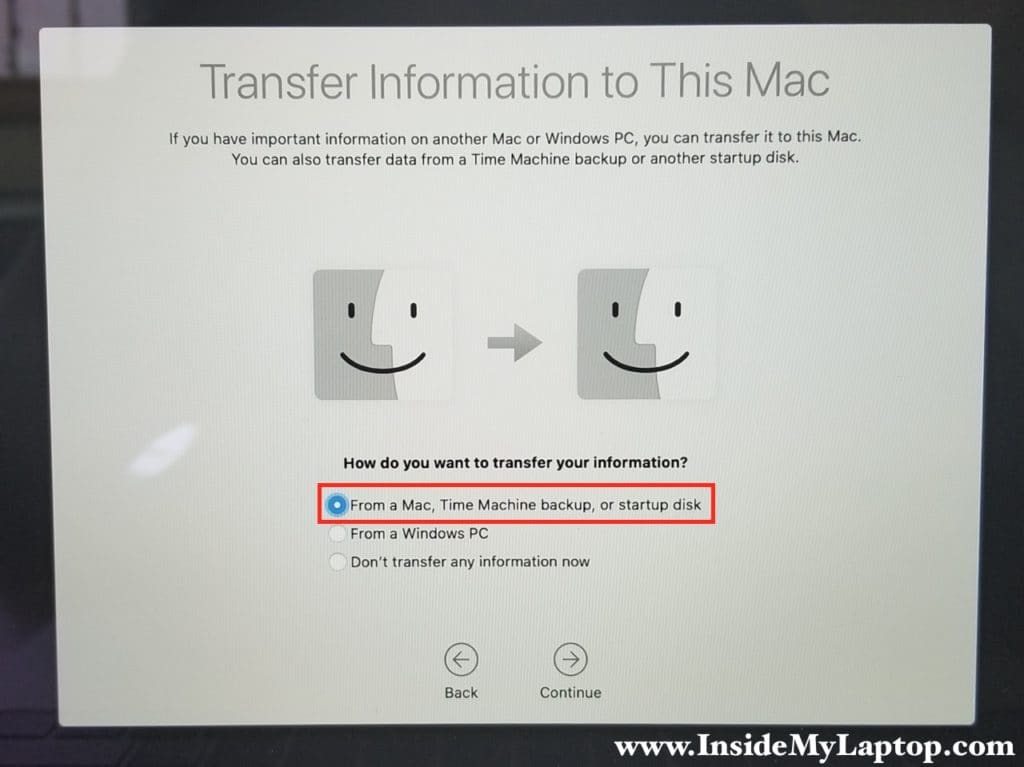
Now go to the target Mac and follow the OS X Setup Assistant until you get to the “Transfer Information to This Mac” page.
Select “From a Mac, Time Machine backup, or startup disk” option which is NOT selected by default.
Click Continue.
STEP 5.
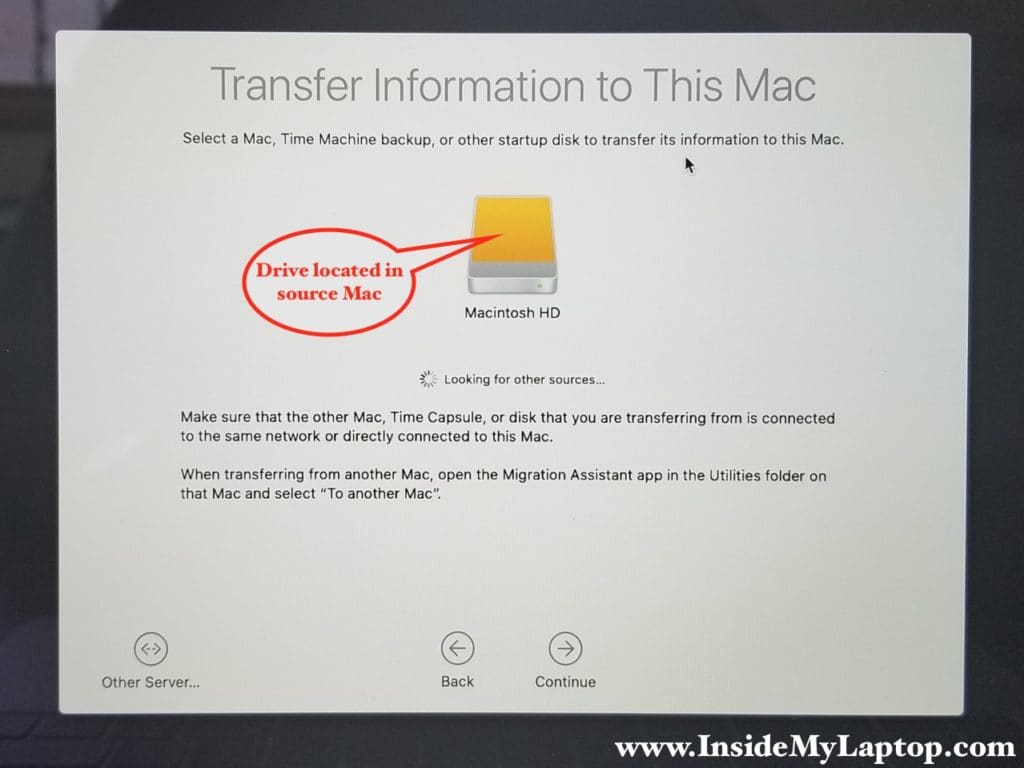
On the next page you should see the source hard drive detected by the target computer.
Click Continue.
Note: If the source hard drive is not detected, there could be a problem with the source hard drive or file system on the source drive.
STEP 6.
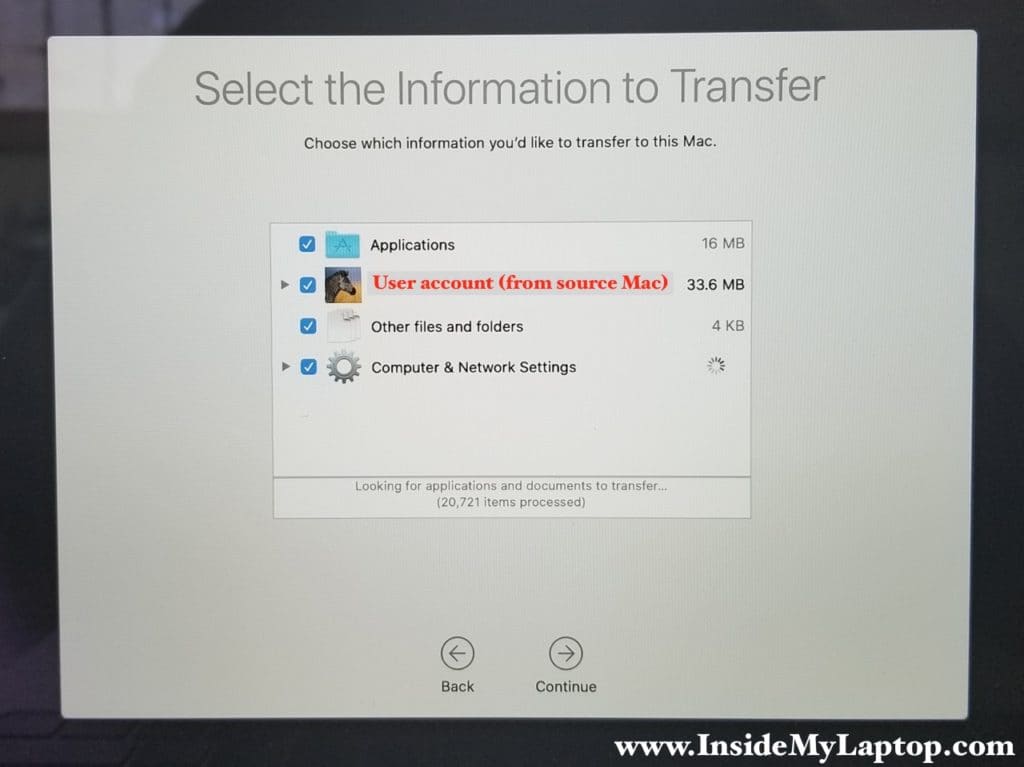
On the next page you should see all the information available for transfer to your new computer (user files, applications, computer and network settings, other files and folders).
If you want your new Mac to be configured exactly as the old one, select everything and click continue.
Now just wait until the data transfer is completed.
Now I will discuss different ways to connect one Mac to another.
As an example I will explain how to connect different laptop models but you can use it for iMacs and MacMinis because they have similar ports.
Connecting two MacBook Pros (2008-2010)
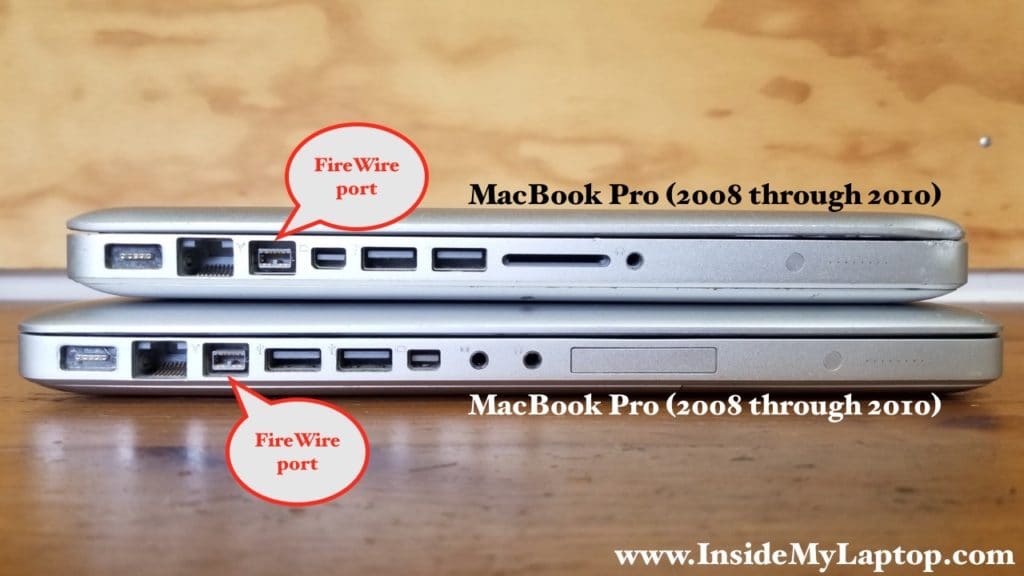
The only port available for linking two laptops to each other is the FireWire 800 Port.
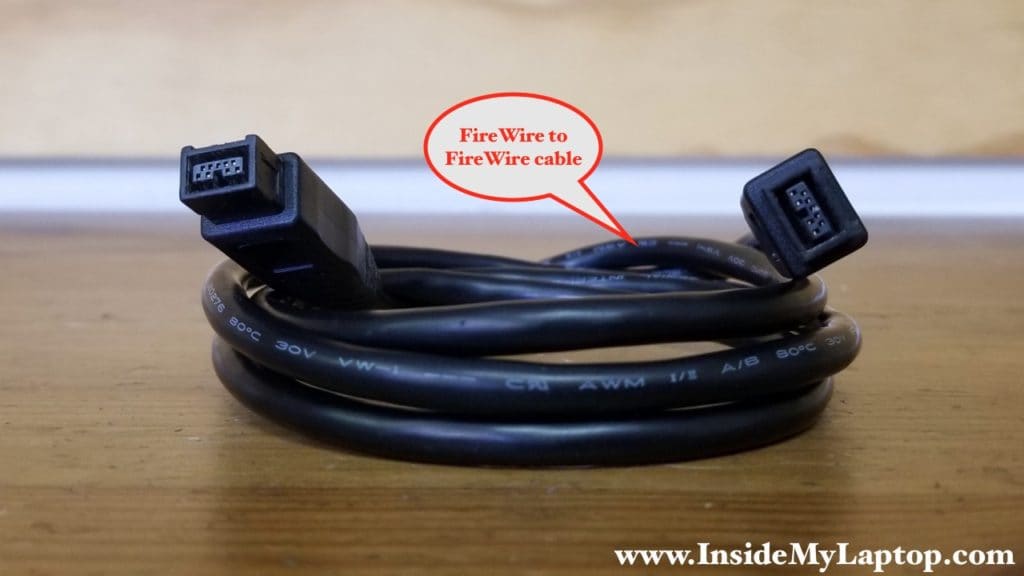
In this case you should use FireWire 800 to FireWire 800 cable shown on the following picture.
Connecting MacBook Air (2011-2017) to MacBook Pro (2008-2009)

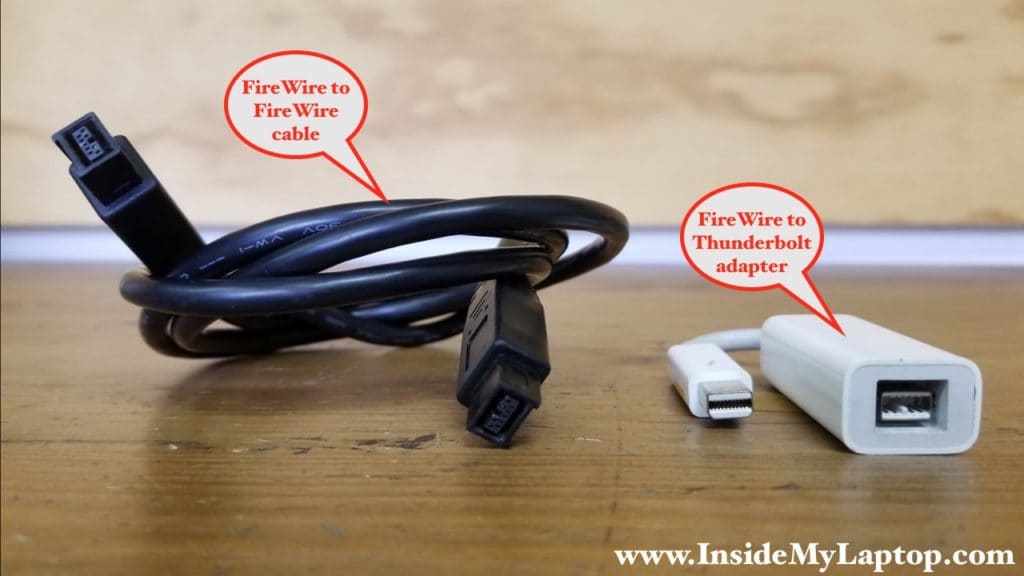
In this case we run into mismatching ports. One of the laptops has the Thunderbolt port and the other one has the FireWire 800 port.
In order to link these computers to each other you will have to use a FireWire 800 to FireWire 800 cable and FireWire 800 to Thunderbolt adapter.
Connecting two MacBook Pros (2011-2012)

In this case we have two different options available because each laptop has two different ports.
I would suggest using the faster connection link which is Thunderbolt to Thunderbolt cable.

Connecting MacBook Pro (2011-2012), MacBook Air (2011-2017) and MacBook Pro Retina (2012-2017)
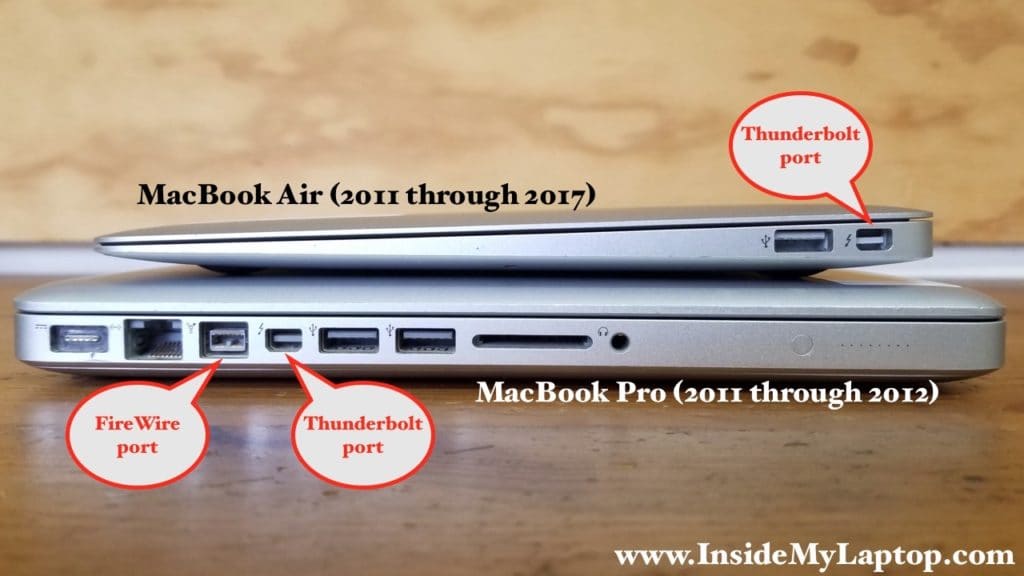
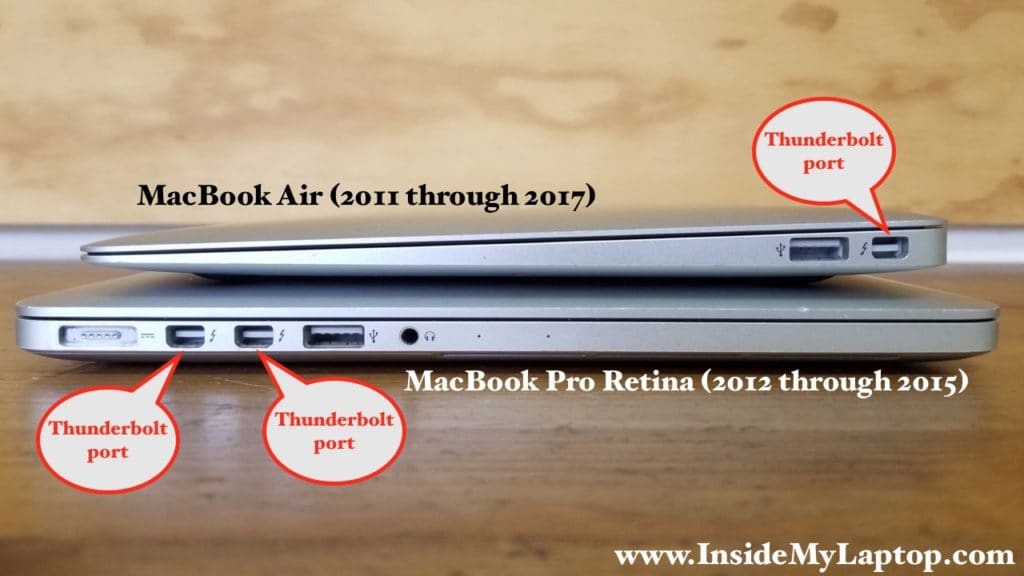

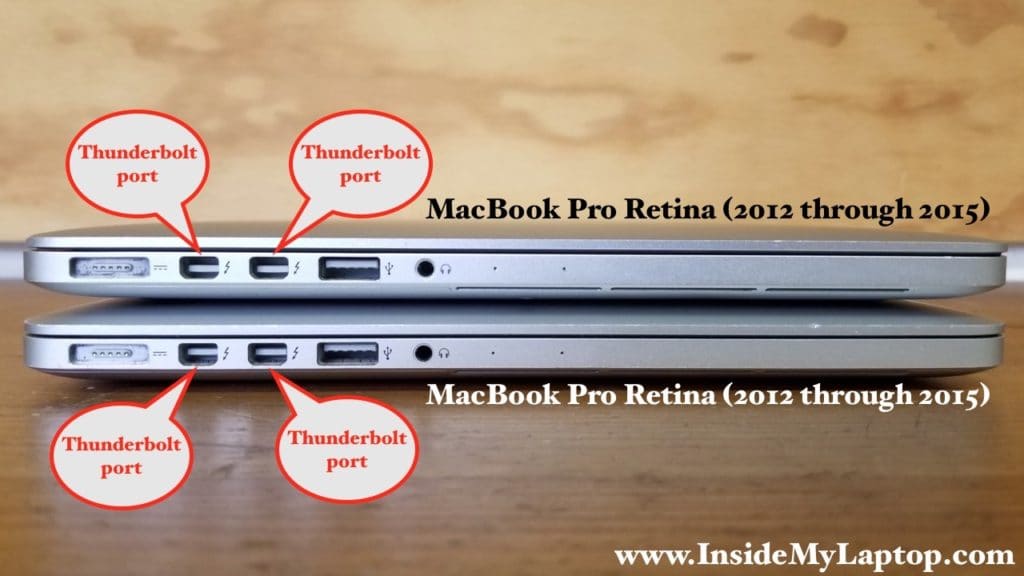
All newer laptops have at least one Thunderbolt port (version 1 or 2) available.
Thunderbolt to Thunderbolt cable is the best way to go.

Connecting MacBook Pro Retina (2012-2015), MacBook Air (2011-2017) and MacBook Pro (2016-1017)
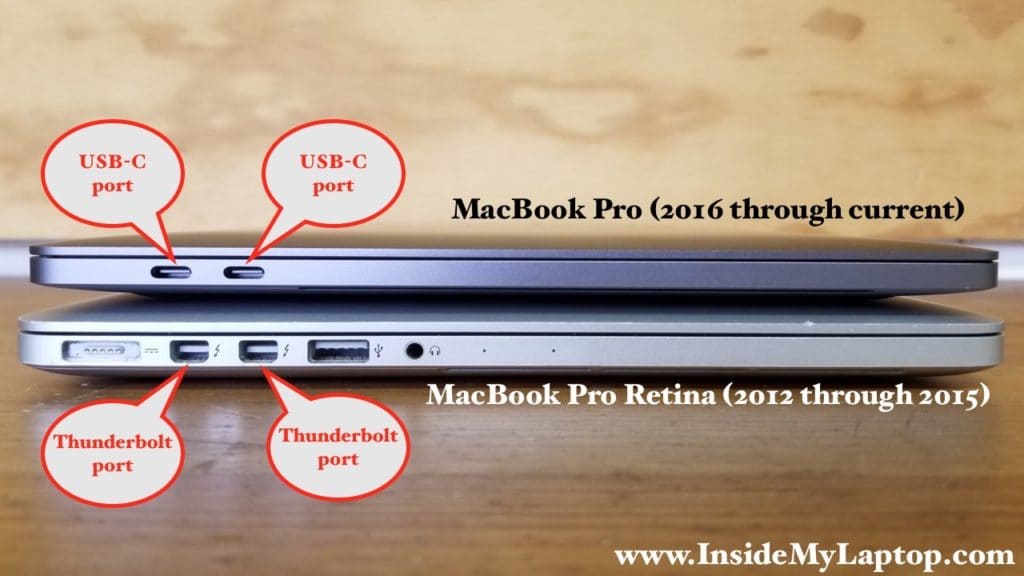
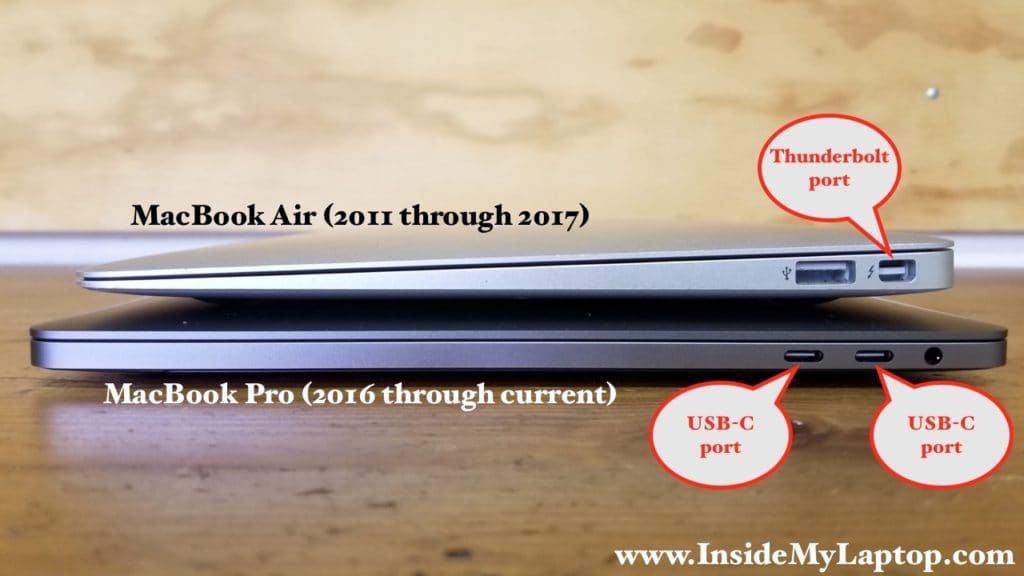
In the latest MacBook Pro (2016-2017) models Apple introduced Thunderbolt 3 (USB-C) ports.
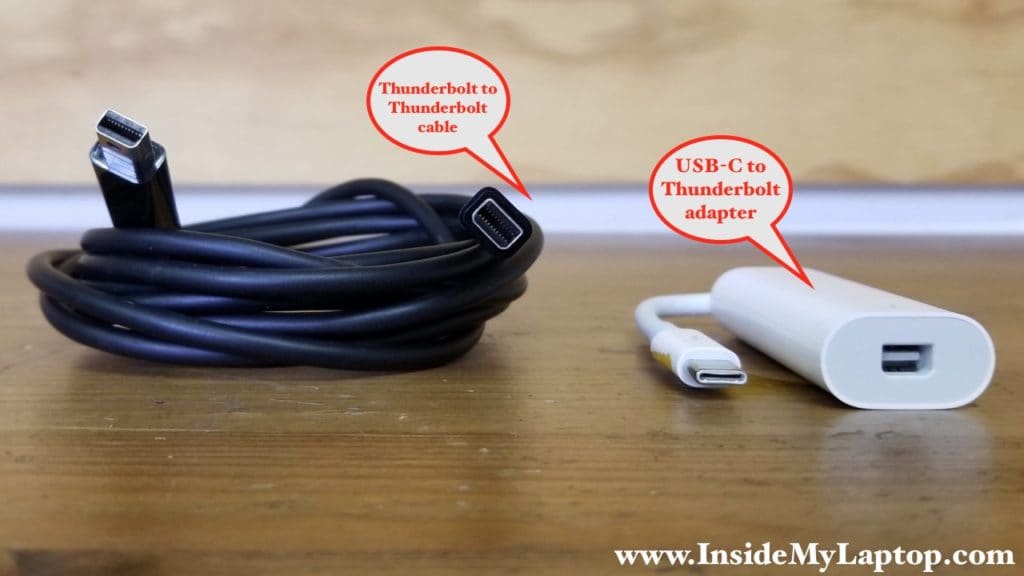
In order to connect the latest model to the previous models you’ll have to use a Thunderbolt to Thunderbolt (version 1 or2) cable and USB-C (Thunderbolt 3) to Thunderbolt 2 adapter.
Connecting two latest MacBook Pros (2016-1017)
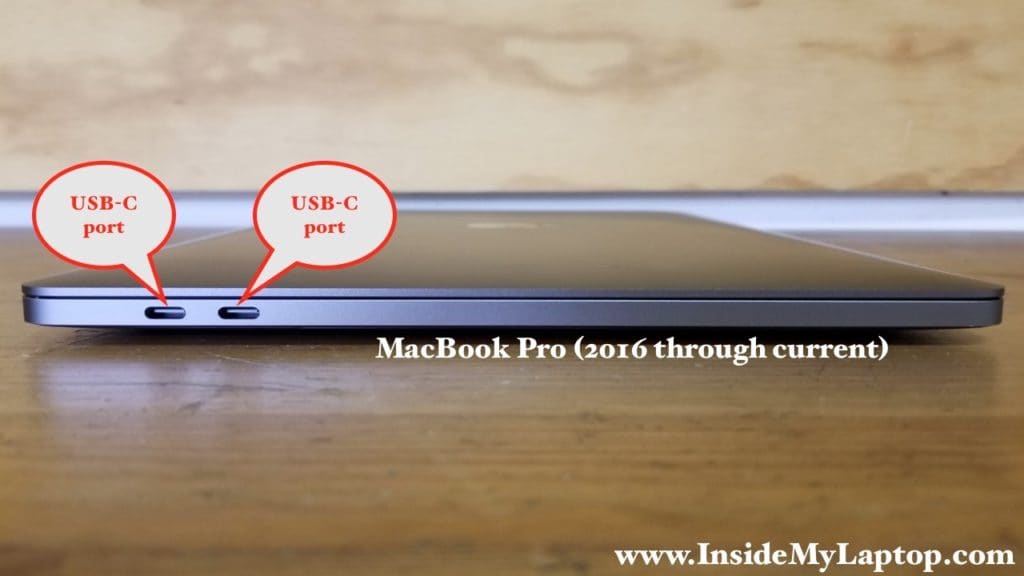
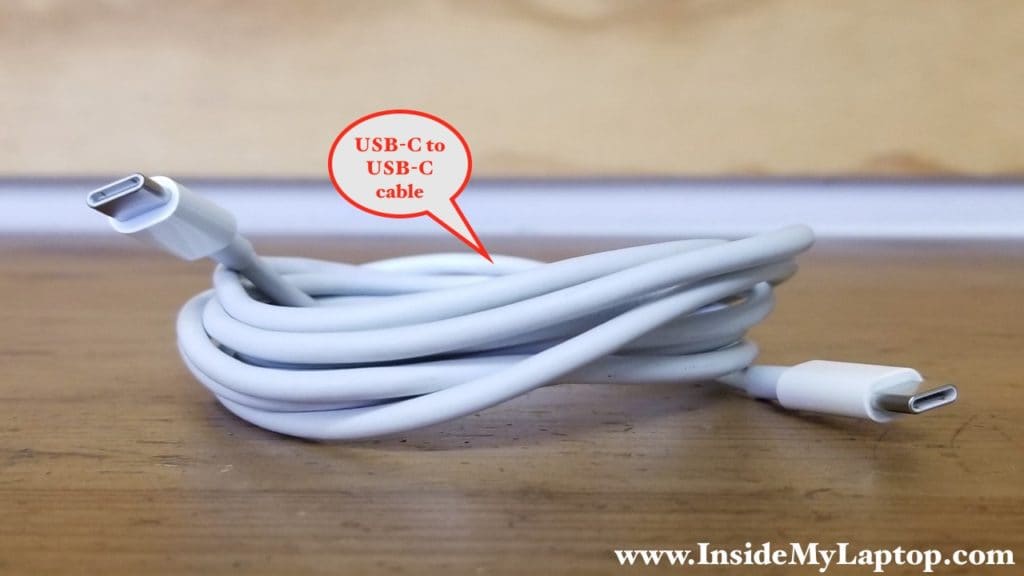
If you are transferring data between two latest MacBook Pros (2016-2017), you should use the  Thunderbolt 3 (USB-C) cable. This cable supports Thunderbolt 3 data transfer up to 40 Gbps.
Do not confuse it with USB-C Charge Cable which looks identical and also works for data transfer but does it at a much lower speed.
Migrating data into new Mac from old hard drive
If your old computer failed but the hard drive is still available and healthy, you can migrate data directly from the hard drive removed from the old Mac.
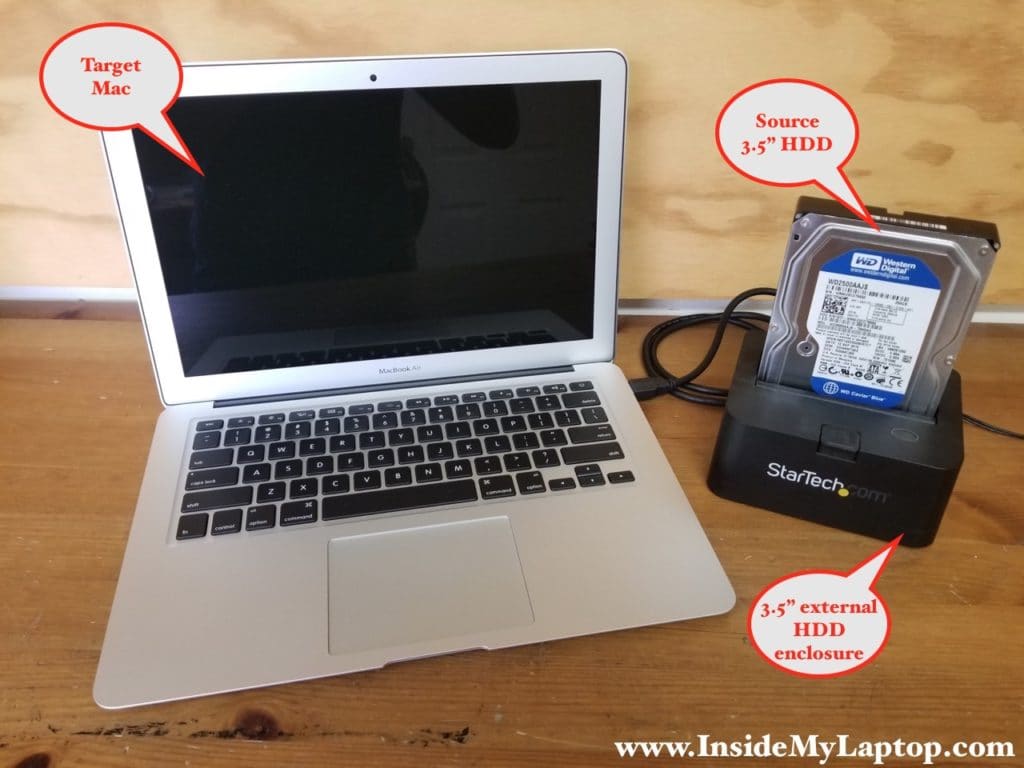
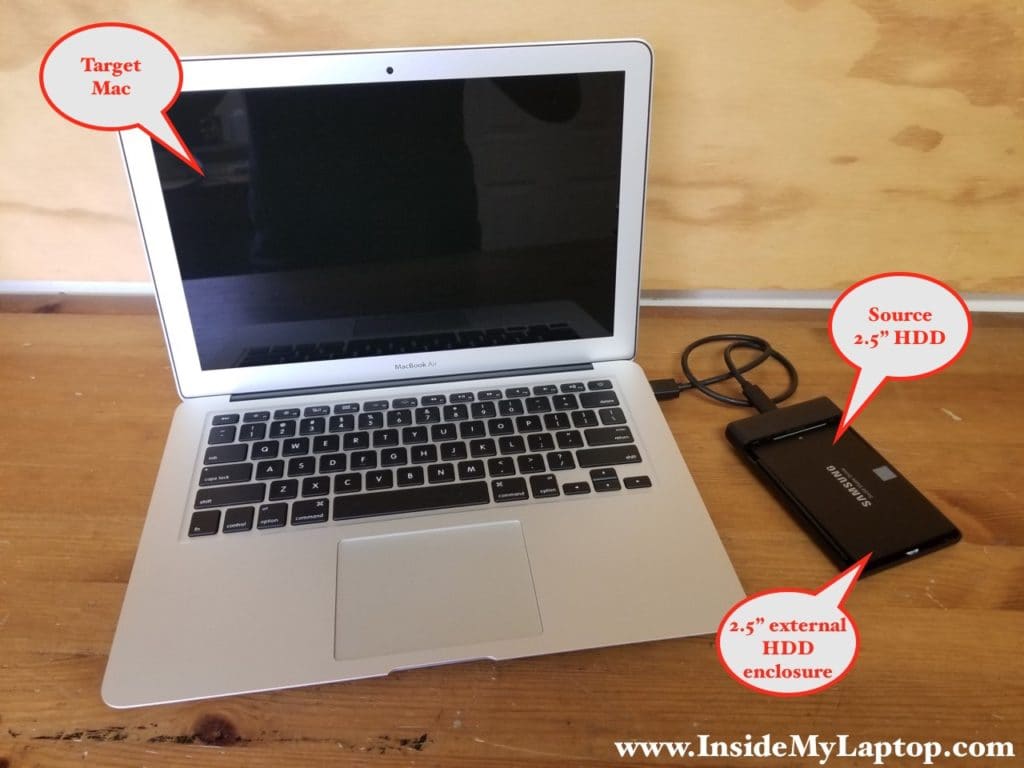
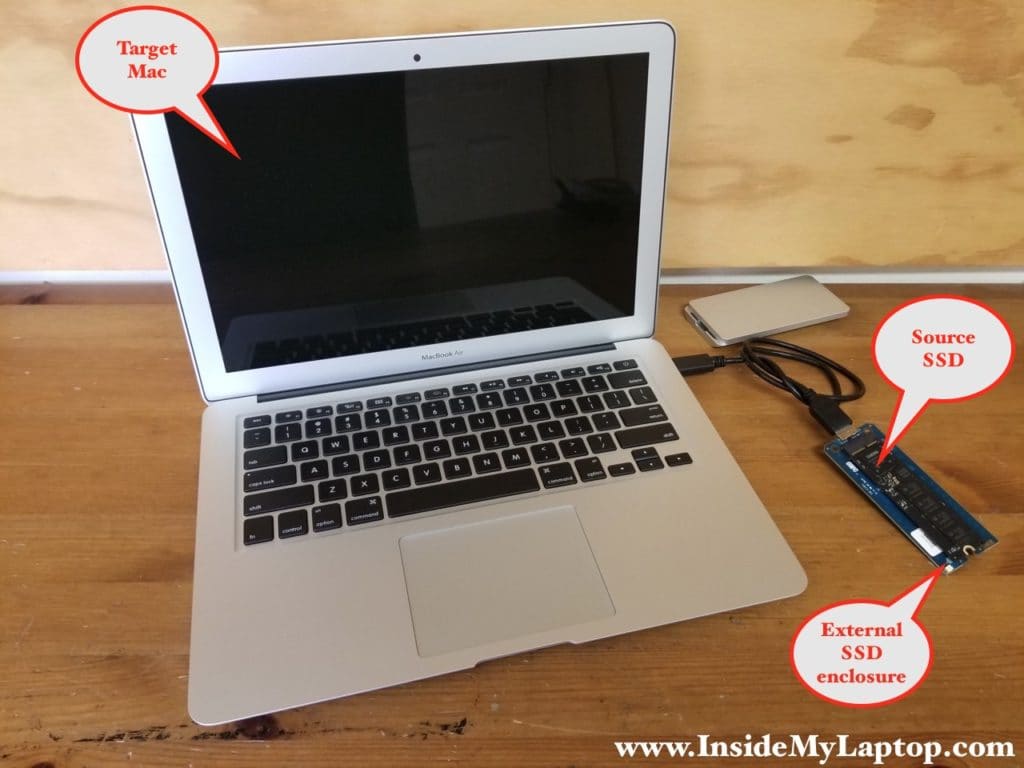
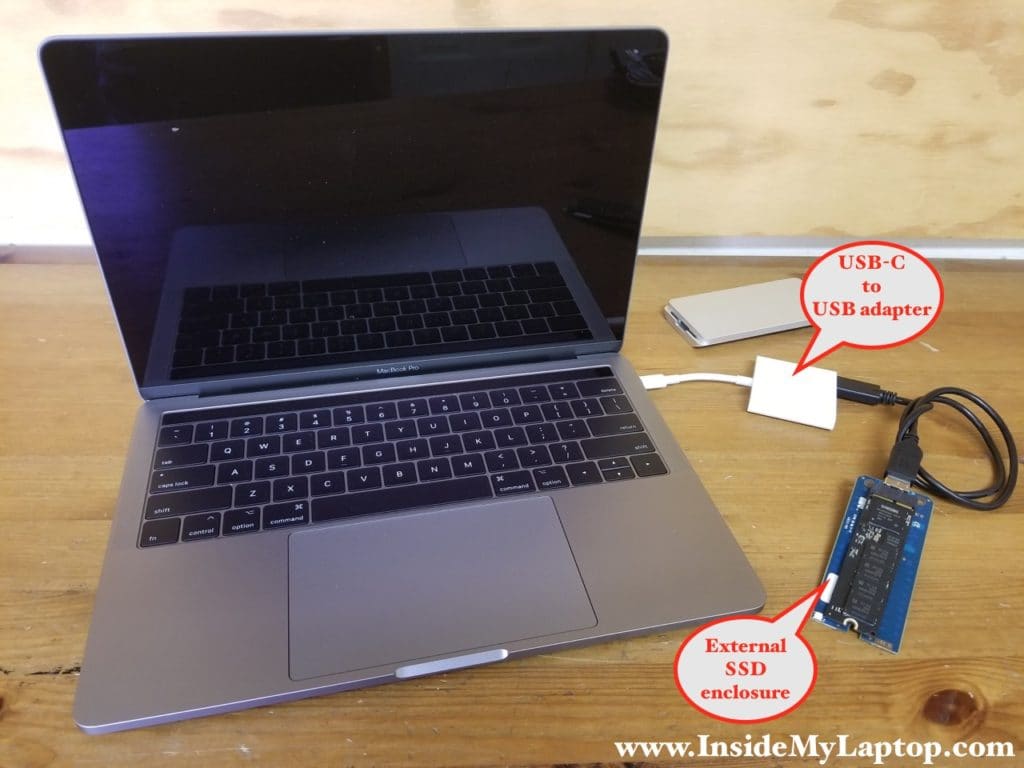
It’s the exact same data migration procedure as I described at the very beginning of this post (going though OS X Setup Assistant) but you’ll have to use an external hard drive enclosure or adapter instead. Take a look at the following pictures as an example.
Migrating data from 3.5″ iMac hard drive using USB enclosure
Migrating data from 2.5″ HDD/SSD using USB enclosure
Migrating data from MacBook Pro/Air SSD using USB enclosure
If the source SSD has been removed from a newer MacBook Pro/Air laptop, you can use OWC enclosures for Apple SSDs.
Connecting external SSD to latest MacBook Pro (2016-2017)
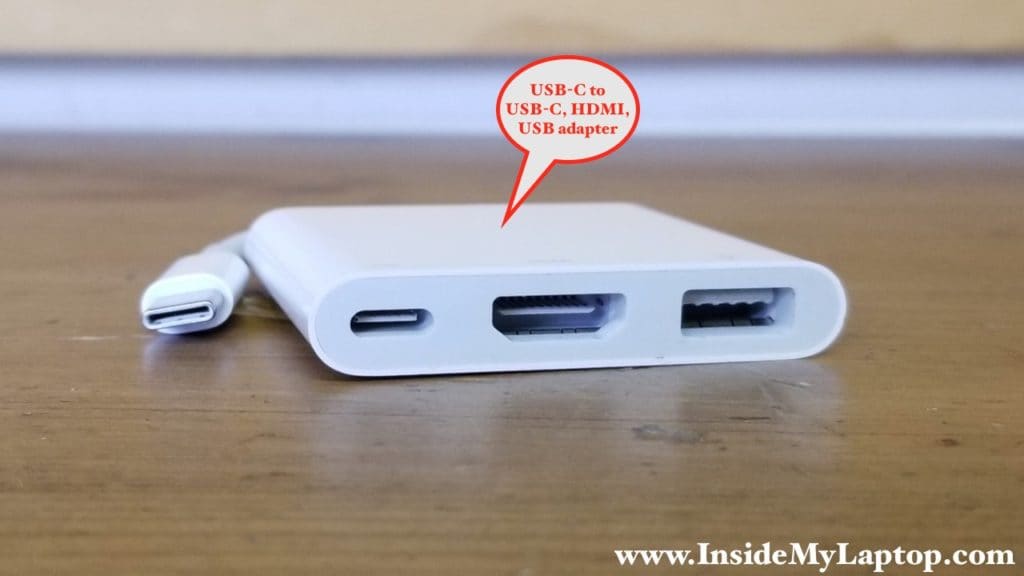
You cannot connect an external USB enclosure directly to the latest MacBook Pro (2016-2017) with USB-C ports.
You will have to use a USB-C to USB adapter, for example this USB-C Digital AV Multiport Adapter.
Stephen Weil
If I’m not mistaken, an number of your steps seems to have reversed the references and pictures.
Step 3 says to put the “old” machine in “target mode.” Isn’t the OLD machine the “Source” and the NEW machine the “Target?”
In Step 4, you initially fail to mention that you’ve now moved from the OLD machine to the NEW machine before saying “Follow the OS X Setup Assistant until you get to the “Transfer Information to This Mac†page.”
In Step 5, you say “On the next page you should see the source hard drive detected by the target computer.” The page you’re referring to is displayed on the NEW (target) computer, but previously, you specified that the Target drive was the OLD computer.
Have I missed something here?
IML Tech
@ Stephen Weil,
I didn’t say the old machine is the “Source”. I said you have to activate “Target Mode” by holding down the T key and basically turn this machine into an external hard drive so you can access the data.
Yes, the old machine is the source and the new one is the target.
You are correct. I fixed that.
Again, I said to activate Target Mode on the old computer. I didn’t say the old computer is the target.
Thank you very much for your input.
Sarah
Can you tell me what would be the best cable and adapter to use on an old 2008 aluminum body MBP with a brand new MBP? FireWire or Ethernet? Finally getting an upgrade!
IML Tech
Sarah, the old 2008 MacBook Pro has a FireFire port and the new MacBook Pro has USB-C port. There is no single cable that can connect two of them for data transfer.
The best option for you would be using a USB-C enclosure.
1. Search for “USB-C enclosure 2.5†and you’ll find many options. They are cheap. Something like this would be perfect: https://amzn.to/2ZCebjb
2. Remove the hard drive from the old MacBook Pro and install it into the enclosure. Removing the hard drive from a 2008 MacBook Pro is easy, just a few screws.
3. Plug in the USB-C enclosure into the new MacBook Pro and migrate the data.
Jo Webb
Can this be achieved on two 2011 iMac 27inch using their thunderbolt (mini display) ports ? If so what is the correct thunderbolt cable ?
Many thanks
IML Tech
Absolutely, you can connect two 2011 27″ iMacs using Thunderbolt cable. You will need Apple Thunderbolt 2 cable (shaped like mini display port), not Thunderbolt 3 (which is USB-C type connector).
M Beaudet
What is best cable and or adapters to use for MacBook Pro mid 2012 non retina to 2021 MBPro M1 Max? Ive read {(thunder 2 bolt to thunder bolt 3 or 4) which take th bolt 2 thunder bolt adapter is okay}
and that {(USB C to CAT 5e) and (thunder bolt 2 to USB C) and CAT 5e to CAT 5e/ USB C adapter) is not okay}
IML Tech
For connecting 2012 MacBook Pro (not Retina) to 2021 MacBook Pro M1 you will need 2 pieces:
1. Apple Thunderbolt 2 cable.
2. Apple Thunderbolt 3 (USB-C) to Thunderbolt 2 adapter.
You plug the first cable into your 2012 MBP, the other end of the cable 1 goes into the adapter. You plug the other end of the adapter into your 2021 MBP.
M Beaudet
Thanks i did see this for mac to silicone mac, just wanted to confirm, it is sad apple keeps forcing us to buy different cords still need the cat 5e to cat 8/ usb c for timecapsule restore and such, if you dont want to use wifi
M Beaudet
I want a clean start transfer to my new 2021 MBPro M1 Max Monterey from my old Mid 2012 MBPro 2.6 Ghz Catalina non retina.
I dont want to migrate the 10 years of no longer used old files and all the years of OS Updates and relocated folders.
I just want to move my {(on my mac) email}, the apps i use, my keychain, my system preferences, my documents and all my photos that are saved in documents, i dont use iPhoto. I only want to move the bare necessities and i could do the preference settings manually. There is no clear instructions anywhere. It seems restore or migration from timecapsule time machine will move all the unwanted stuff. Also i have a SSD drive i could use, do i format the SSD as APFS what i feel it should be or what ive read it keeps directing towards OS extended journaled? I have not set up 2021 yet not sure if its best to set up new user under set up assistant or use migration assistant? Ive saw stuff on disk utility and using target disk, again it seems ive read conflicting info on both some say yes some say cant???
Why hasnt apple offered and easy clean / fresh start using migration assistant???
Thank you for any advice and help.
IML Tech
I don’t think there is an option to do “clean” migration as you want. I wouldn’t worry much about OS updates and relocated folders being transferred to the new Mac. I’m not sure if the migration process filters off those folders of not.
I think there are two options for you.
Option 1.
1. Setup and run Time Machine backup on the old 2012 MacBook Pro just in case you have all the files.
2. Remove all unnecessary apps, files, etc… from the 2012 MacBook Pro. Make it look the way you want to see your new 2021 MBP.
3. Connect computers together and start 2012 MBP in target mode (T-key on startup).
4. Start your new MBP and choose the option to migrate the data from the old computer.
Option 2.
1. Connect computers together and start 2012 MBP in target mode (T-key on startup).
2. Start your new MBP and choose the option to migrate the data from the old computer. It will migrate all the data from 2012MBP as is.
3. Delete unnecessary data from the new 2021 MBP.
Do not setup new user on the 2021 MBP. The setup assistant will walk you through. All setting, user stuff, apps, etc… will be transferred to the new computer.
In case you already configured a new user on the 2021 MBP, run the migration assistant and it will give you an option to delete this user and replace it with an old user from 2012 MBP.
Hope it’s clear enough.
M Beaudet
Apple doesnt offer a clean start, my question is a real question but a sarcastic one.
As far as a clean start your advice is the exact opposite. Im asking many sources is why i asked you guys, im looking for the best easiest solution which is far from your advice, a sincere thanks for your advice and time however it is not what im trying to accomplish.
It is bad to copy over years of rewritten over OS updates.
From integro, this is a short quick intro, ive got many more detailed reasons from other of why transferring over multi year updated OS systems is bad they are far more detailed than what is listed here.
From “integro†If you’ve just bought a new Mac, and you’re upgrading from an older computer, you want all of your files and data to be accessible on the new machine. But when you set up a new Mac, should you migrate your old files or do a clean installation?
Over a period of 12 years, some unwanted baggage can accumulate, and that user account you rely on can get a little temperamental. How does a computer with a more than a decade-old user account express its temperament? It’s slow. It lets you rename the computer in the Sharing Preferences pane but doesn’t change the name in the Terminal. It refuses to let you connect via screen sharing. It takes two tries to reboot it. It’s generally just surly and difficult.
When you get a new Mac, it might be a good idea to do a clean installation; starting from scratch with a brand-new operating system, and copy the files that you need from your old Mac manually.
Clean Installation
When you do a clean installation, you let macOS run its Setup Assistant and create a new, empty user account. During the process, you enter some information, such as your Apple ID, so your iCloud account is activated, but, for the most part, your Mac will be a tabula rasa—a blank slate. It will contain the default apps that are part of macOS, but nothing more.
If you go this route, you then must manually copy files from your old Mac, or from a backup. This part of the process can be time-consuming, but it can allow you to sift through your files to find what you really need, and slim down your Mac. When you do this, you may be surprised to find how much you can ignore from your old Mac.
Here’s what you need to copy after a clean installation:
Applications: macOS installs a number of applications, many of which you probably use every day. These include Safari, Mail, Calendar, Music, Photos, and the iWork apps (Pages, Numbers, and Keynote). But you likely use plenty of other apps on your Mac. If you have purchased apps from the Mac App Store, you’ll need to re-download them; these apps won’t work if you copy them from one Mac to another. But for apps you’ve purchased directly from developers, it can easier to copy them manually. (Though you might also just want to download the latest versions, to ensure that yours aren’t up to date.) And this is a good time to decide which of the many apps in your Applications folder you want to keep. You may find dozens of apps that you rarely use. If so, don’t copy them.
Your Home Folder: you want to copy most of the files from your home folder (that’s the folder with the house icon and your username). You don’t want to copy the folders at the top level of your home folder—Desktop, Documents, Downloads, Movies, Music, and Pictures—but rather the contents of these folders into the identically-named folders on the new Mac. Again, take this opportunity to check whether you need to keep all of the files in these folders.
Your Library Folder: there is a special folder in your home folder called Library. By default, this folder is hidden, but it contains many files that you should copy. For example, all of your email is in this folder, as is the information in the Contacts app. First, you need to tell your Mac to display this folder. Go go to your home folder; you should see folders like Documents, Pictures, Movies, etc. Choose View > Show View Options, or press Command-J, then, at the bottom of the window, check Show Library Folder. It will now be permanently visible.
In another Finder window, navigate to the old Library folder. If it’s not visible, press Command-Shift-G, then enter, for example, /Volumes/backup-disk-name/Users/your-user-name/Library, and click Go. (Type the appropriate names for the backup disk and your user name.) You’ll have two windows open.
Here are some of the folders that you want to copy from the old Library folder to the new one; though if you sync a lot of data with iCloud, then many of the folders below will already be populated with your up-to-date data:
Application Support; though look inside this folder, and only copy folders for apps you’re still using. Note that if you’re syncing data via iCloud, a lot of this data will already be available, so check the folders on the new Mac and don’t overwrite ones that contain data that is up to date.
Containers; this contains data for many apps, both from Apple and third-party developers.
Group Containers; as above, this has data from many apps,
Calendars
Fonts
HomeKit; this has HomeKit settings, if you use those features.
Music; this may contain AppleScripts, if you have used any with the Music app.
Keychains; this contains all your stored passwords.
Mail; this contains all your email, and your email settings.
Preference Panes; if there are any that you’ve installed that you still use.
Safari; this has your Safari bookmarks.
There’s a lot of important data in the Application Support folder. In addition to the above folders, it’s a good idea to copy any folder whose modification date is in the past year or so. To do this, choose View > As List, then right-click the window header – where you see columns like Name and Size – and enable Date Modified. Click that header, to sort in date order. Start looking at the newest dates and work your way back. Also, if you see folders with names for apps that you know you no longer use, then don’t copy them. Do the same for the library folder in general. But, check inside the folders to see if they contain contents with newer modification dates than those shown for the folders; this is probably a bug, but a lot of the folders in my Library folder have older modification dates than their contents. One folder you don’t need to copy is /Library/Caches; this may be quite large, and your apps will create new caches as you use them.
I don’t recommend that you copy the Preferences folder; this probably contains lots of files for apps you no longer use. I do, however, suggest that you go through that folder and copy over any files or folders for apps that you do use, especially if, when you launch them, their setup is different. However, you may just want to manually reset the preferences for your apps; this is a good way to rediscover your apps and their interfaces.
You’ll notice, as you start working with the new Mac, that you will need to enter serial numbers for all of the apps that you did not purchase from the Mac App Store. This is because many apps store invisible files on your Mac for registration purposes, and you haven’t copied these. So make sure you know where your serial numbers are.
As you work on your new Mac, you may find that certain files are missing. For this reason you should absolutely not delete your old backup, and especially the ~/Library folder. You may need to go back into that folder and copy some other files to the new Mac.
While I don’t recommend doing a clean installation for each new Mac you get, or for each macOS update, it’s a good idea to do it every few years. Just make sure to keep a backup in case there are any files you need to find that you didn’t copy over the first time around.